This guide walks you through the full process of integrating your Flipkart Seller Hub account with Base.com. Once connected, you’ll be able to manage orders, generate labels, update statuses, and handle logistics seamlessly – all from one centralized platform.
Step 1: Connect Your Flipkart Account to Base
To begin managing your Flipkart orders through Base, you must first establish a secure API connection between your Flipkart Seller account and Base.
Instructions:
- Log in to your Base panel using your admin credentials.
- Navigate to the Integrations section from the sidebar.
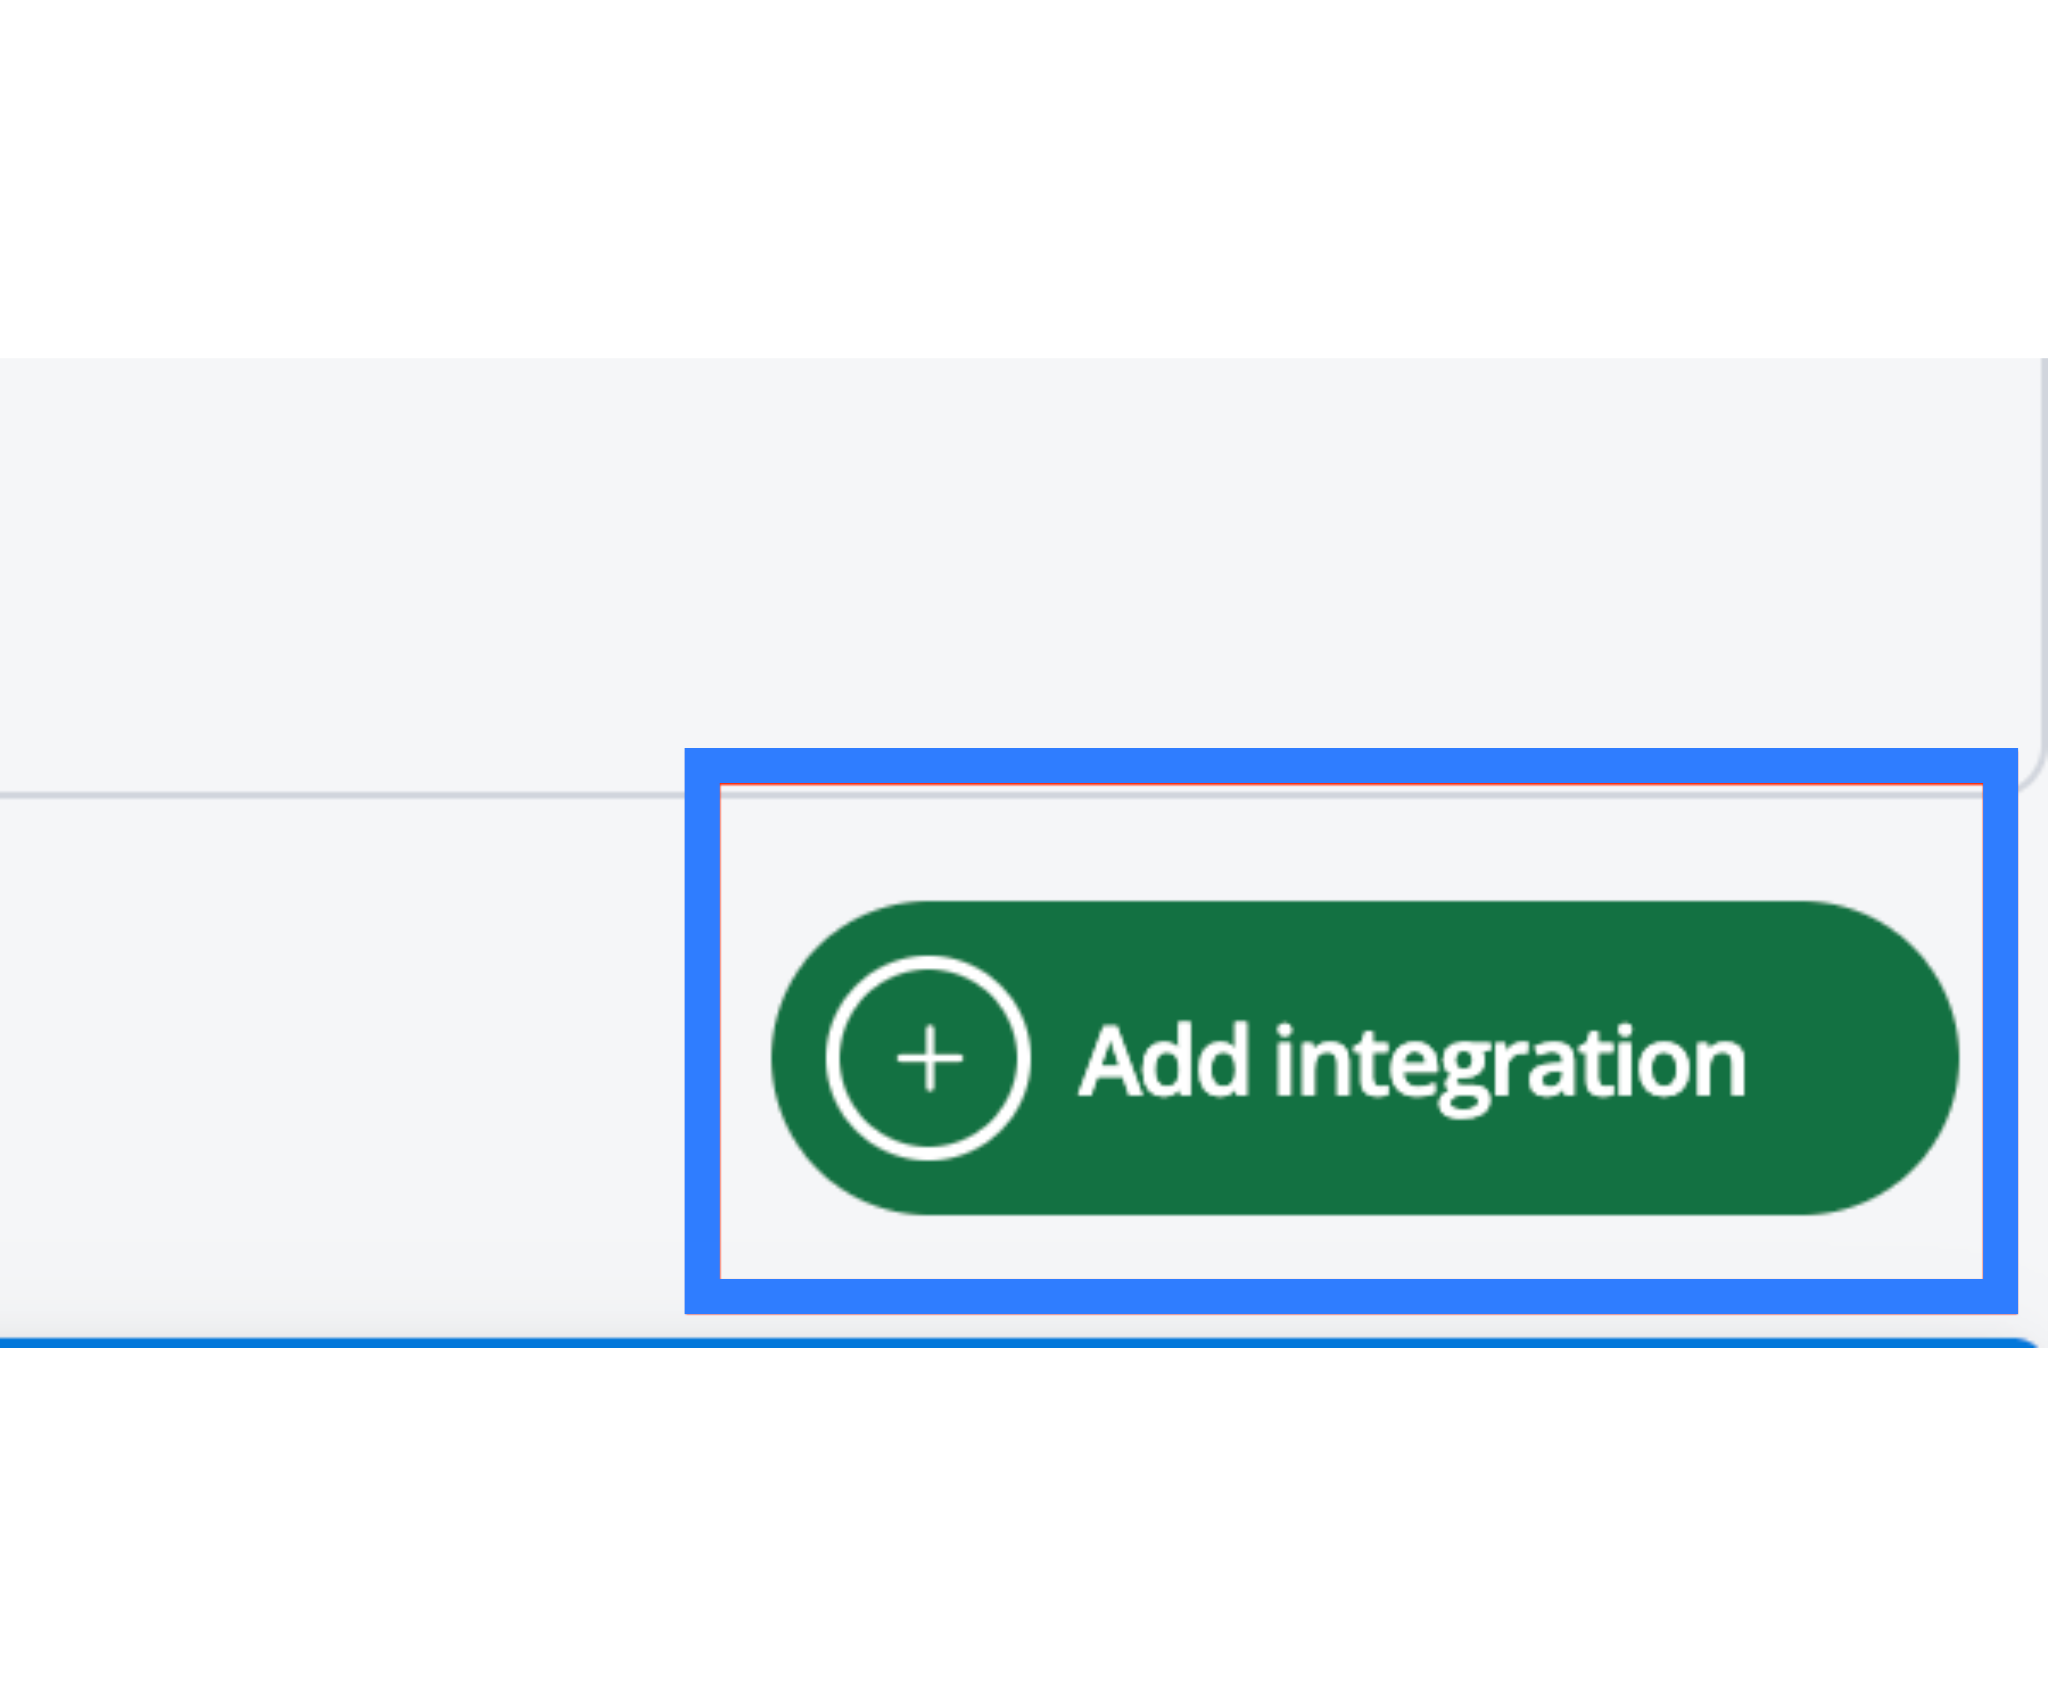
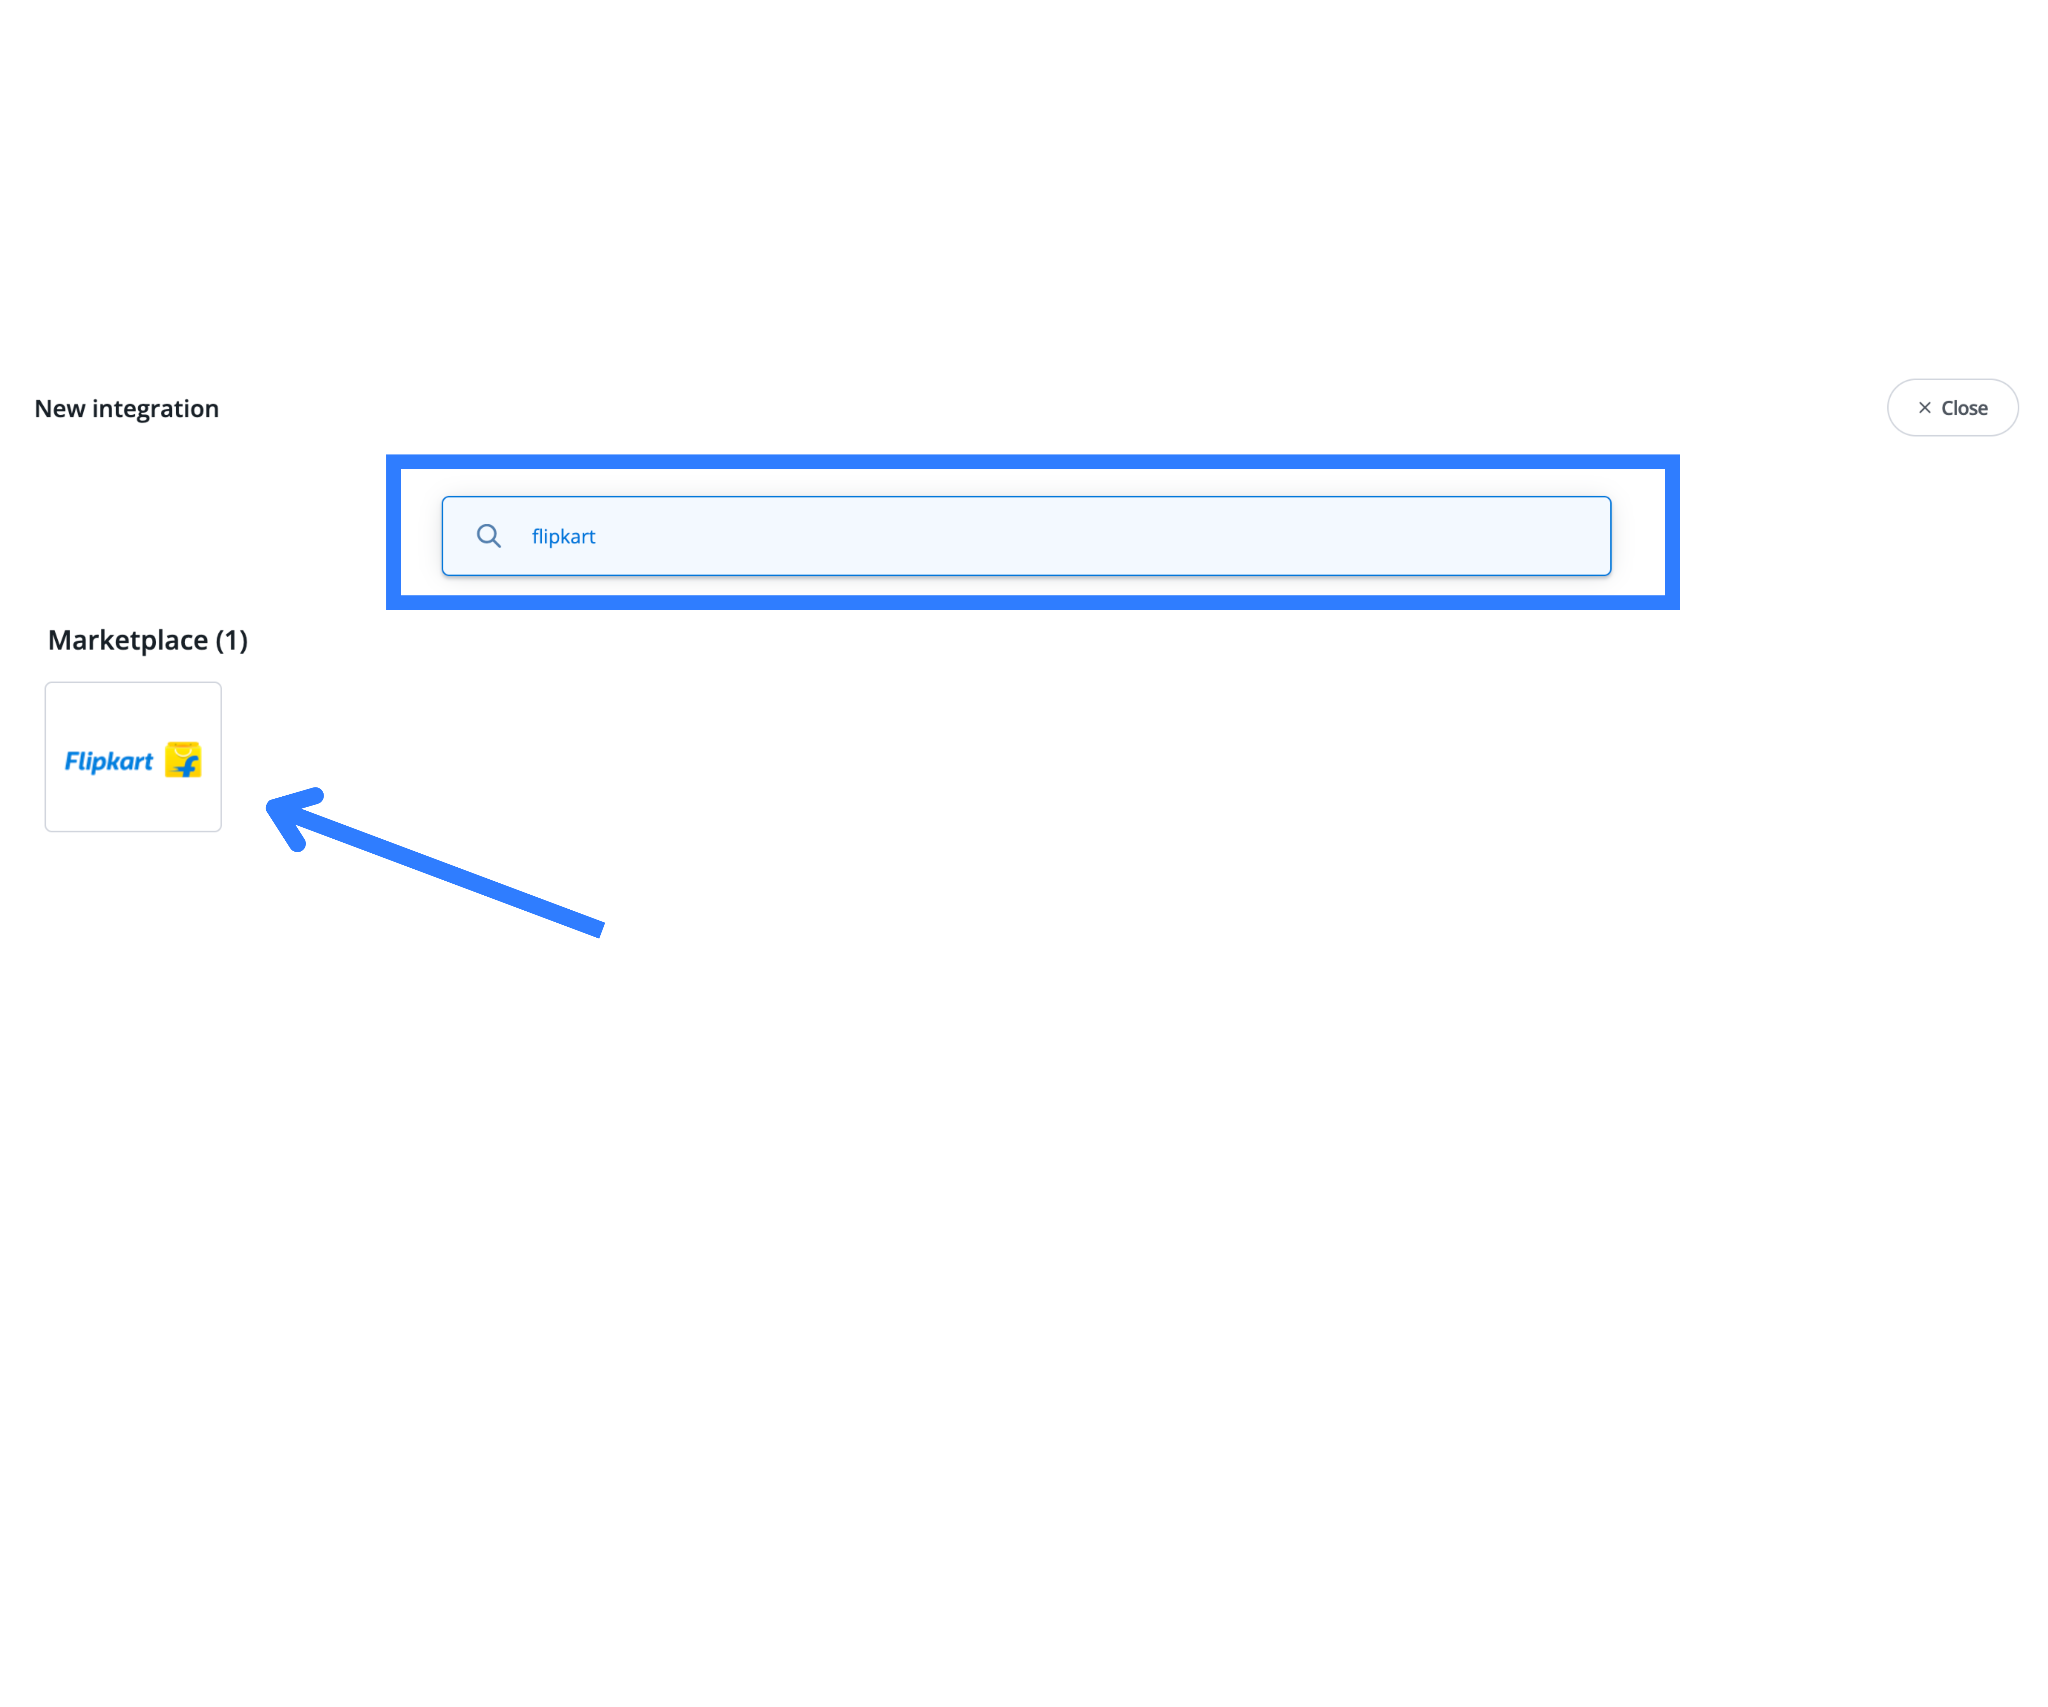
- Search for Flipkart and click on “Add Account.”
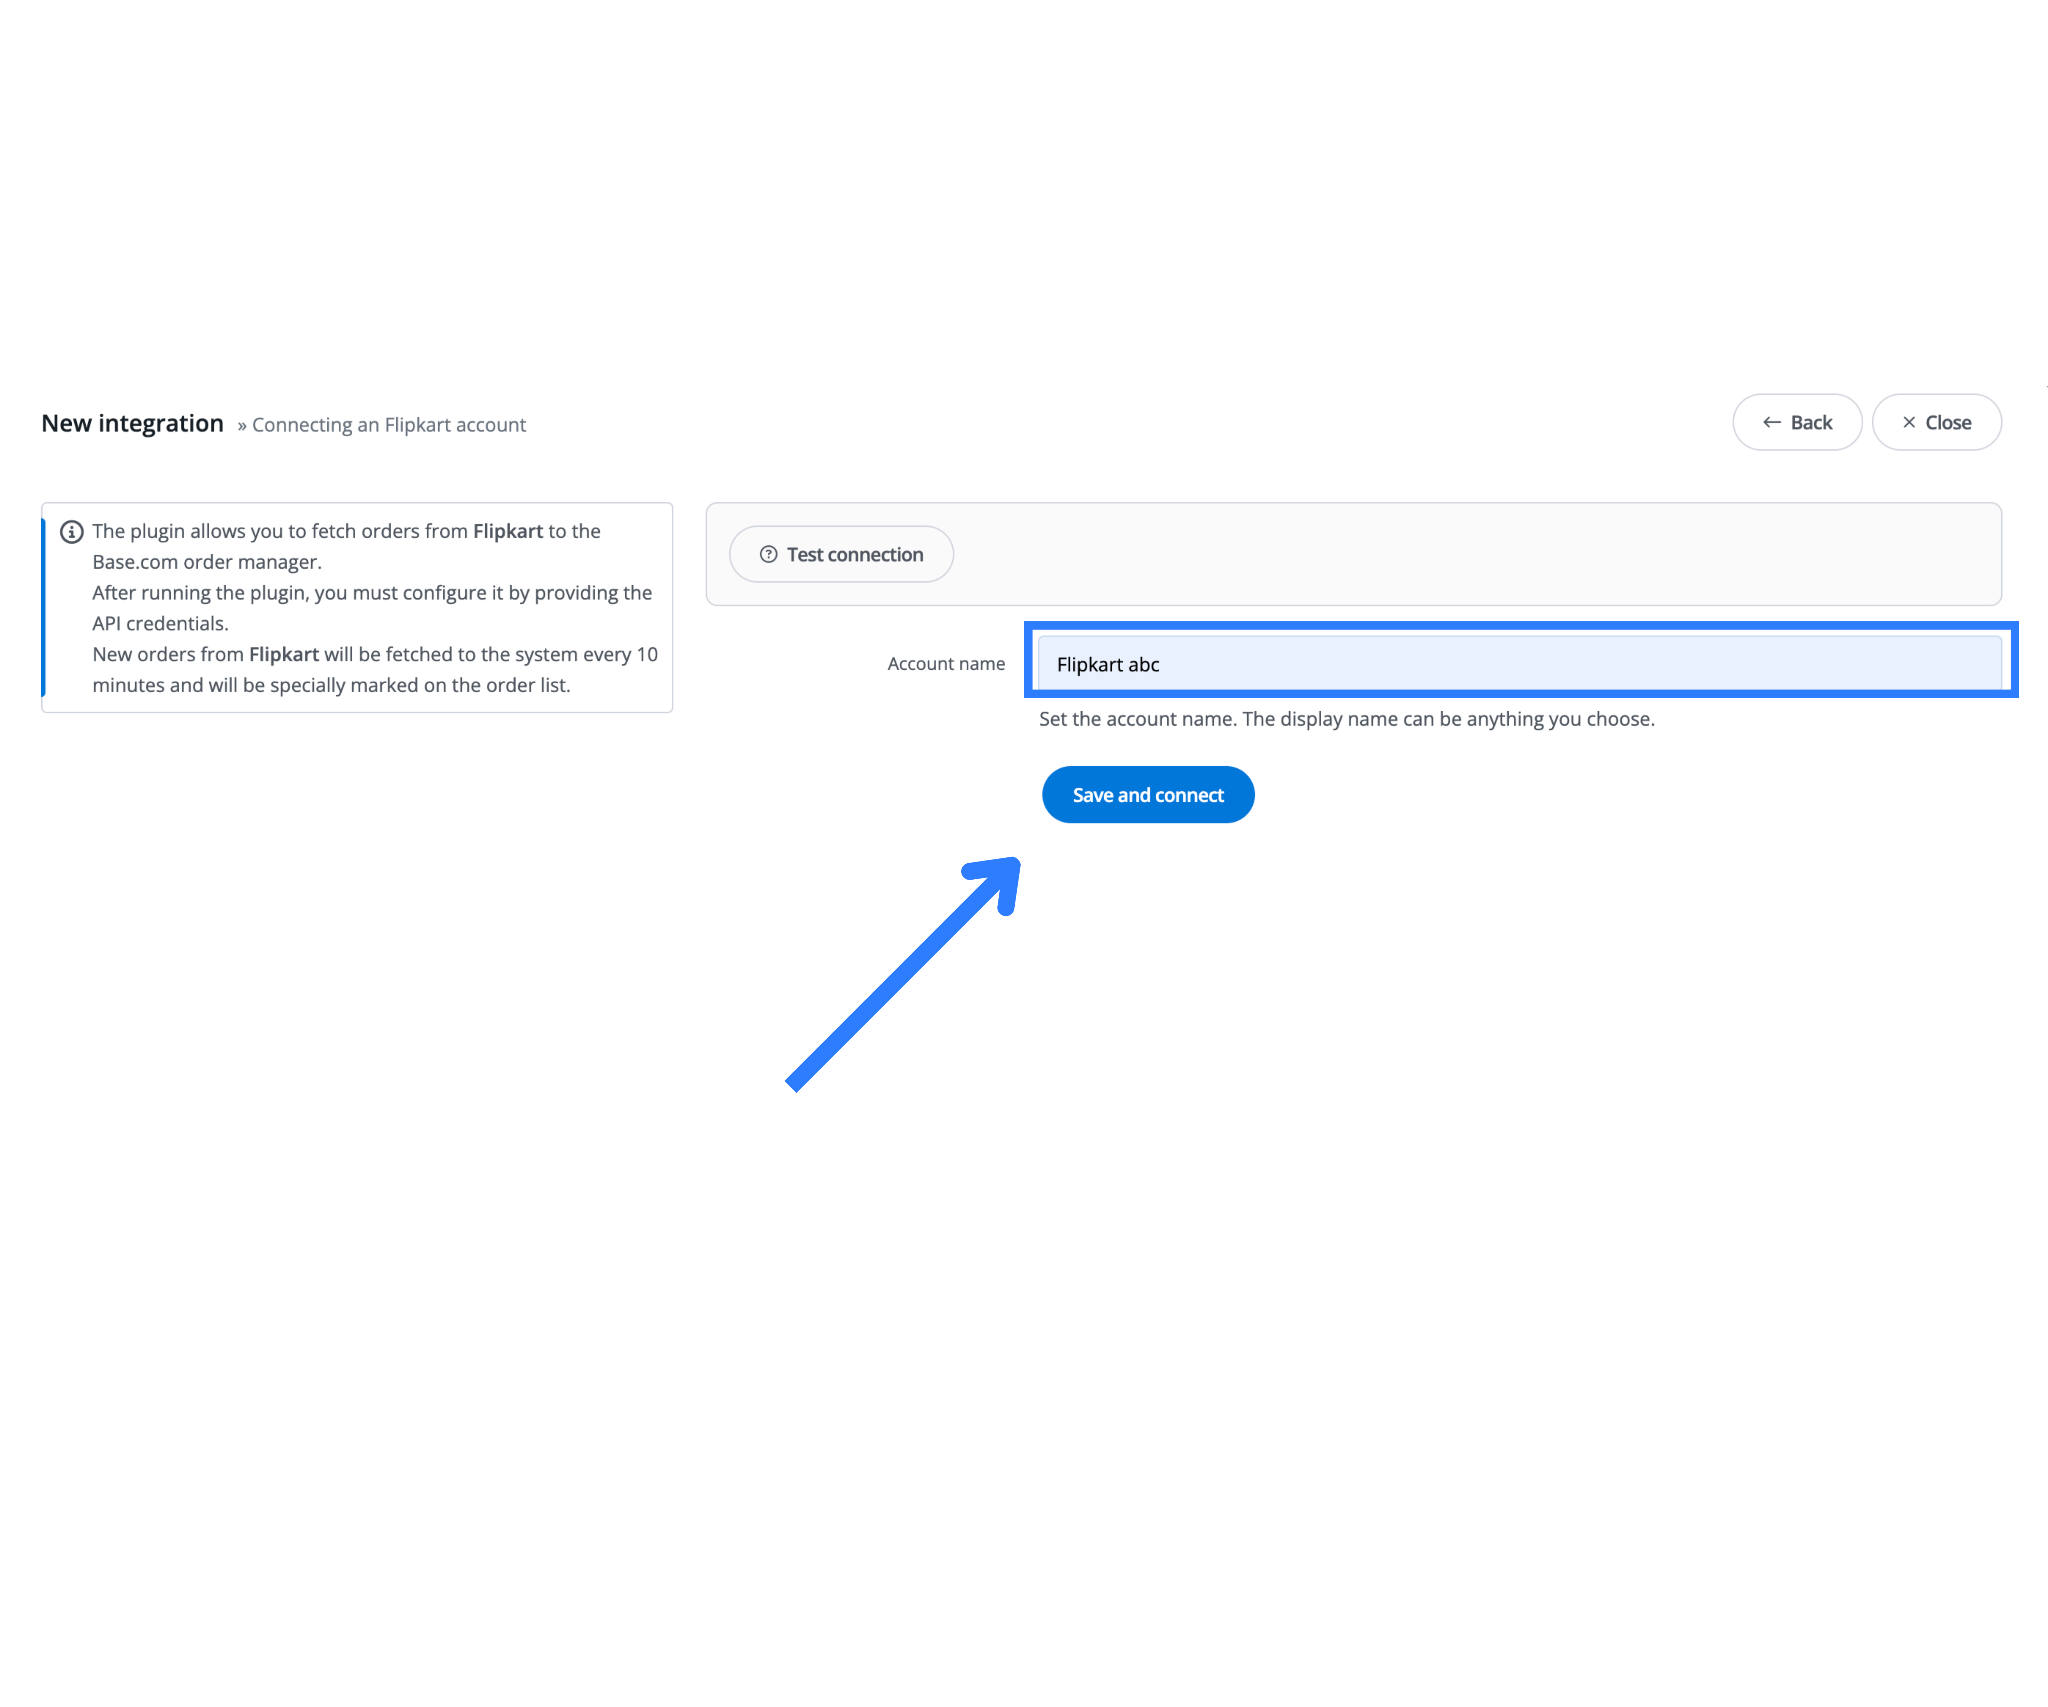
- Set the Account Name (Display Name). This is the name you’ll see in your Base dashboard.
- You will be redirected to the Seller Panel Access page. Log in to your account and grant the required permissions to proceed.
- Click “Connect” to authorize the integration.
Important: Location ID Setup
Flipkart uses Location IDs to manage inventory and fulfillment. Base must correctly recognize your warehouse or location ID to sync and fulfill orders.
- If the Location ID is not visible or empty:
- Click the “Download” button to fetch it from Flipkart.
- Wait a few seconds for the sync to complete.
- The list of available fulfillment locations should now be visible.
Refer to the visual aid provided in the panel for exact button placements.
Step 2: Map Order Statuses – Flipkart to Base
Order fetching allows Base.com to automatically import new Flipkart orders into your Base dashboard at regular intervals. This ensures that your order processing workflow stays up to date without manual input.
Order status mapping is critical to ensure Flipkart’s order lifecycle is in sync with your internal Base workflow.
Why Mapping Matters:
Each platform uses its own terminology for order statuses. Without mapping, updates won’t reflect correctly on either side.
Example Status Mapping:
| Base Status | Flipkart Status |
| Pending Handover | Ready to Dispatch (RTD) |
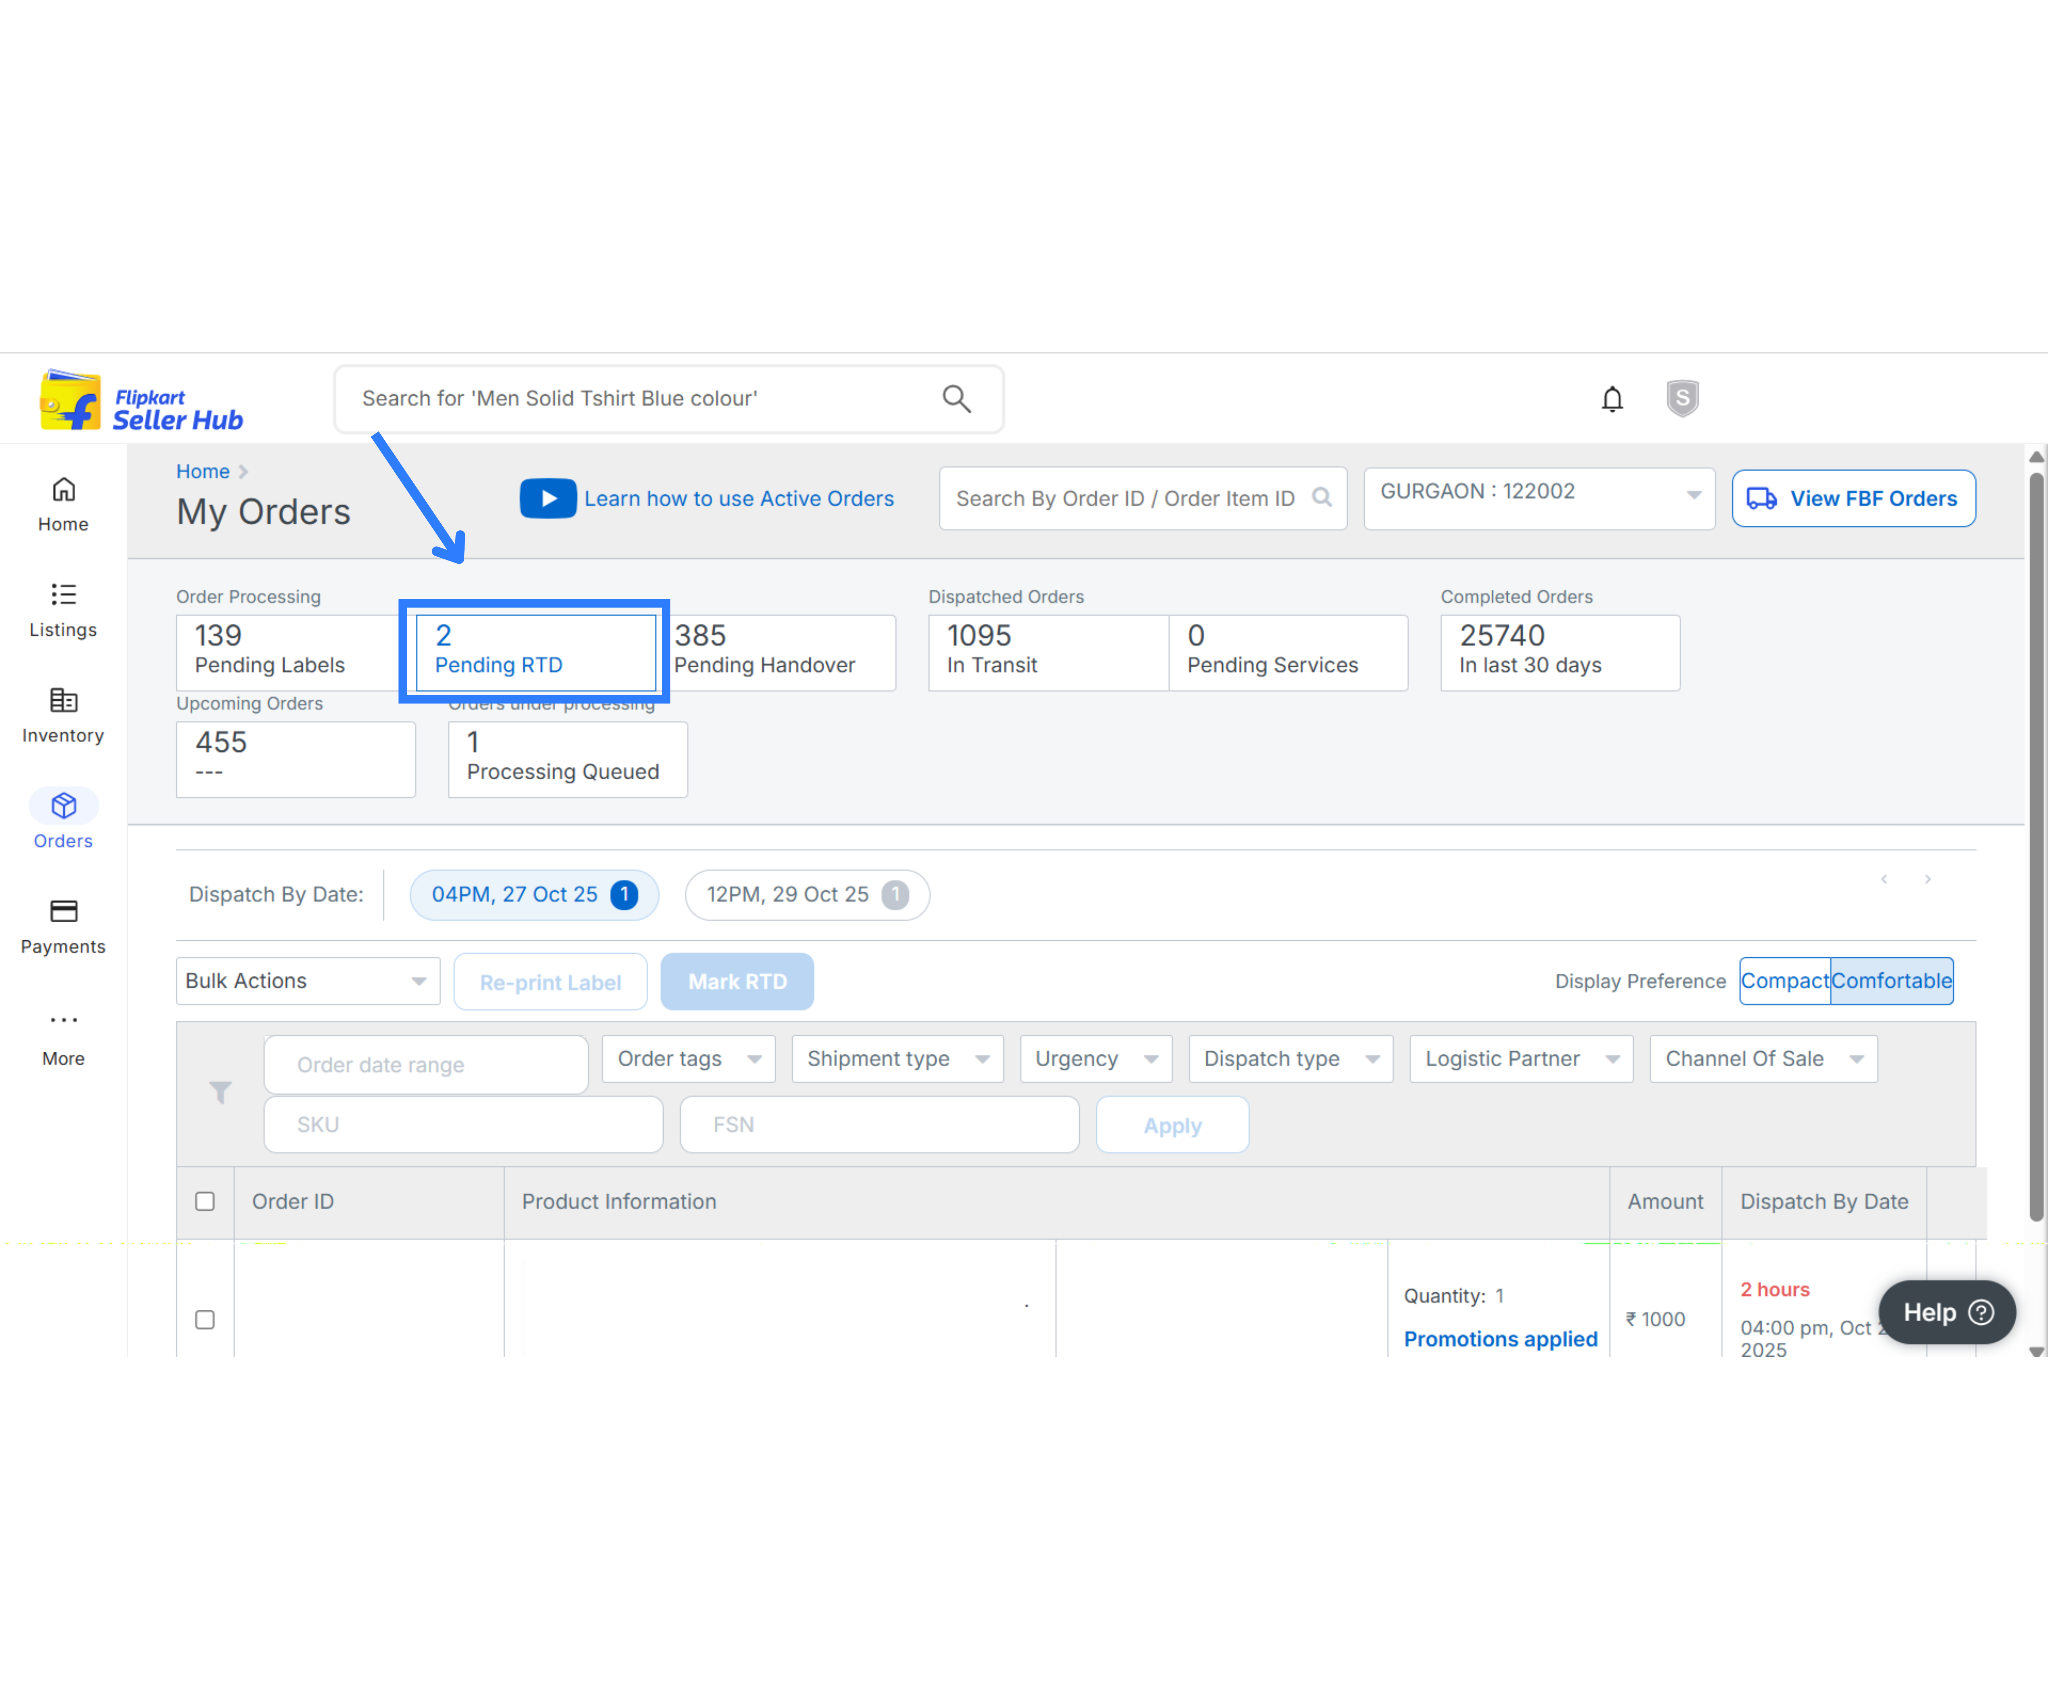
| Ready to Ship (internal) | Pending RTD |
To configure this:
- In your Flipkart integration settings inside Base, locate the “Order Status Mapping” section.
- Set:
- “Pending Handover” → “Ready to Dispatch (RTD)”
- “Ready to Ship (internal)” → “Pending RTD”
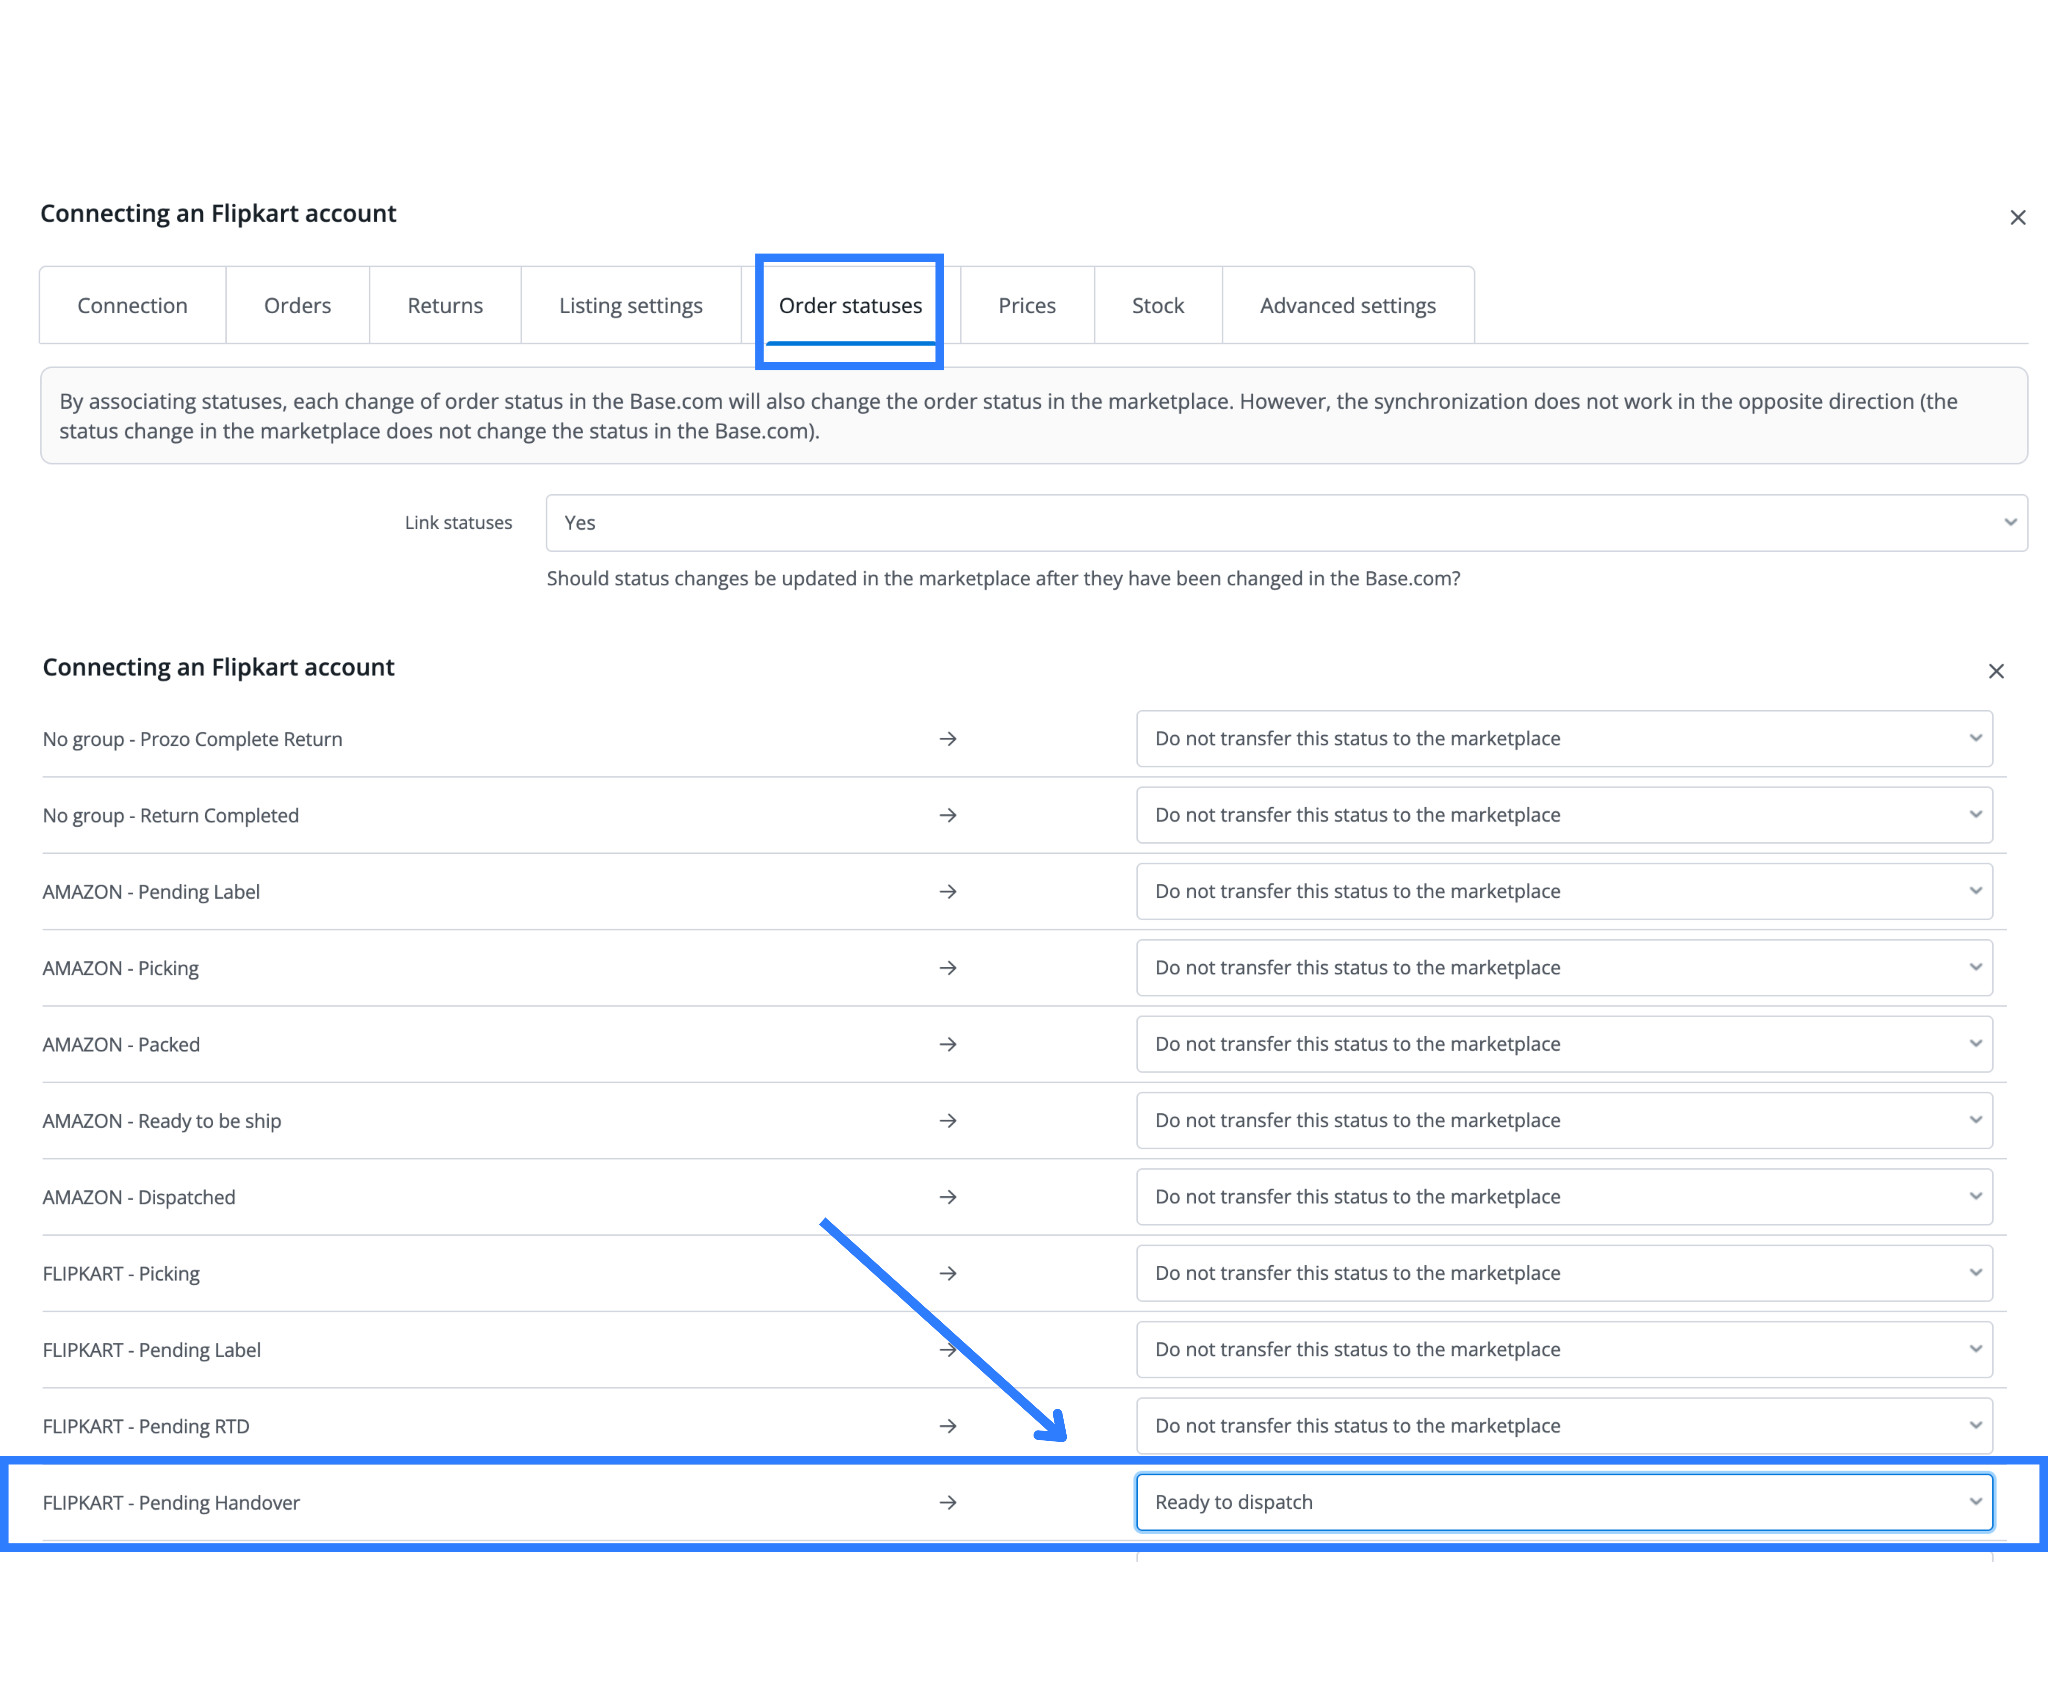
Once mapped, Base will automatically update Flipkart with real-time order progress as you process orders internally.
Order Fetching Fields and Configuration
Sellers can use Base.com’s field-level customization options to define how the system fetches order data from Flipkart.
| Order Status | Specifies which orders from Flipkart should be fetched (e.g., only new/unfulfilled orders). |
| Target Status Set for Fetched Orders | Assigns a default status in Base for newly imported Flipkart orders. |
| Product Names from Inventory | If enabled, Base uses product names from your internal inventory rather than those on Flipkart. |
| Product SKU from Storage | Uses the SKU from your Base catalog instead of the SKU provided in the Flipkart order. Useful for SKU standardization across marketplaces. |
| Thumbnails from Inventory | Controls whether product images in orders come from your internal catalog or Flipkart offers. |
| Tax Rates from the Storage | Inserts the VAT rate from your internal Base storage instead of the one listed on Flipkart. Ensures tax consistency across systems. |
| Forward Orders to the Store | Determines whether fetched orders are forwarded to your connected ecommerce store. Typically left off for direct marketplace fulfillment. |
| Send Tracking Numbers | If enabled, Base will send tracking numbers back to Flipkart once the package is shipped. May slow down waybill generation if activated. |
| Fetch return_type_additional_field | Controls whether Flipkart’s return type field is imported with orders. |
| Fetch replacement_order_id_extra_field | Option to import the replacement order ID field (used in return/replacement workflows). |
| Fetch order_fulfilment_profile_extra_field | Imports fulfillment profile metadata (used for seller-fulfilled vs Flipkart-fulfilled orders). |
| Fetch partial_cancellation | If enabled, imports partial cancellation info on orders (e.g., one item canceled out of three). |
| Enable Self Shipment | Activates the self-shipment workflow. Useful only if you fulfill Flipkart orders outside of Ekart or preferred partners. |
| Fetch self_shipment_extra_field | Pulls metadata related to self-ship status from Flipkart (used only if self-shipping is enabled). |
| Download On-Hold Orders | If enabled, imports orders that are currently on hold (e.g., awaiting confirmation or external verification). |
| Fetch Discount | Retrieves discount information associated with the order (e.g., coupon or promotional discount data). |
| Auto-Split Partially Cancelled Orders | Automatically splits an order into multiple parts if some items are canceled. Helps maintain accuracy in fulfillment. |
| Download Order Commissions | Imports the commission amount charged by Flipkart per order (useful for financial reconciliation and margin tracking). |
Step 3: Flipkart Order Lifecycle in Base
After successful integration, your Flipkart order management process in Base will follow this structured lifecycle:
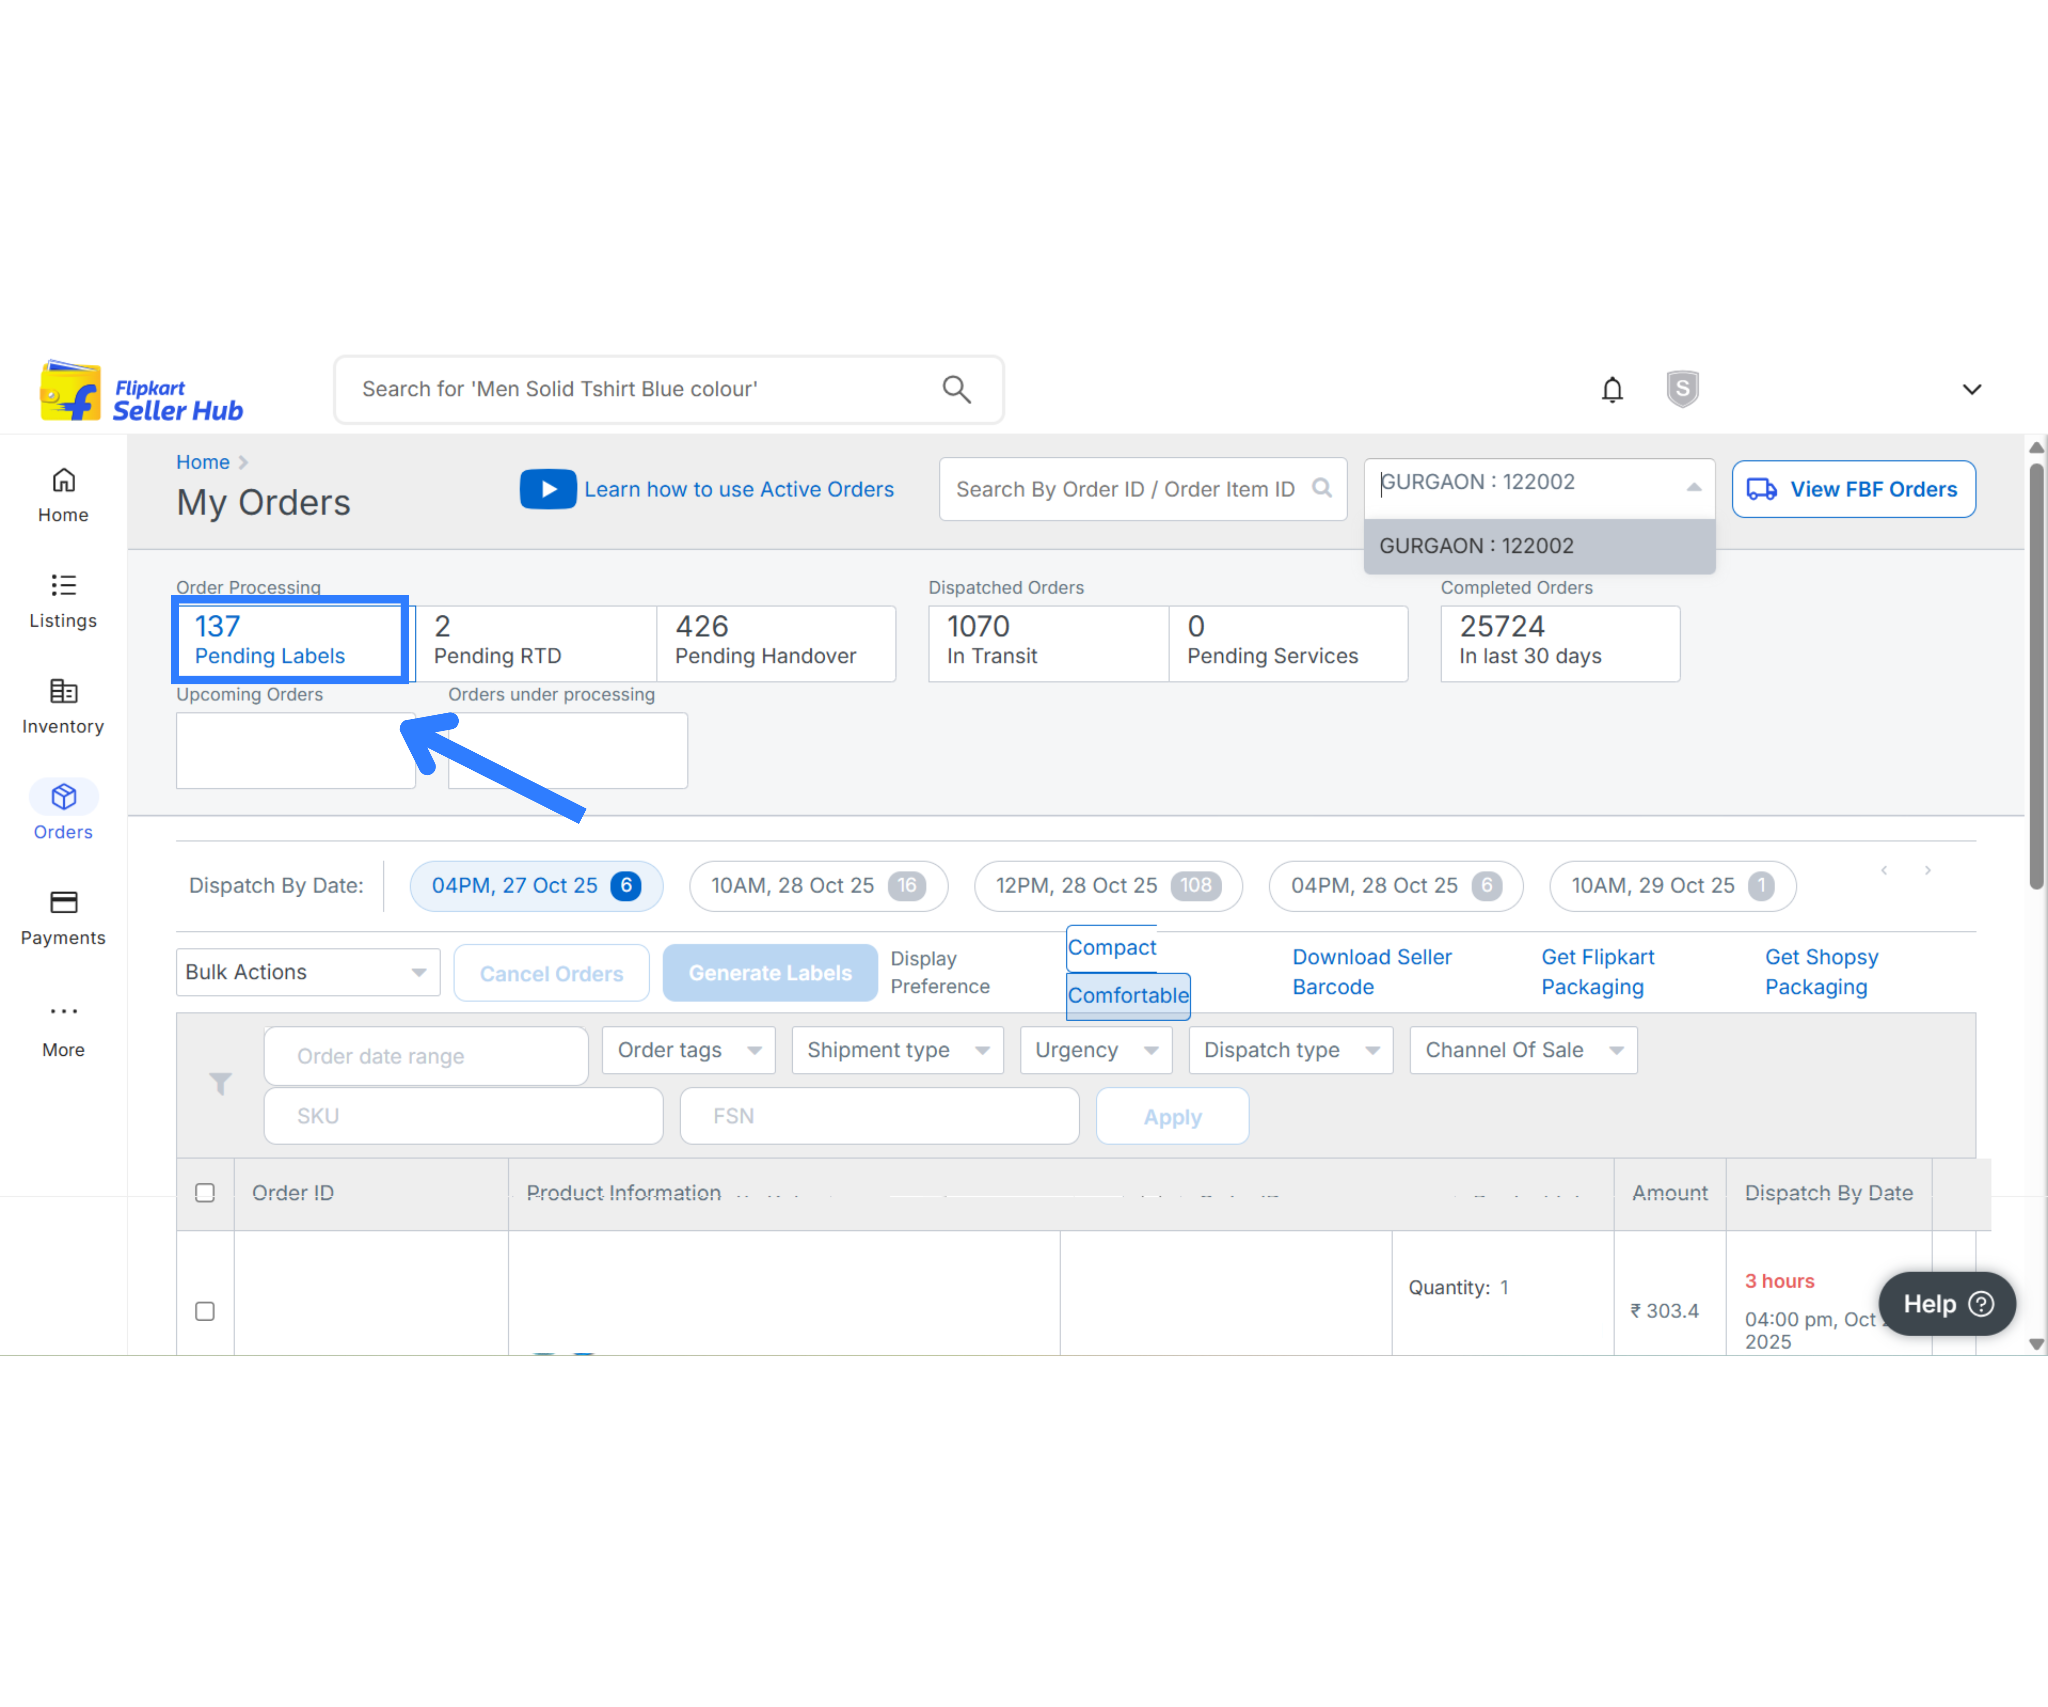
1. Order Import
2. Label Generation
- Go to the Flipkart panel in Base and click “Label Generation.”
- This action updates the order status on Flipkart to “Pending RTD.”
3. Change Order Status in Base
- In Base, select the relevant orders.
- Change their status to “Pending Handover.”
- Behind the scenes, Base now marks these orders as Ready to Dispatch (RTD) on Flipkart.
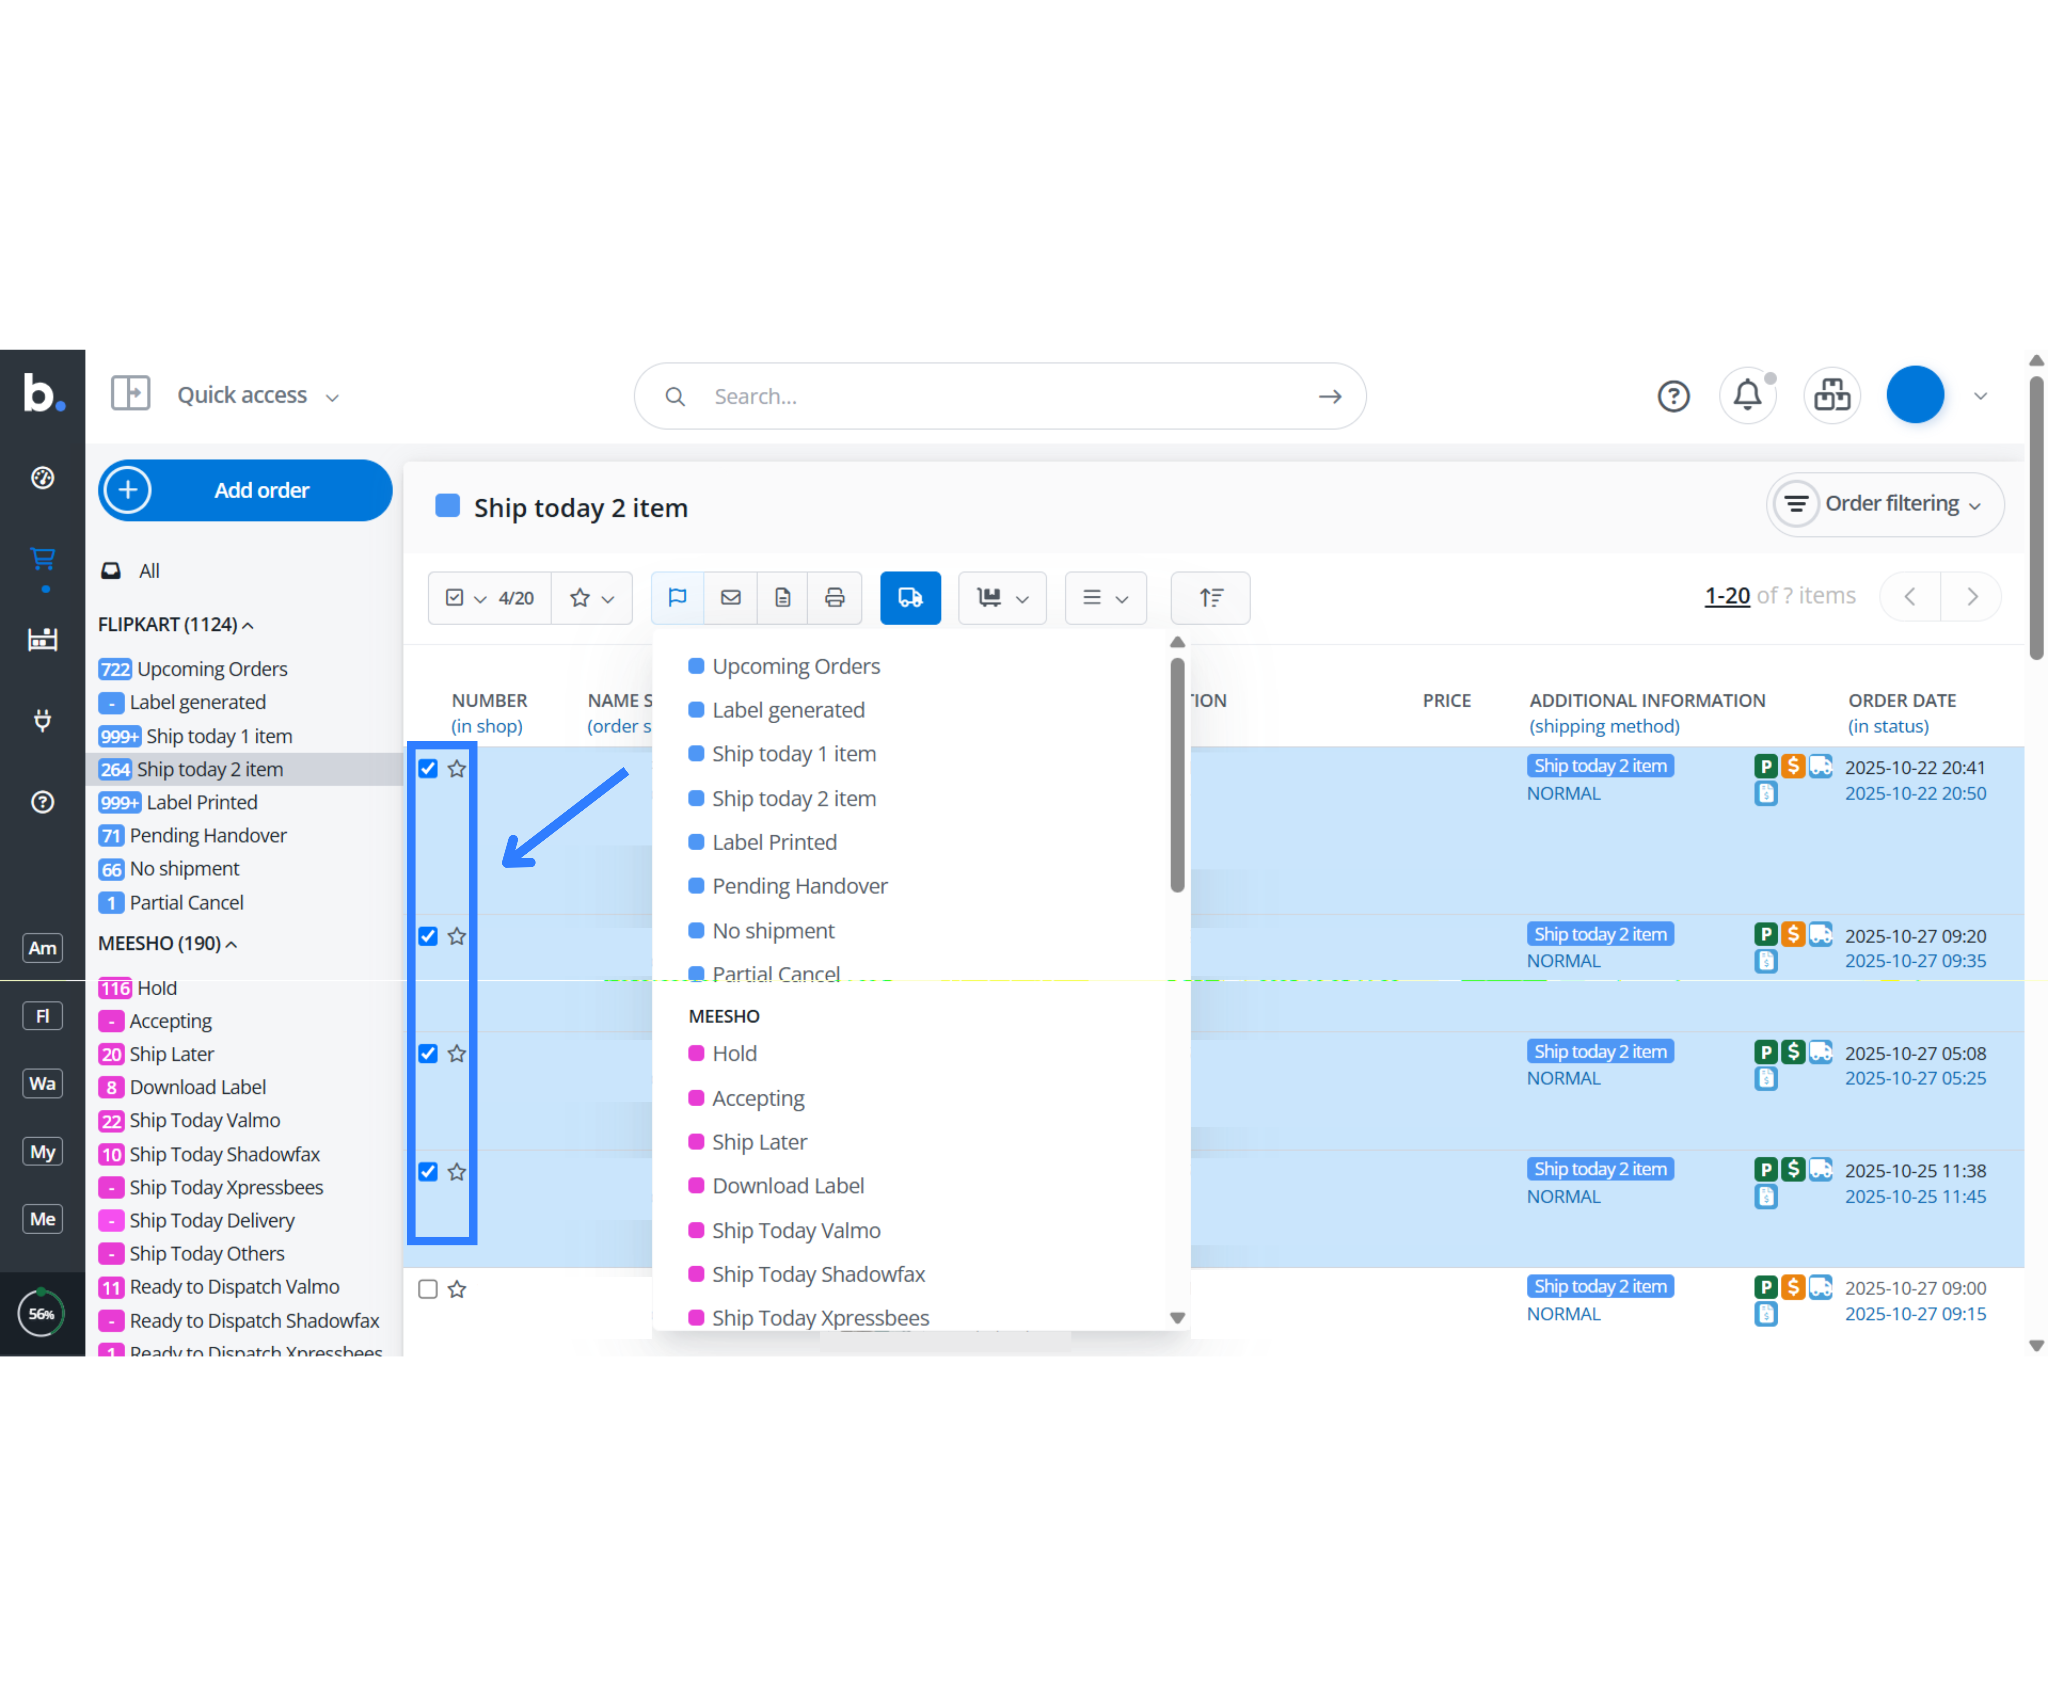
Pro Tip: Use batch status updates to change multiple orders at once, saving time during high-volume periods.
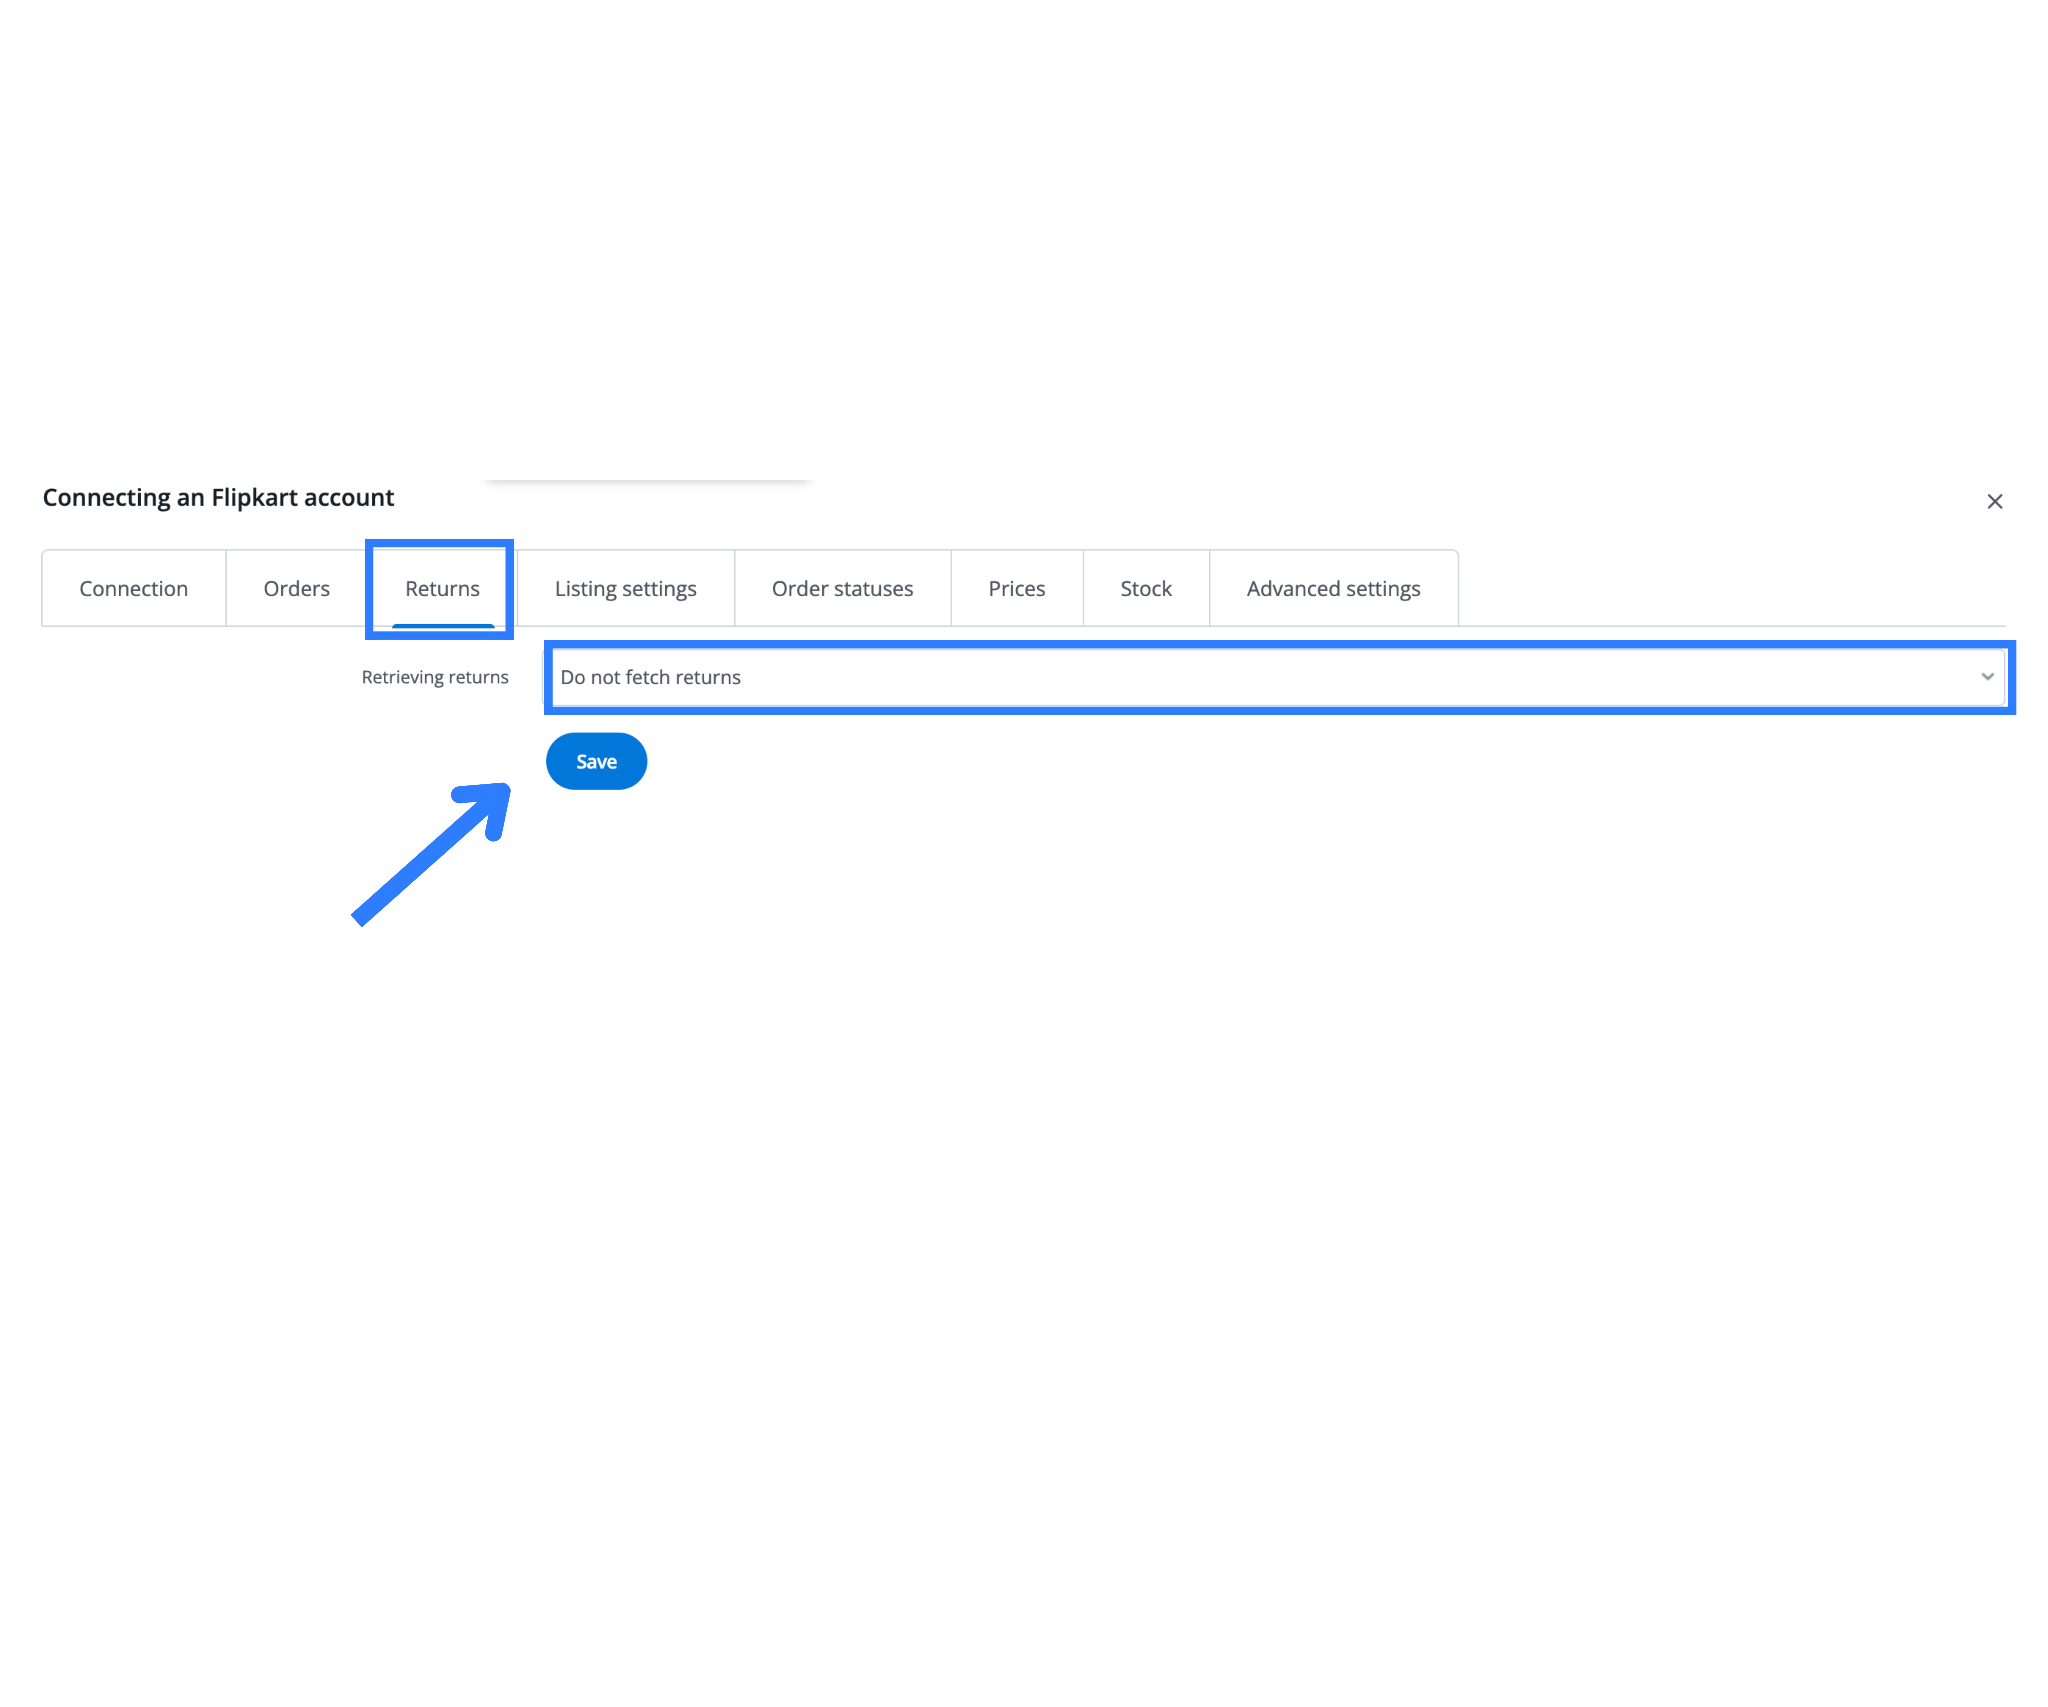
Step 4: Returns Handling from Flipkart
Flipkart allows customers to initiate returns through the platform for various reasons such as damaged products, wrong items, or quality issues. These returns generate specific metadata – including return types, reasons, and replacement order IDs, that can be fetched and processed in Base.com.
By default, Base does not fetch returns from Flipkart unless the related settings are enabled. When enabled, this data helps sellers monitor, manage, and act on returns more efficiently, whether it’s issuing refunds, generating replacement shipments, or analyzing return patterns.
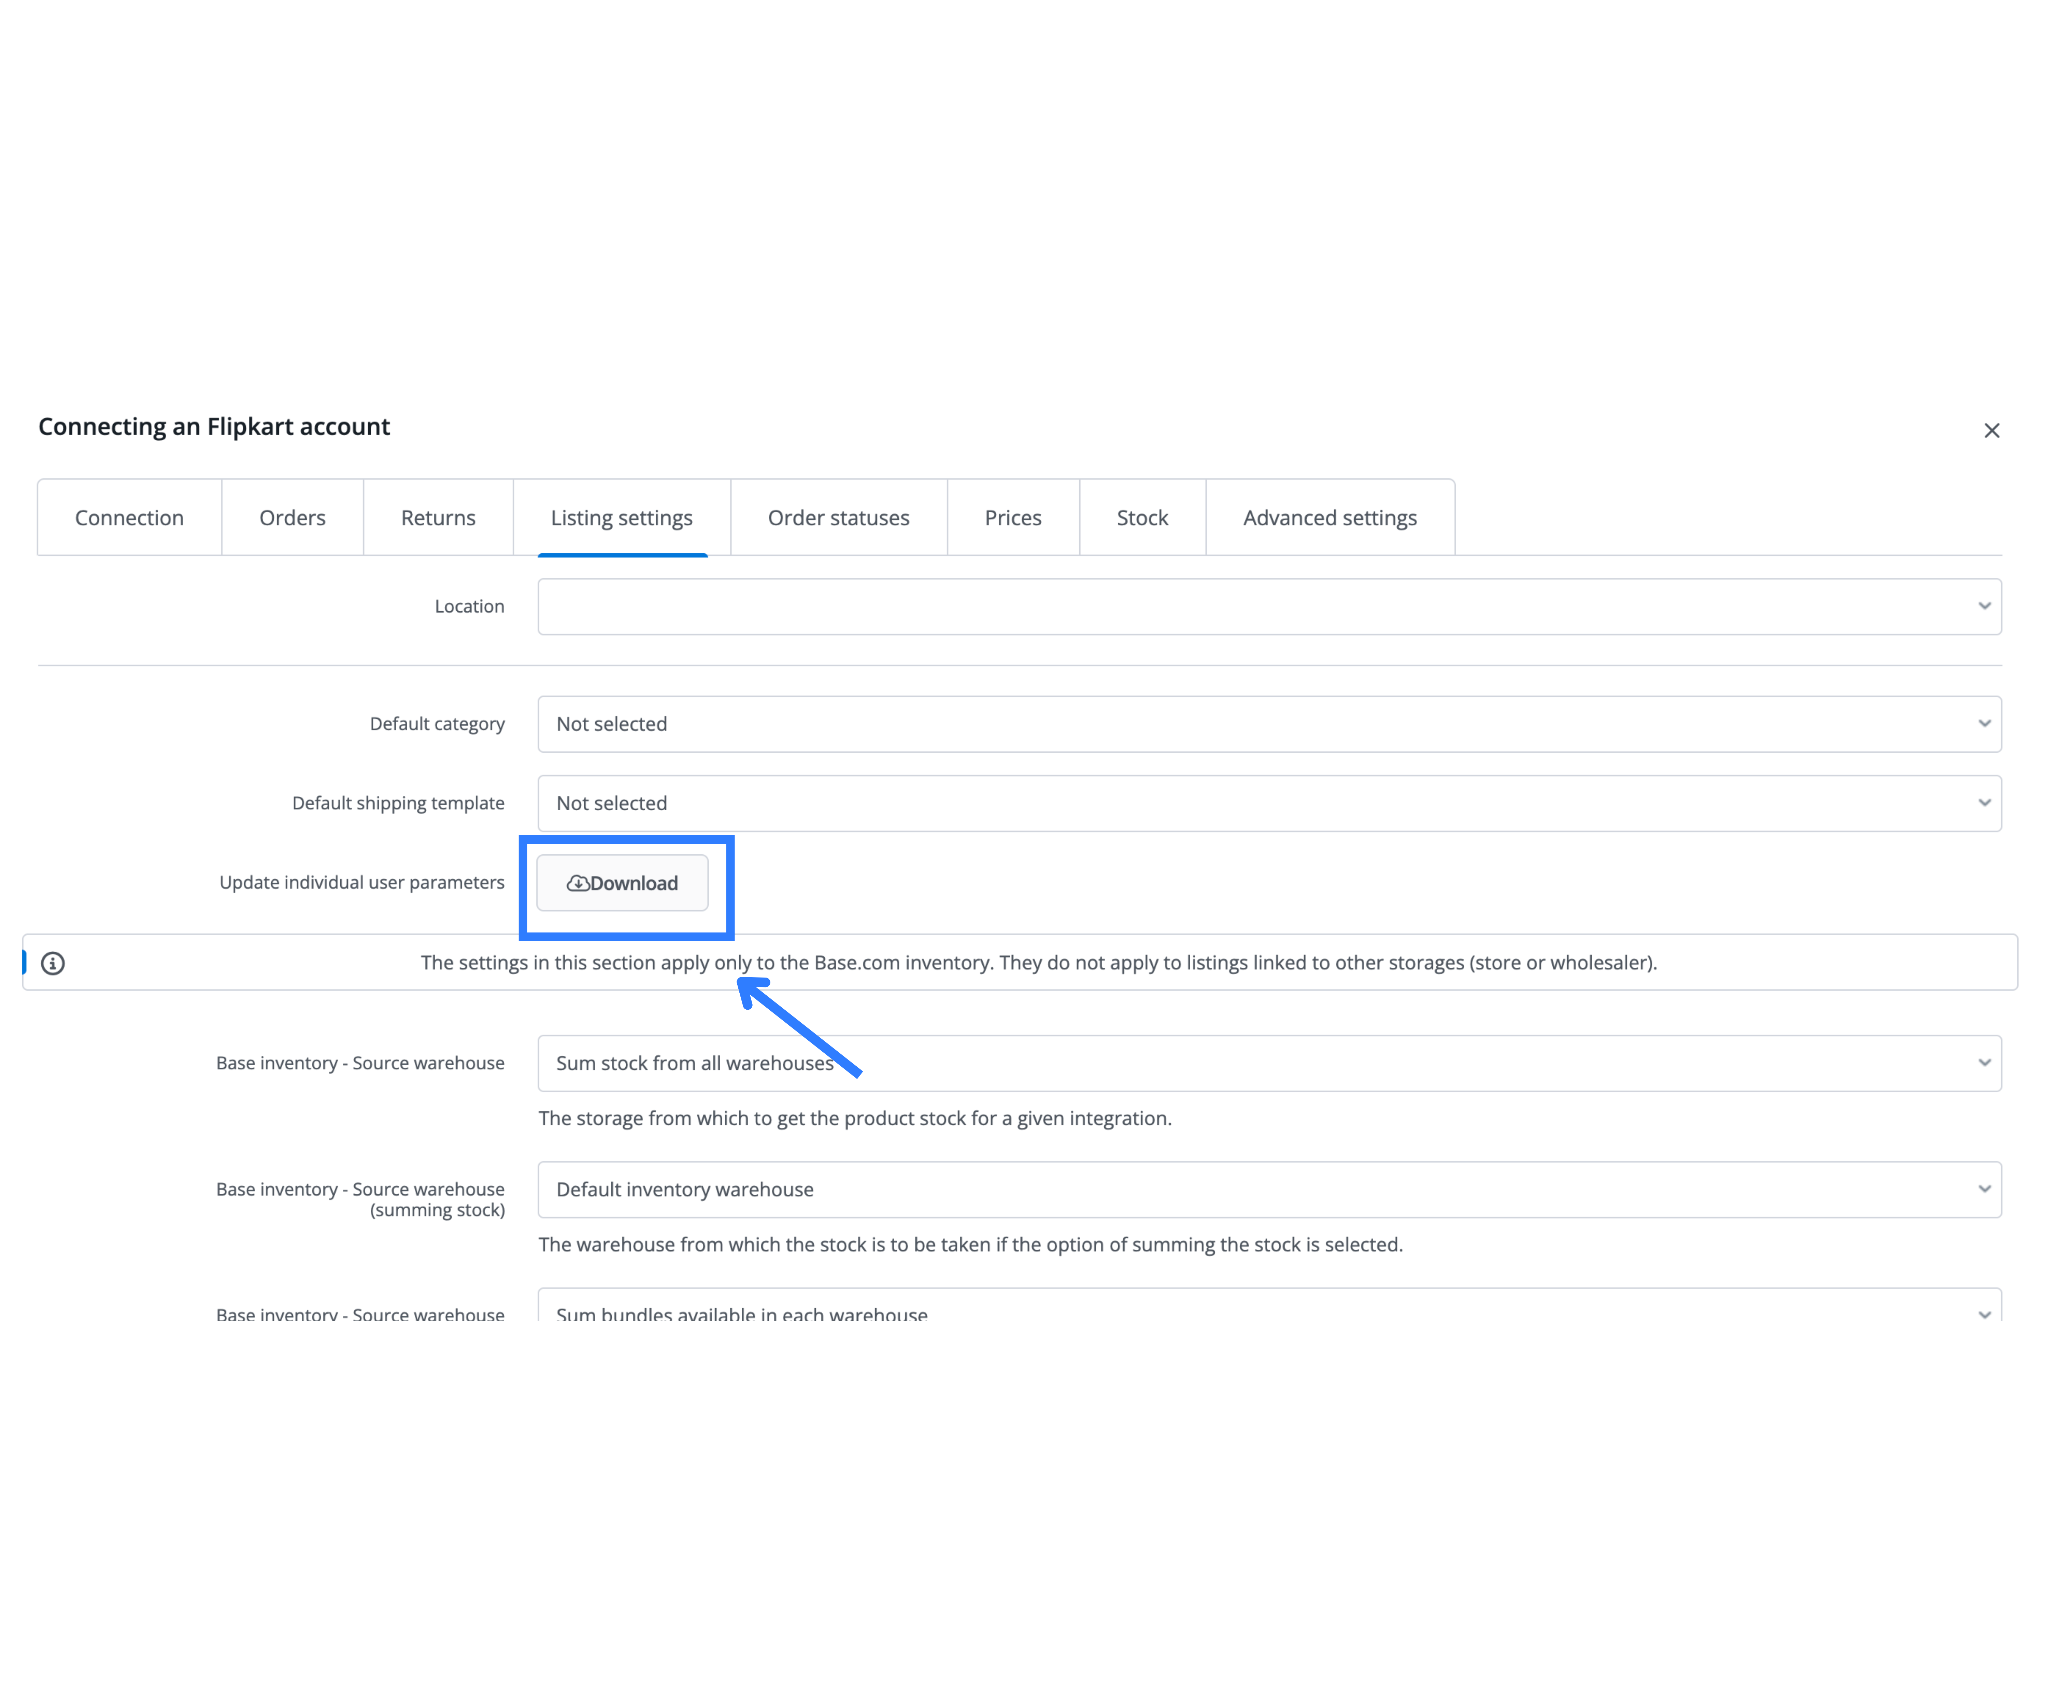
Step 5: Listing Management in Flipkart Integration
Listing products on Flipkart through Base.com requires a well-configured inventory sync setup.These settings control how product stock, pricing, images, and variant data are pulled from your Base.com catalog and published to the marketplace. By customizing listing parameters, sellers can maintain accurate listings, enforce inventory controls, and optimize how products appear on Flipkart.
Flipkart Listing Configuration Settings Explained
| Setting | Description |
| Location | Specifies the warehouse location linked to the listing. Must match Flipkart’s fulfillment location for proper order routing. |
| Default Category | The default Flipkart product category to assign if none is selected during listing. |
| Default Shipping Template | Assigns a shipping template for the listing. If not selected, Flipkart’s default shipping rules may apply. |
| Update Individual User Parameters | These settings apply only to products in Base.com inventory and not to listings from connected stores or wholesalers. |
| Base Inventory – Source Warehouse | Designates the warehouse from which product stock is pulled. |
| Sum Stock from All Warehouses | Aggregates stock across multiple warehouses to calculate total availability for listing purposes. |
| Default Inventory Warehouse | If summing is enabled, this warehouse will be the default source for product stock. |
| Bundles – Sum Stock | Controls how stock for product bundles is calculated across warehouses. |
| Default Price Group | The primary price group used to assign product prices for Flipkart listings. |
| Promotional Price Group | Assigns a separate price group for promotional pricing. If left blank, standard pricing is used. |
| Price Multiplier | Allows you to automatically increase or decrease prices before sending them to Flipkart (e.g., add 10%). |
| Expanded Sections | Controls whether optional listing sections (like parameters or descriptions) expand automatically during product listing. |
| Image Gallery – Images Order | Defines the display order of product images according to your catalog. |
| Image Gallery – Number of Images | Sets how many images to include in the listing (e.g., only the first image). |
| Include Spaces in Gallery | Enables or disables white space around gallery images. |
| Apply to Variants | Determines whether listing settings apply to product variants. |
| Include Parent Product Images in Variants Gallery | Controls whether variant listings inherit images from the parent product. |
| Maximum Available Quantity | Sets a cap on the quantity displayed in the listing (e.g., don’t list more than 100 units). |
| Do Not List More Than Available Stock | Ensures you don’t oversell by limiting listing quantity to what’s actually available in stock. |
| Variant Name | Controls how variant names are constructed (e.g., default naming or using specific attributes). |
| Copy SKU from Main Product | If a variant doesn’t have its own SKU, this option copies the SKU from the main product. |
| Copy EAN from Main Product | Same logic as above, but for the EAN (barcode) field. |
| Name Filter | Allows dynamic naming using tags like [auction_name], [sku], [manufacturer], etc., for customizing listing titles. |
| Convert Name Case | Adjusts the text case for listing names (e.g., title case, uppercase). |
Important: To import your Flipkart listings into Base:
Go to Flipkart Listing Management > Import Offers.
You can either leave the section blank to import all listings, or enter specific SKUs separated by commas to import selected products only.
Once imported, proceed to associate listings with your Base inventory for accurate stock, pricing, and catalog syncing.
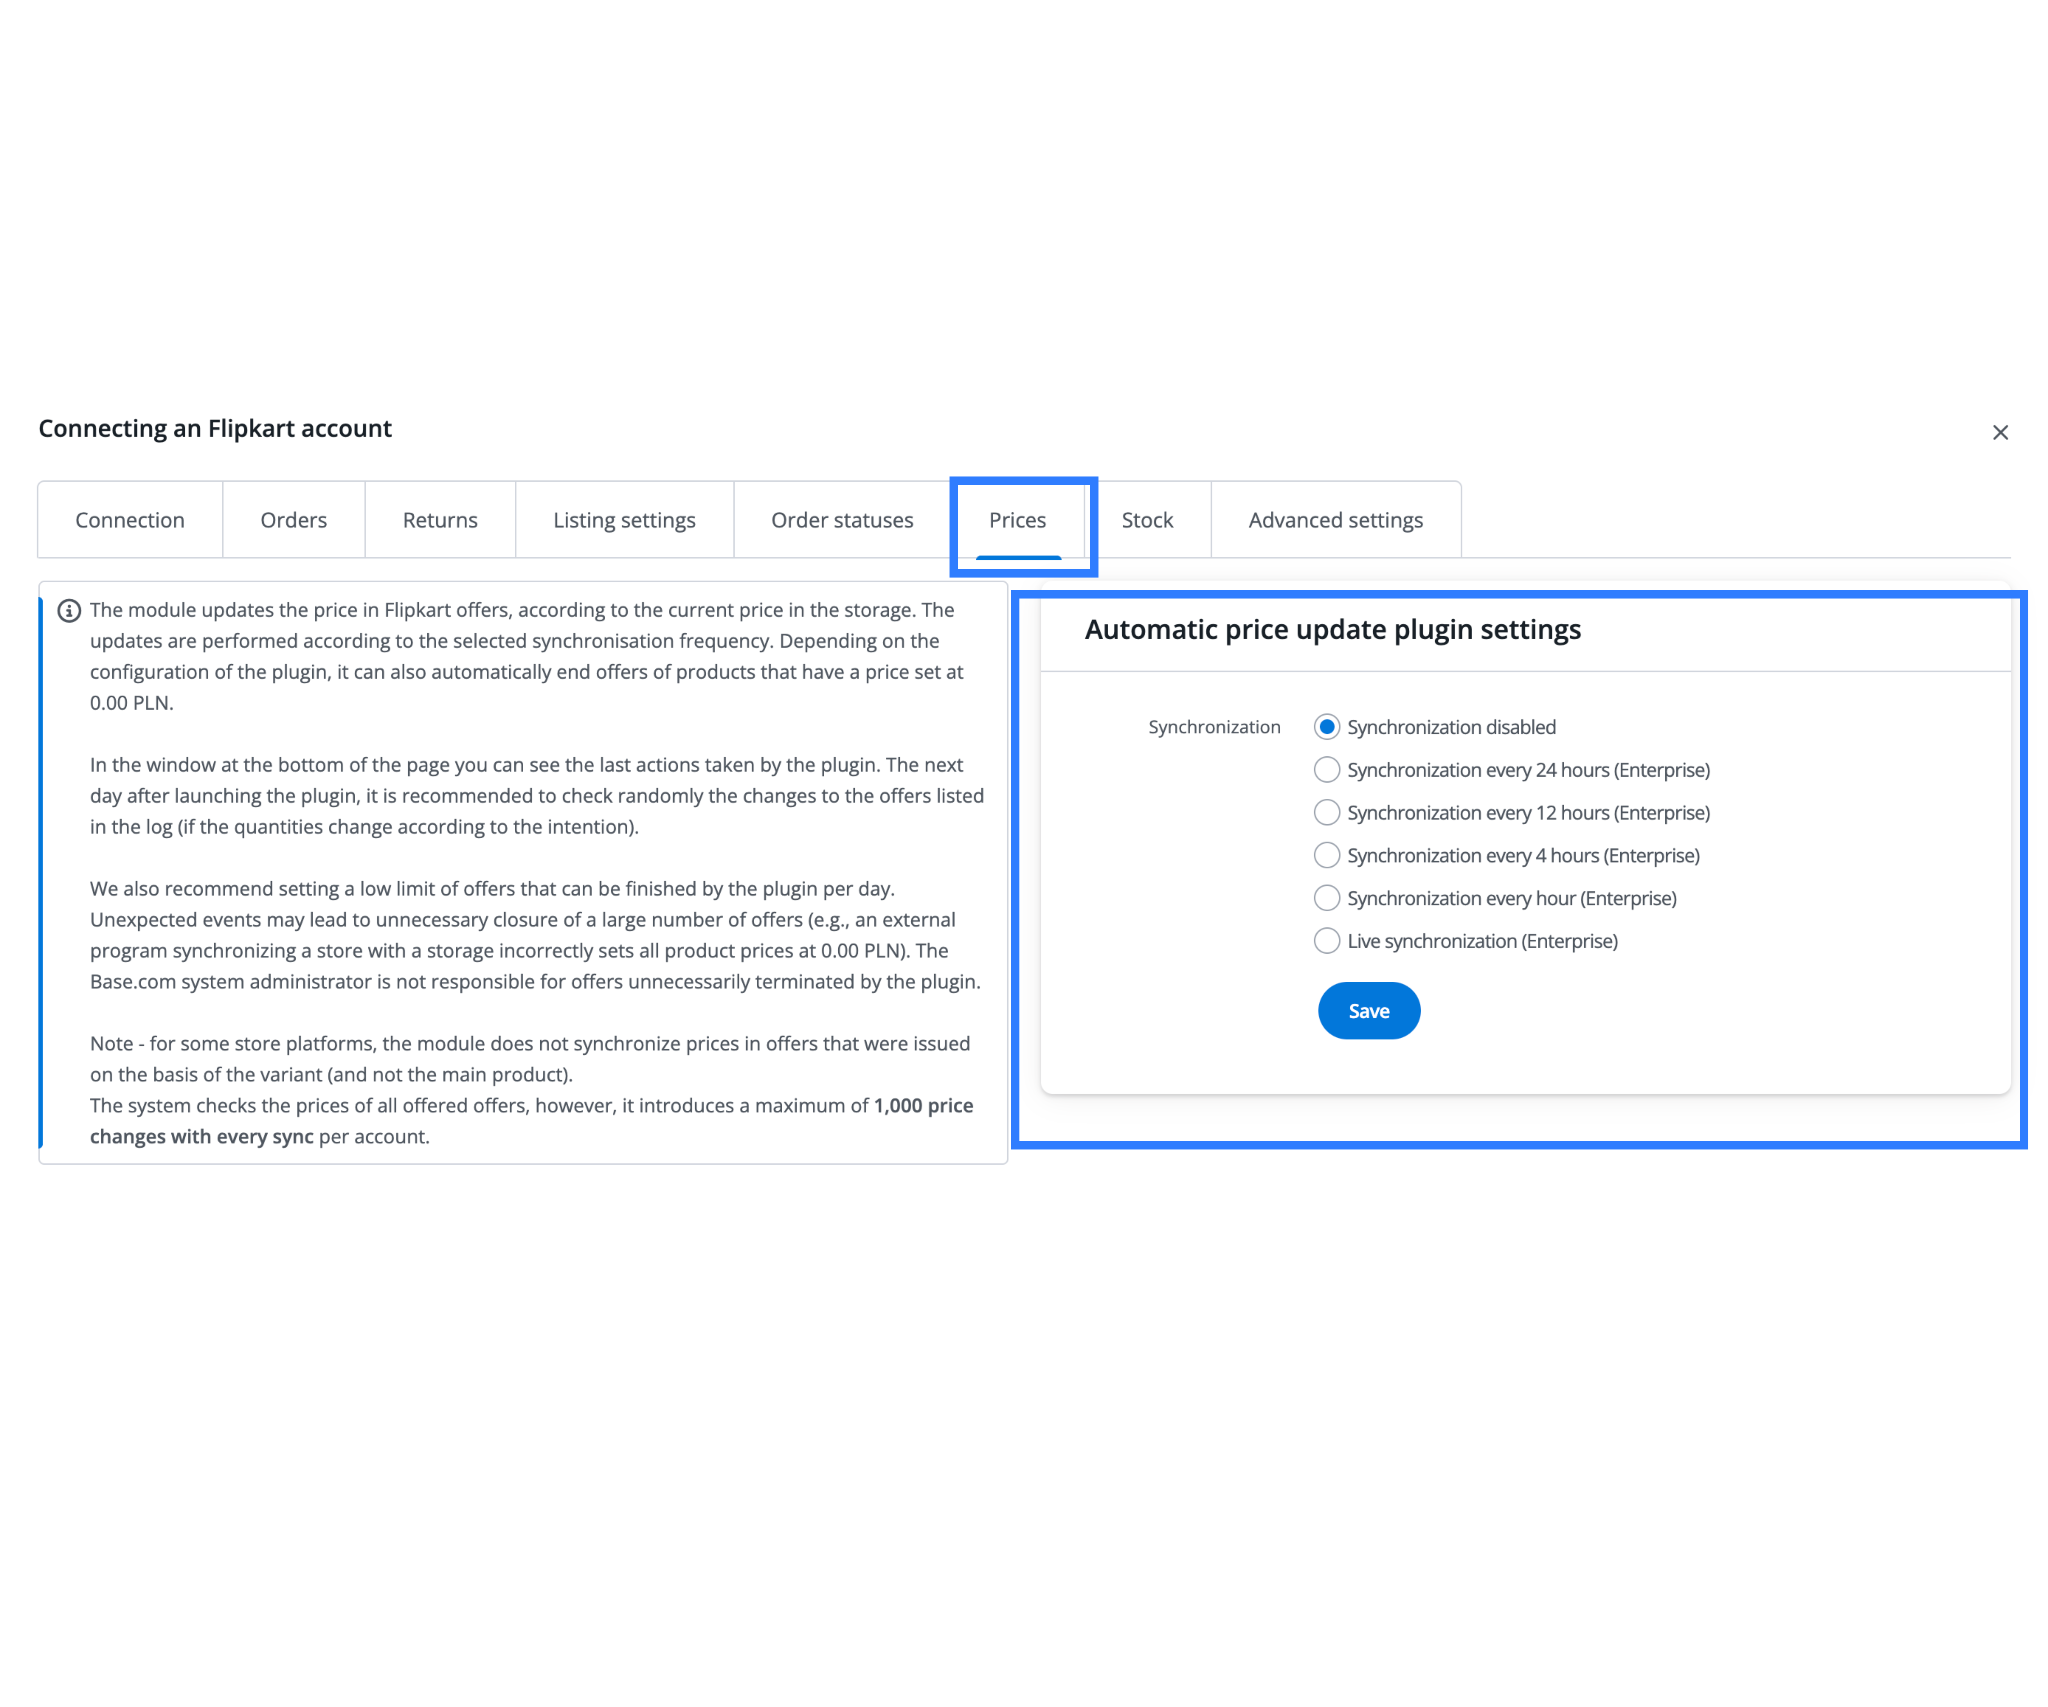
Step 6: Automatic Price Update Plugin – Flipkart Integration
The automatic price update plugin helps keep your Flipkart listings aligned with the latest prices in your Base.com storage (catalog). Once enabled, the system periodically checks product prices and updates them on Flipkart offers. This ensures your pricing remains accurate across platforms without manual intervention.
The sync runs automatically, with options ranging from hourly to daily updates. The plugin can also close Flipkart offers with invalid prices (e.g., set at 0.00) to prevent listing errors, but you should use it carefully.
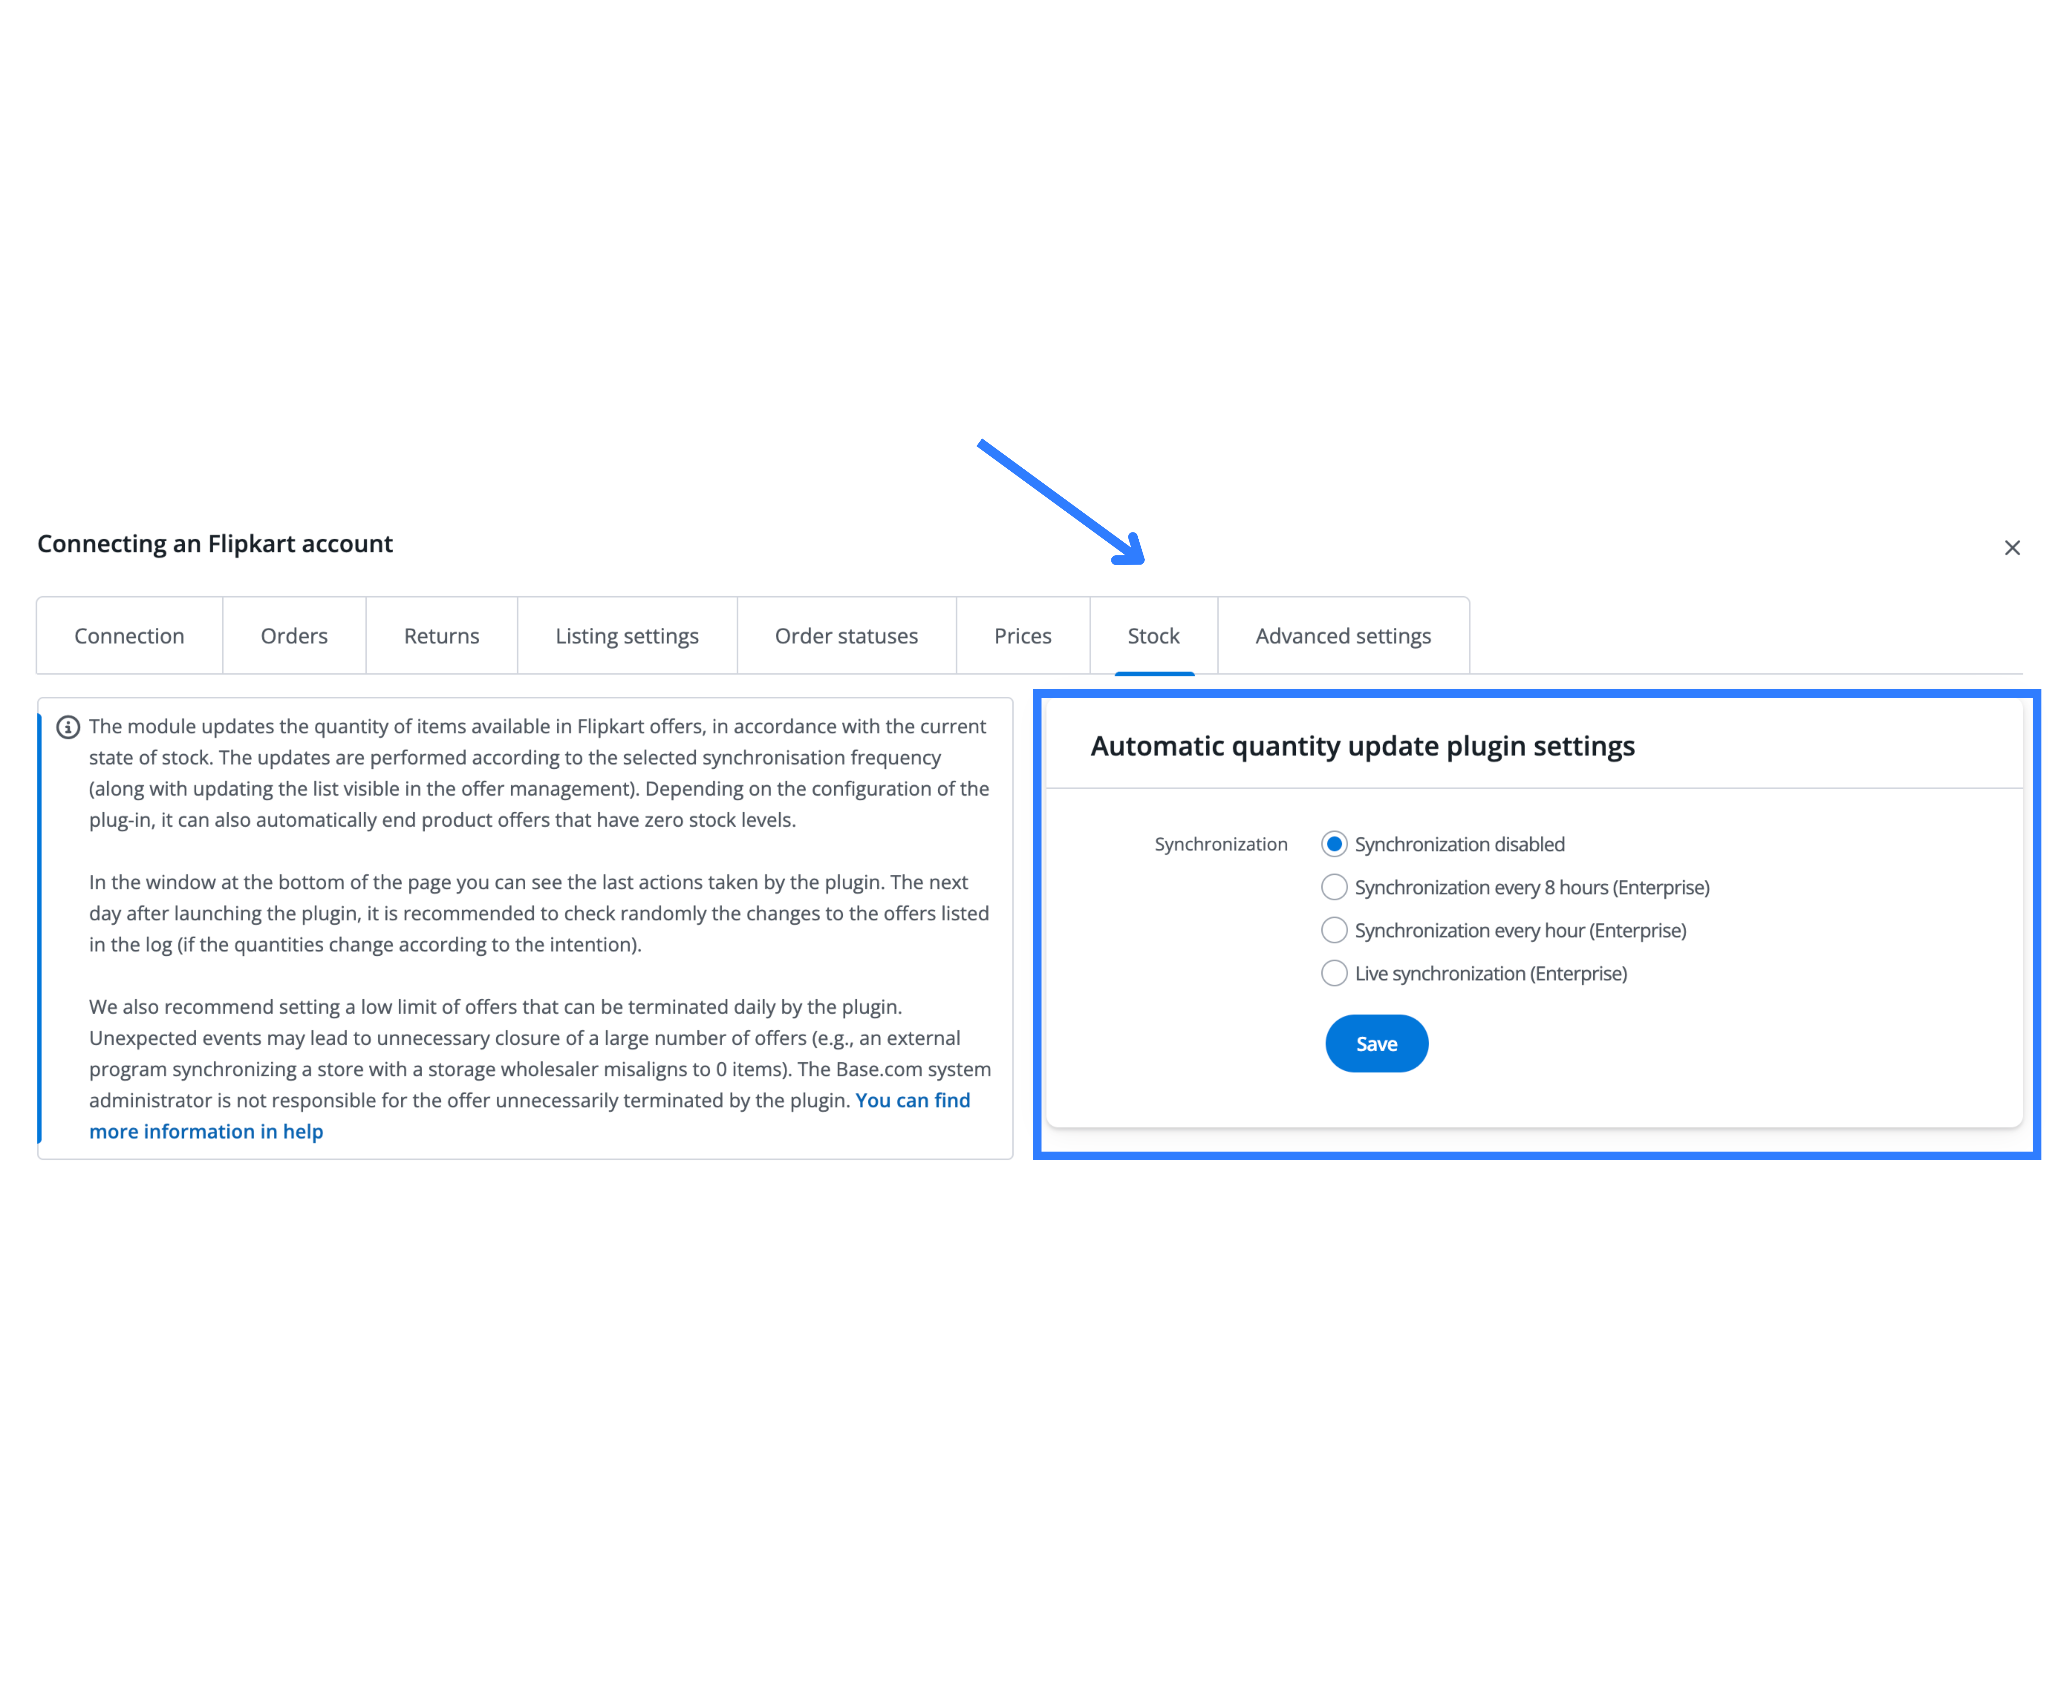
Step 7: Automatic Quantity Update Plugin – Flipkart Integration
The Automatic Quantity Update Plugin ensures that your Flipkart offer quantities always reflect the latest available stock from your Base.com inventory. The plugin synchronizes available quantities at regular intervals and, in addition, if enabled, can automatically end listings with zero stock, preventing overselling and maintaining listing accuracy.
By keeping your stock levels synced, you minimize order cancellations, improve buyer trust, and comply with Flipkart’s seller performance standards.
Step 6: Ekart Logistics – Sending the Package
For shipments via Ekart Logistics (Flipkart’s own courier service), Base.com supports direct handover and tracking.
Instructions:
- Go to Integrations → Ekart Logistics in Base.
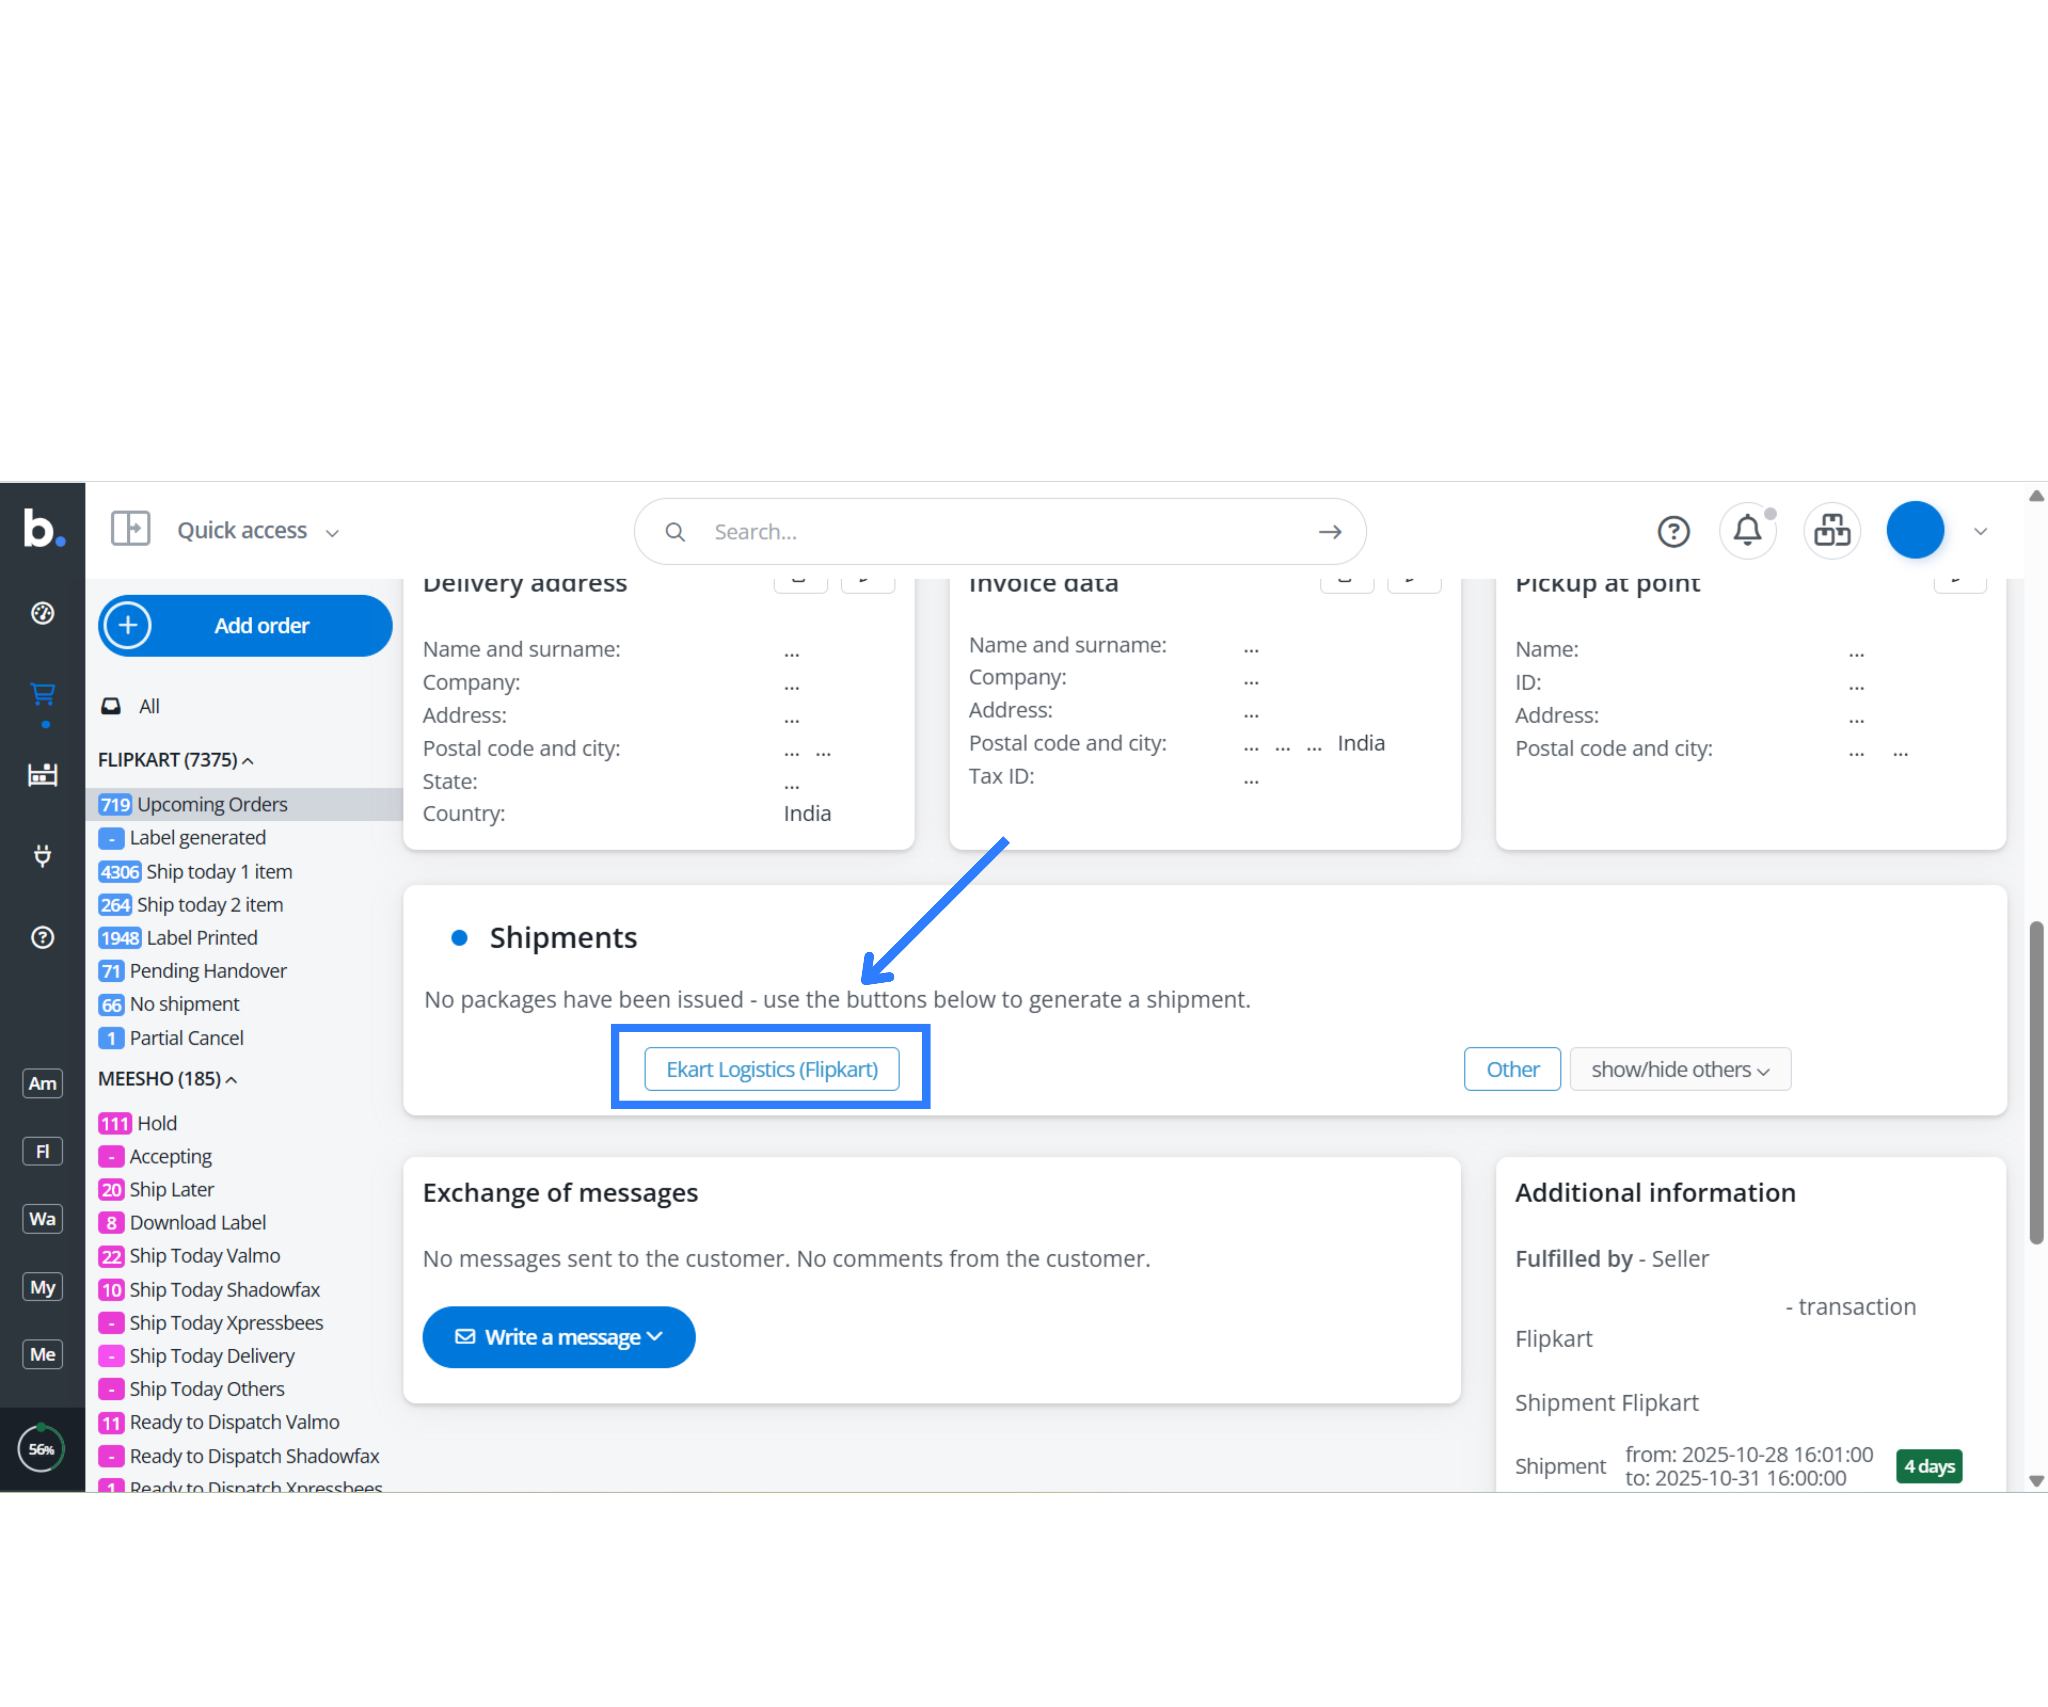
- Select the orders you want to ship.
- Click “Send Package – Ekart Logistics.”
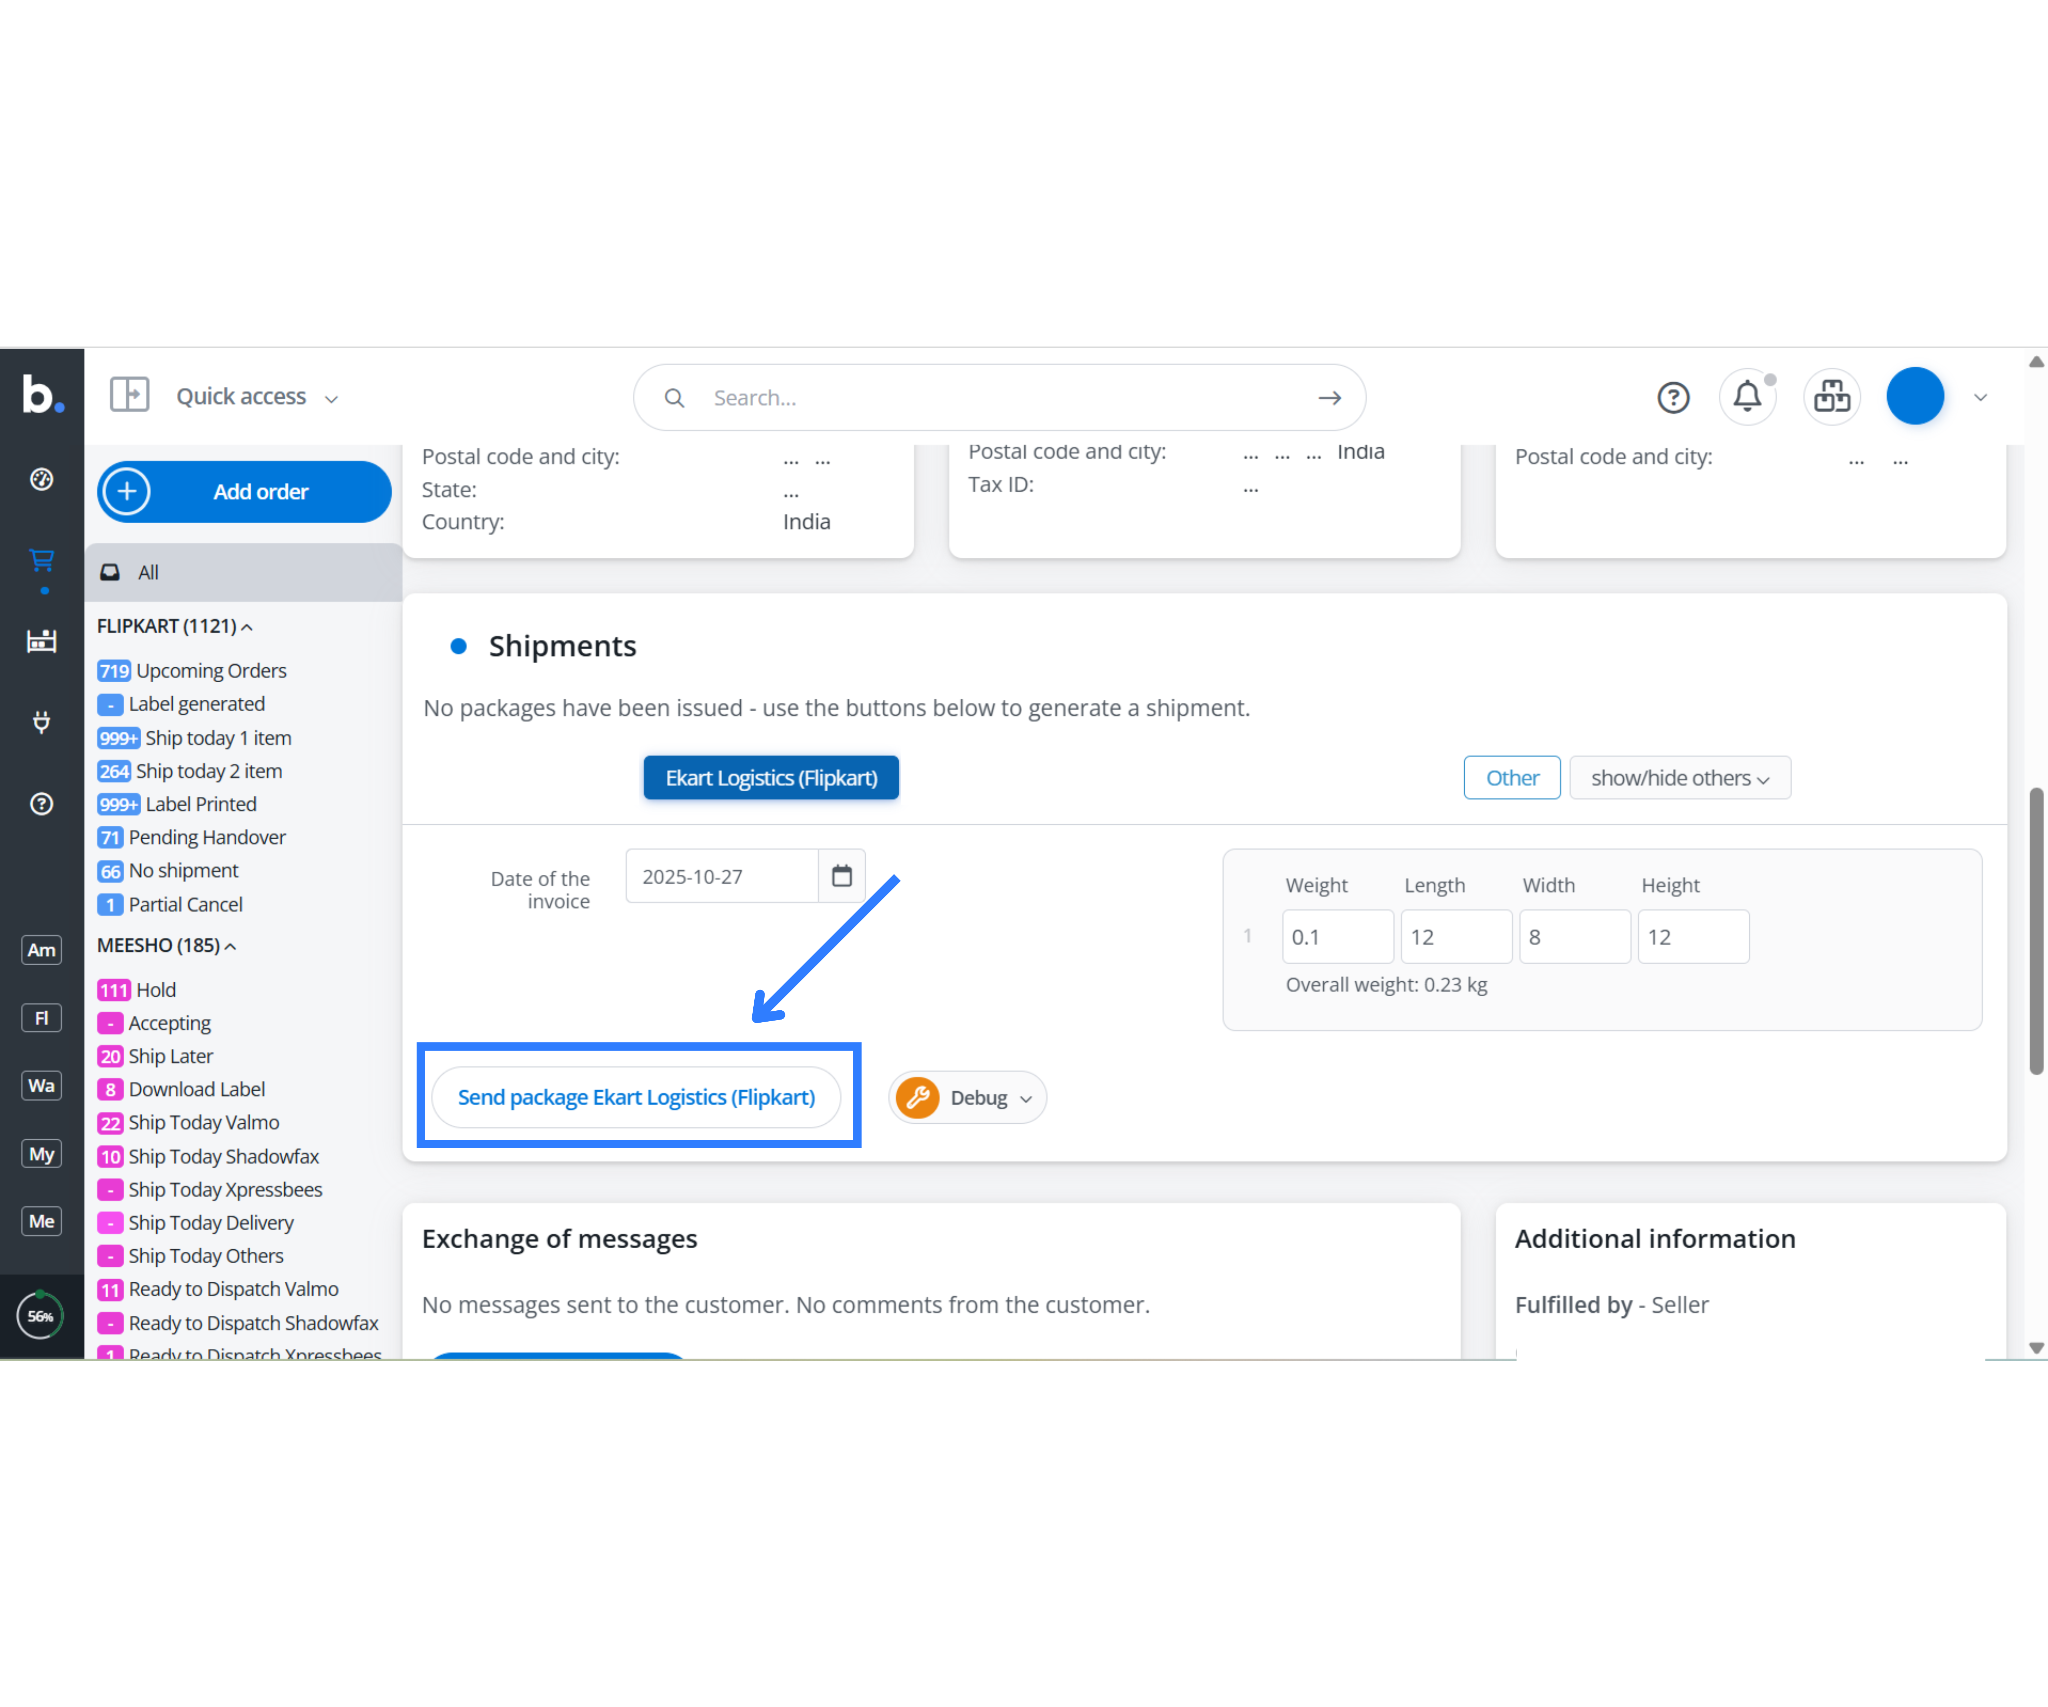
- Ensure you fill in the weight and dimensions for each package.
- These values are mandatory for label generation.
- If they’re missing, you can manually edit them before proceeding.
Without accurate package dimensions, Ekart will reject label generation and delay dispatch.
Step 5: Download Labels, Invoices & Mark RTD
After sending the package to Ekart, Flipkart generates both the shipping label and the invoice.
Steps:
- Go to the “Labels” tab in Base.
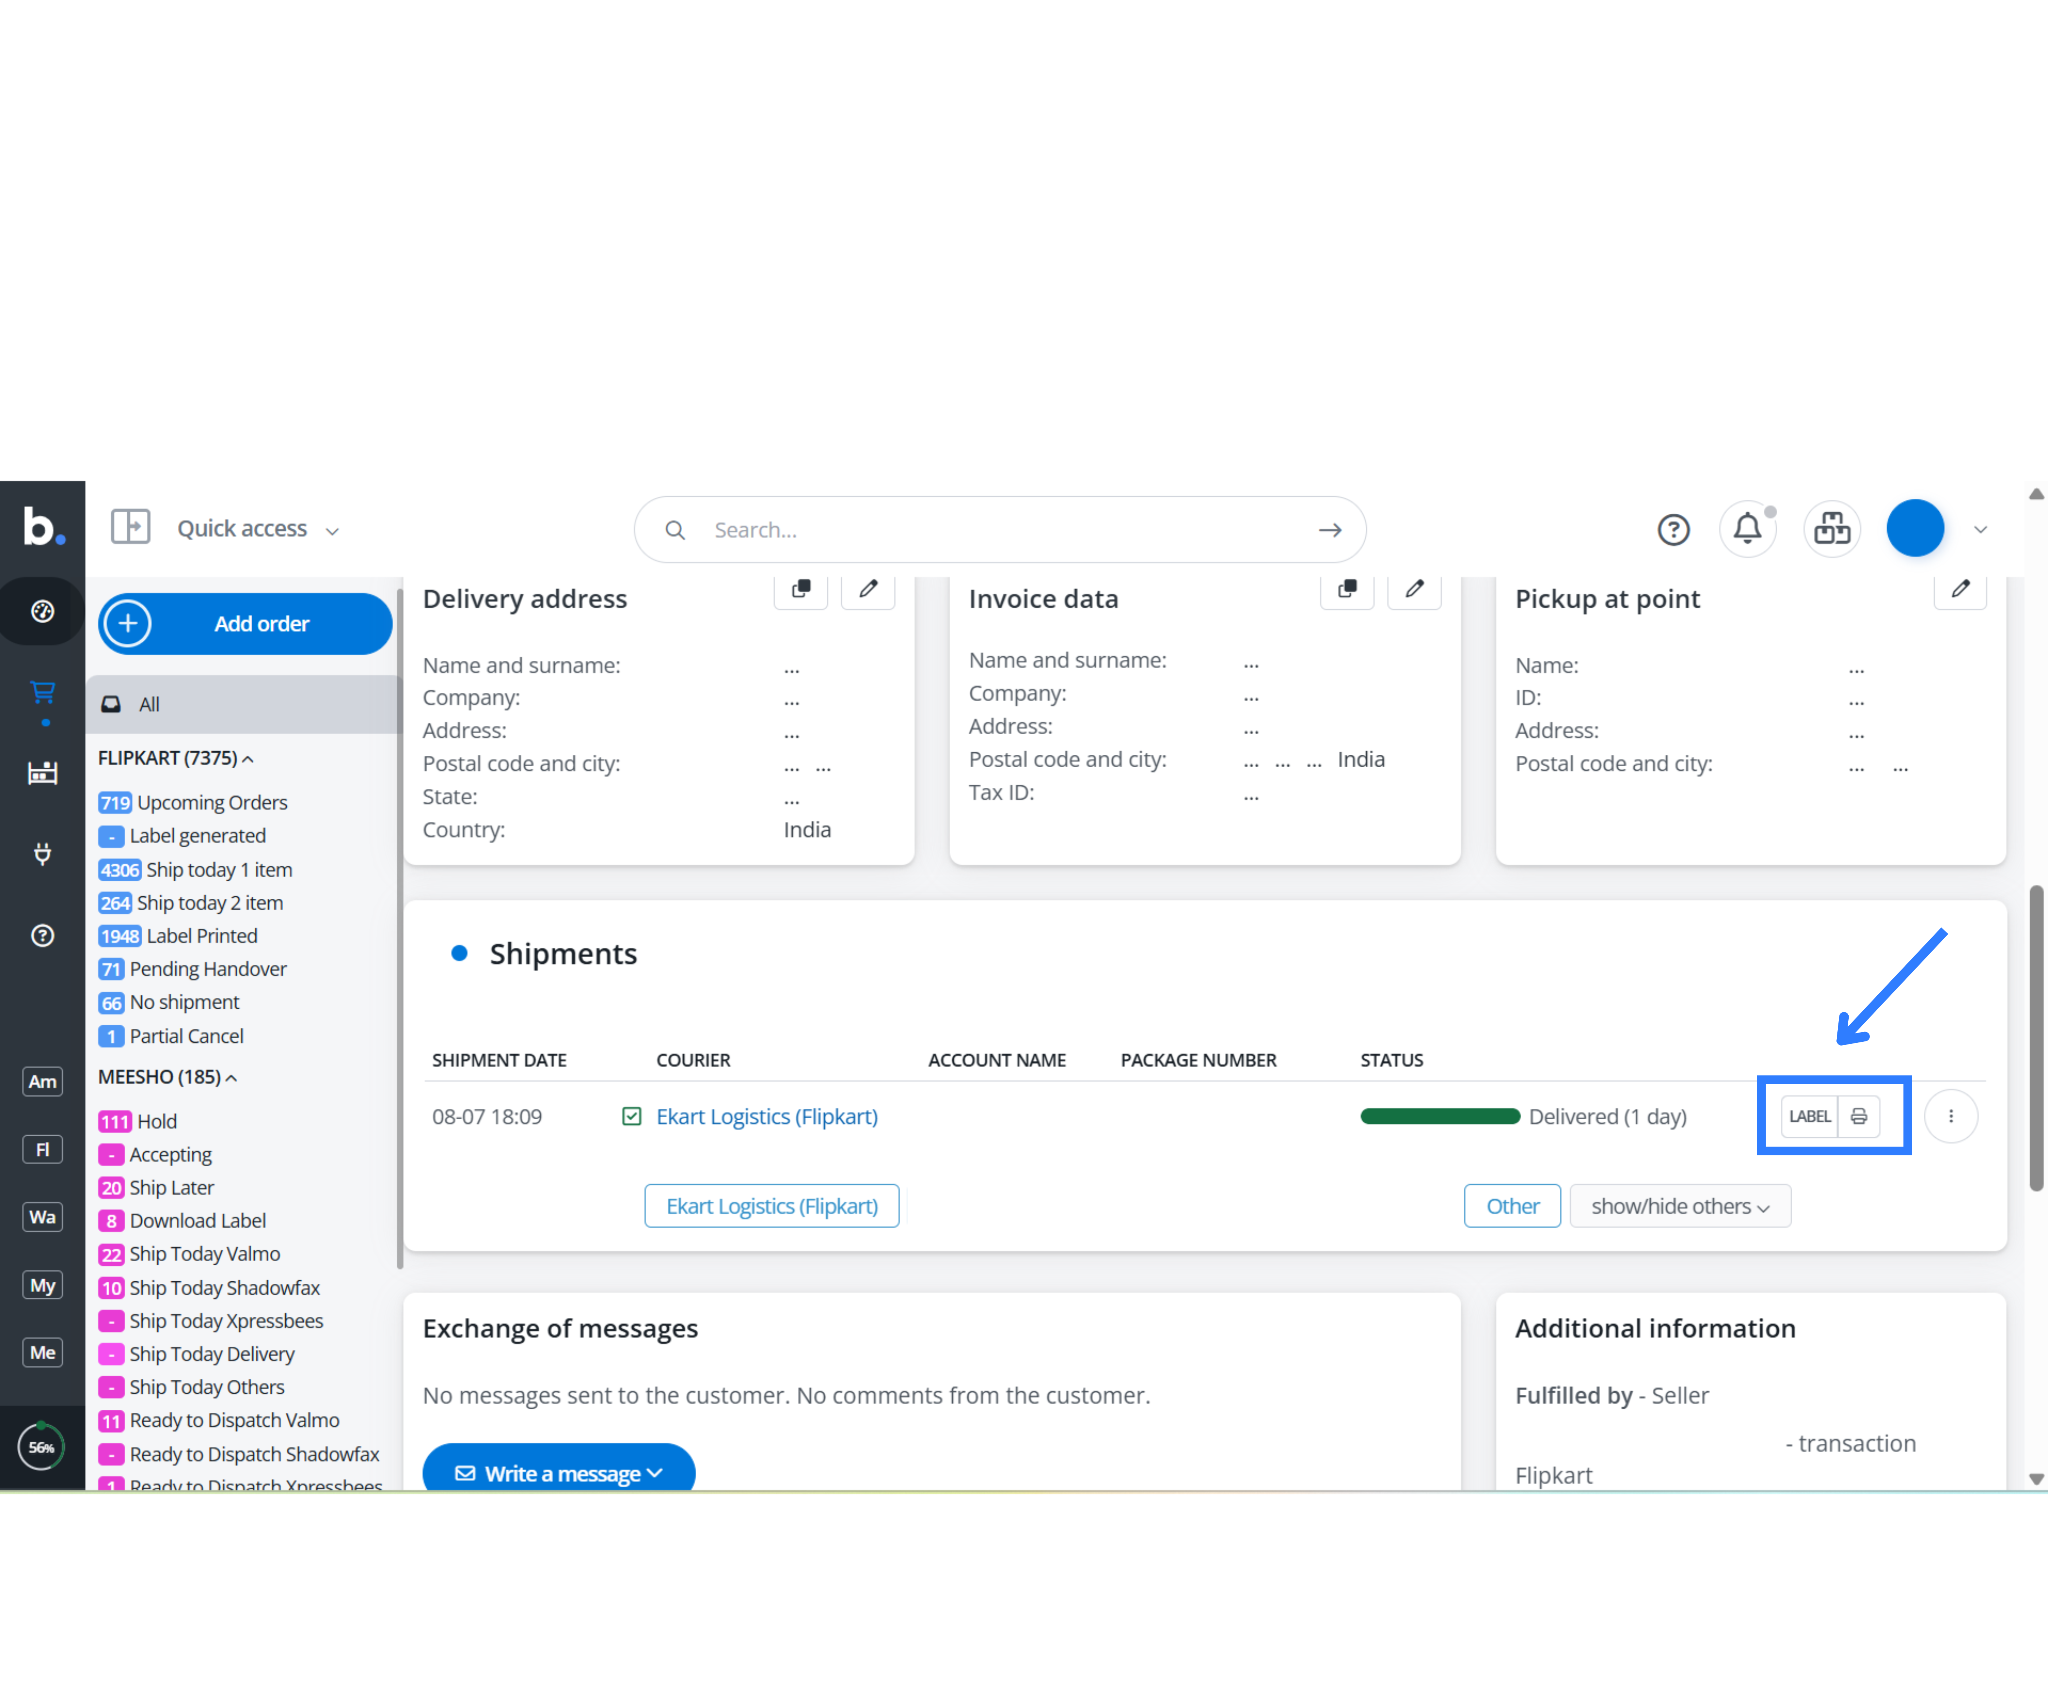
- Download the:
- Shipping label (required for pickup)
- Invoice (required for handover and compliance)
- The order status will now be marked as “Pending RTD” on Flipkart.
To finalize the RTD status:
- Select the order again in Base.
- Change the status to “Pending Handover.”
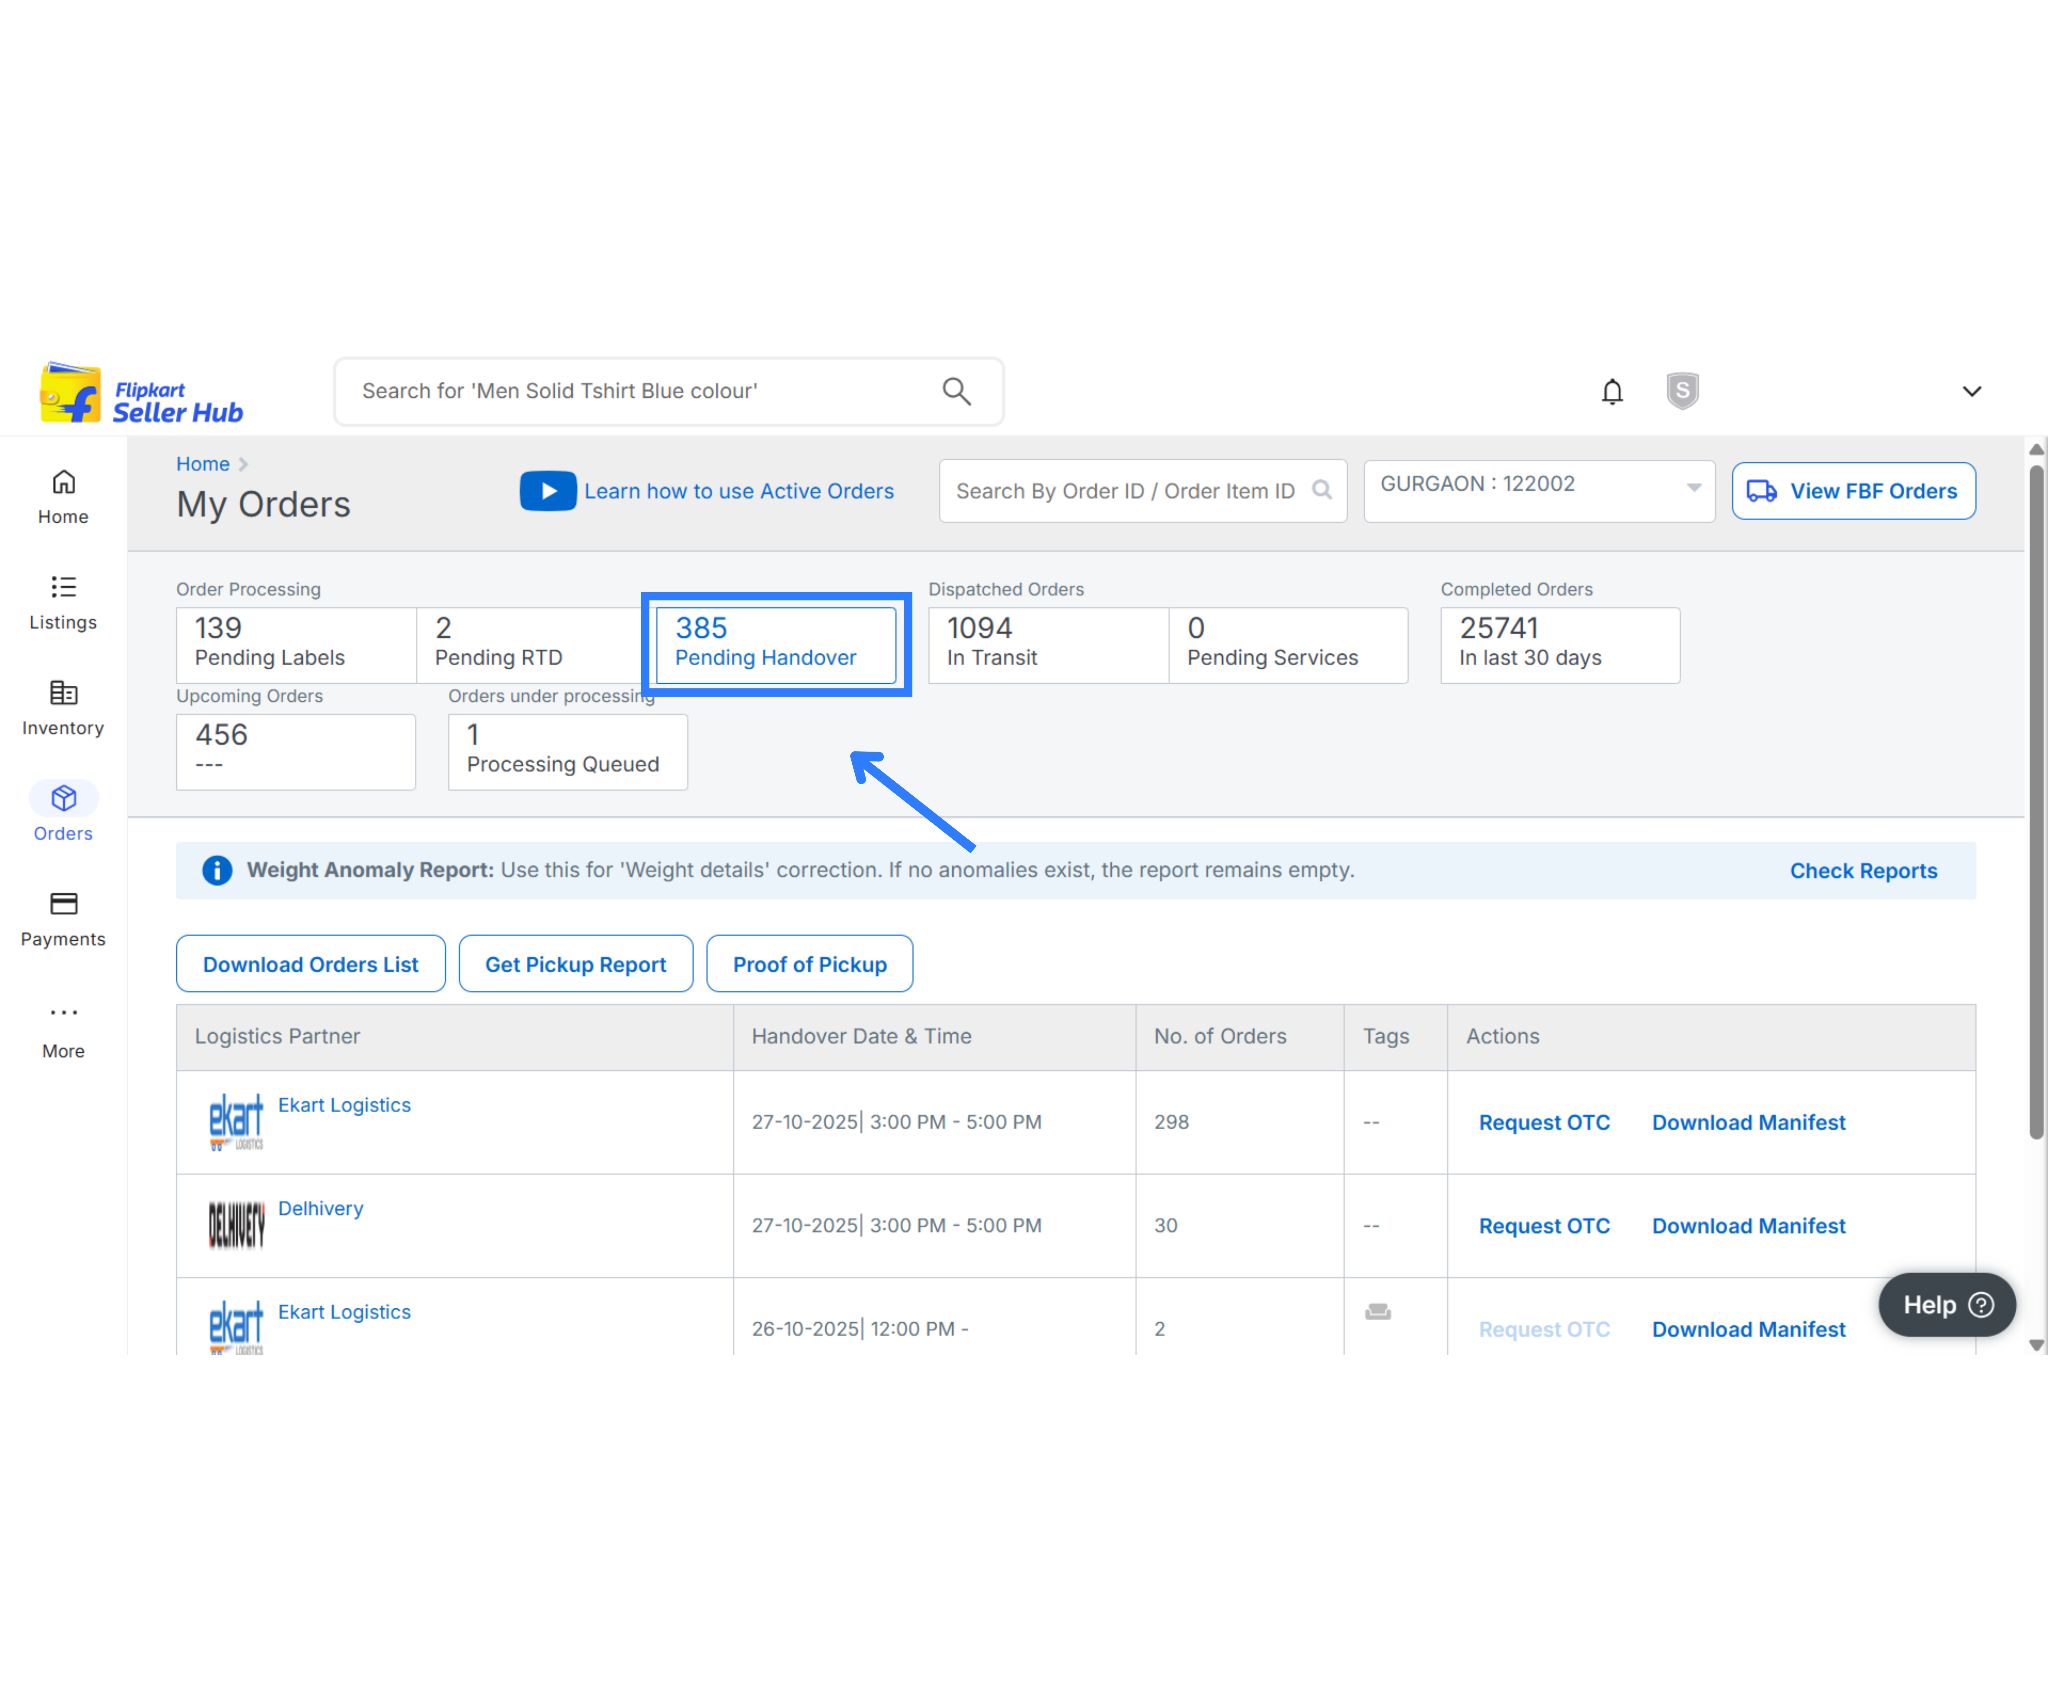
- Base will automatically update Flipkart and confirm that the order is Ready to Dispatch.
Step 6: Manifest Download and Forward OTC (One-Time Code)
After you mark your orders as RTD, generate the shipping manifest and retrieve the Forward OTC for Ekart handover.
Steps:
- Go to Shipping Integrations → Ekart Logistics in Base.
- Locate the shipments scheduled for dispatch.
- Click on “Download Manifest.”
- The Forward OTC (One-Time Code) will be displayed.
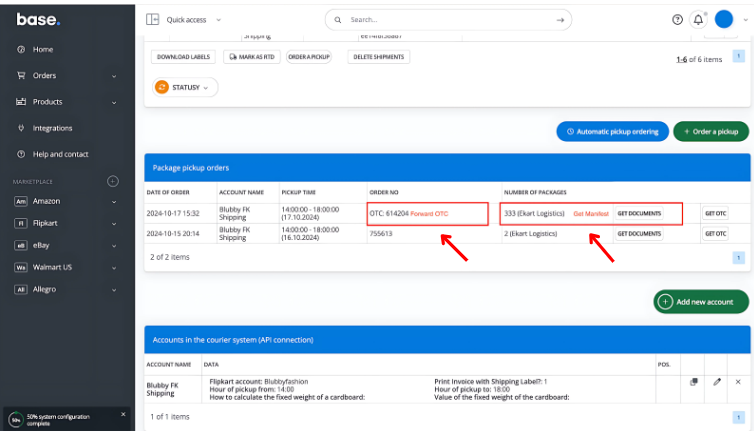
This OTC is mandatory during physical handover of packages to Ekart’s delivery personnel. Therefore, always present the manifest and OTC when requested.
Summary
The Base integration adds significant value by automating routine tasks, eliminating manual data entry, reducing dispatch errors, and syncing order statuses in real time. It also supports direct integration with Ekart Logistics, ensuring accurate label generation and streamlined handovers using manifest and Forward OTC. With centralized control and operational efficiency, Base empowers Flipkart sellers to scale confidently while maintaining full visibility and compliance.
Connect your marketplaces, generate shipping labels instantly, and grow your brand without the chaos. Register now to start in just a few minutes.
FAQs: Flipkart Integration with Base.com
1. How do I get my Flipkart Location ID for order syncing?
Flipkart Location IDs identify your fulfillment warehouse. If your Location ID doesn’t populate automatically during setup in Base, then click the “Download” button in the Flipkart integration panel. Wait a few seconds for the system to fetch and sync your available fulfillment locations. Please confirm that Flipkart has registered and approved your warehouse.
2. What should I do if my labels are not generated in Base for Flipkart orders?
Label generation requires accurate package dimensions and weight details. If these values are missing, then Flipkart’s system may reject the request. Therefore, before generating labels, make sure that each order has the weight and size fields filled out. You can manually edit this information in Base under the order details. Additionally, verify that your integration is active and synced correctly.
3. Can I use Base to fulfill Flipkart orders with my own logistics partner?
Yes, but only if your Flipkart seller account has self-shipment enabled. In Base, go to the Flipkart integration settings and enable “Self Shipment” along with the relevant extra fields. This will allow you to manage and update tracking manually. However, for most sellers using Ekart Logistics, Base supports automated shipping, manifest creation, and Forward OTC generation for smoother order processing.