This guide will help you understand Myntra (PPMP) Integration and independently integrate Myntra with your Base Panel using the PPMP (Pure Play Marketplace) model. This model supports only Myntra Logistics for pickup and delivery.
Step 1: Migrate OMS and Set Up Integration
Before you begin, ensure the following:
- All open orders are processed and inventory is set to zero
- A migration ticket is raised with Myntra for switching OMS to Base
- Your Myntra account has been validated post-migration by their team
Once that’s done, proceed with the following:
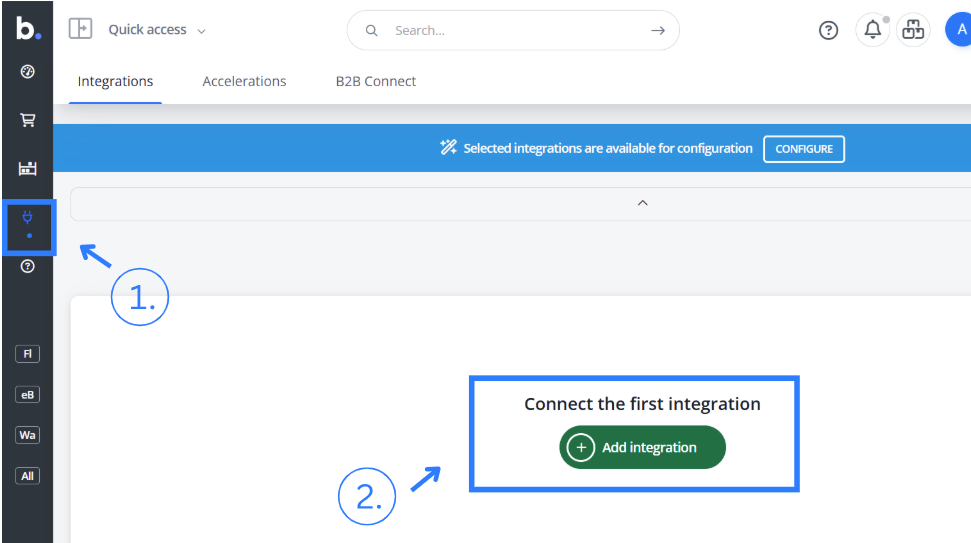
- In your Base account, go to the Integrations section.
- Click Add Integration and select Myntra (PPMP) from the Marketplace options.
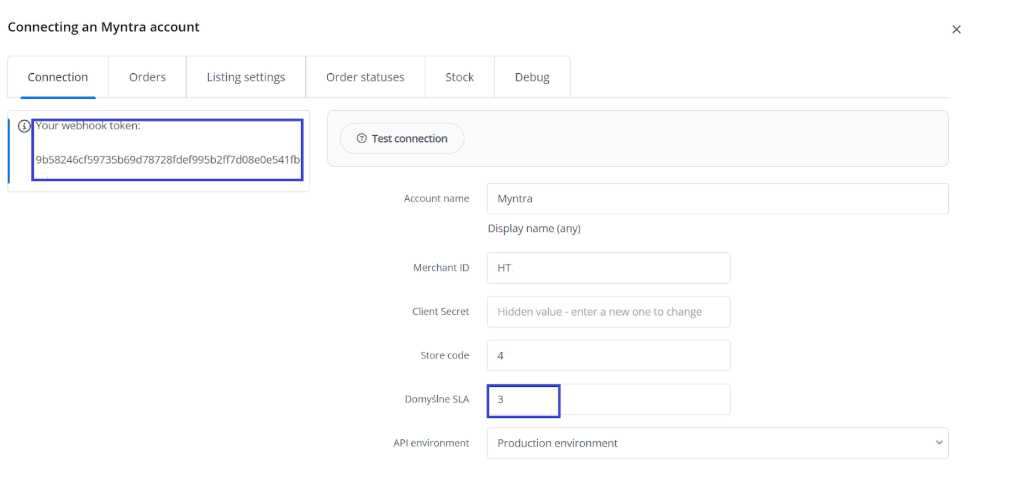
- Fill in these fields:
- Store Code (mandatory)
- Merchant ID
- Client Secret
- SLA (as defined by Myntra for your category)
You will receive Store Code, Merchant ID, and Client Secret in the response with the OMS migration ticket to Myntra. Ensure you clearly mention these details in the ticket for reference.
- Save your settings.
Base will automatically generate a webhook token. Share this token with the Myntra team as part of your OMS migration ticket. This establishes the OMS connection and enables the system to sync orders and inventory.
Integration Notes:
Step 2: Order Fetching in Myntra Integration
Base.com supports automated order syncing with Myntra Partner Portal, allowing sellers to process orders efficiently through the Base.com system. This module fetches new orders at regular intervals and maps key product data like SKU, thumbnails, MRP, and style IDs, based on your preferences. It ensures your orders in Base reflect the correct inventory, pricing, and catalog details, aligned with Myntra’s ecosystem.
Myntra Order Fetching Settings Explained
| Setting | Options | Description |
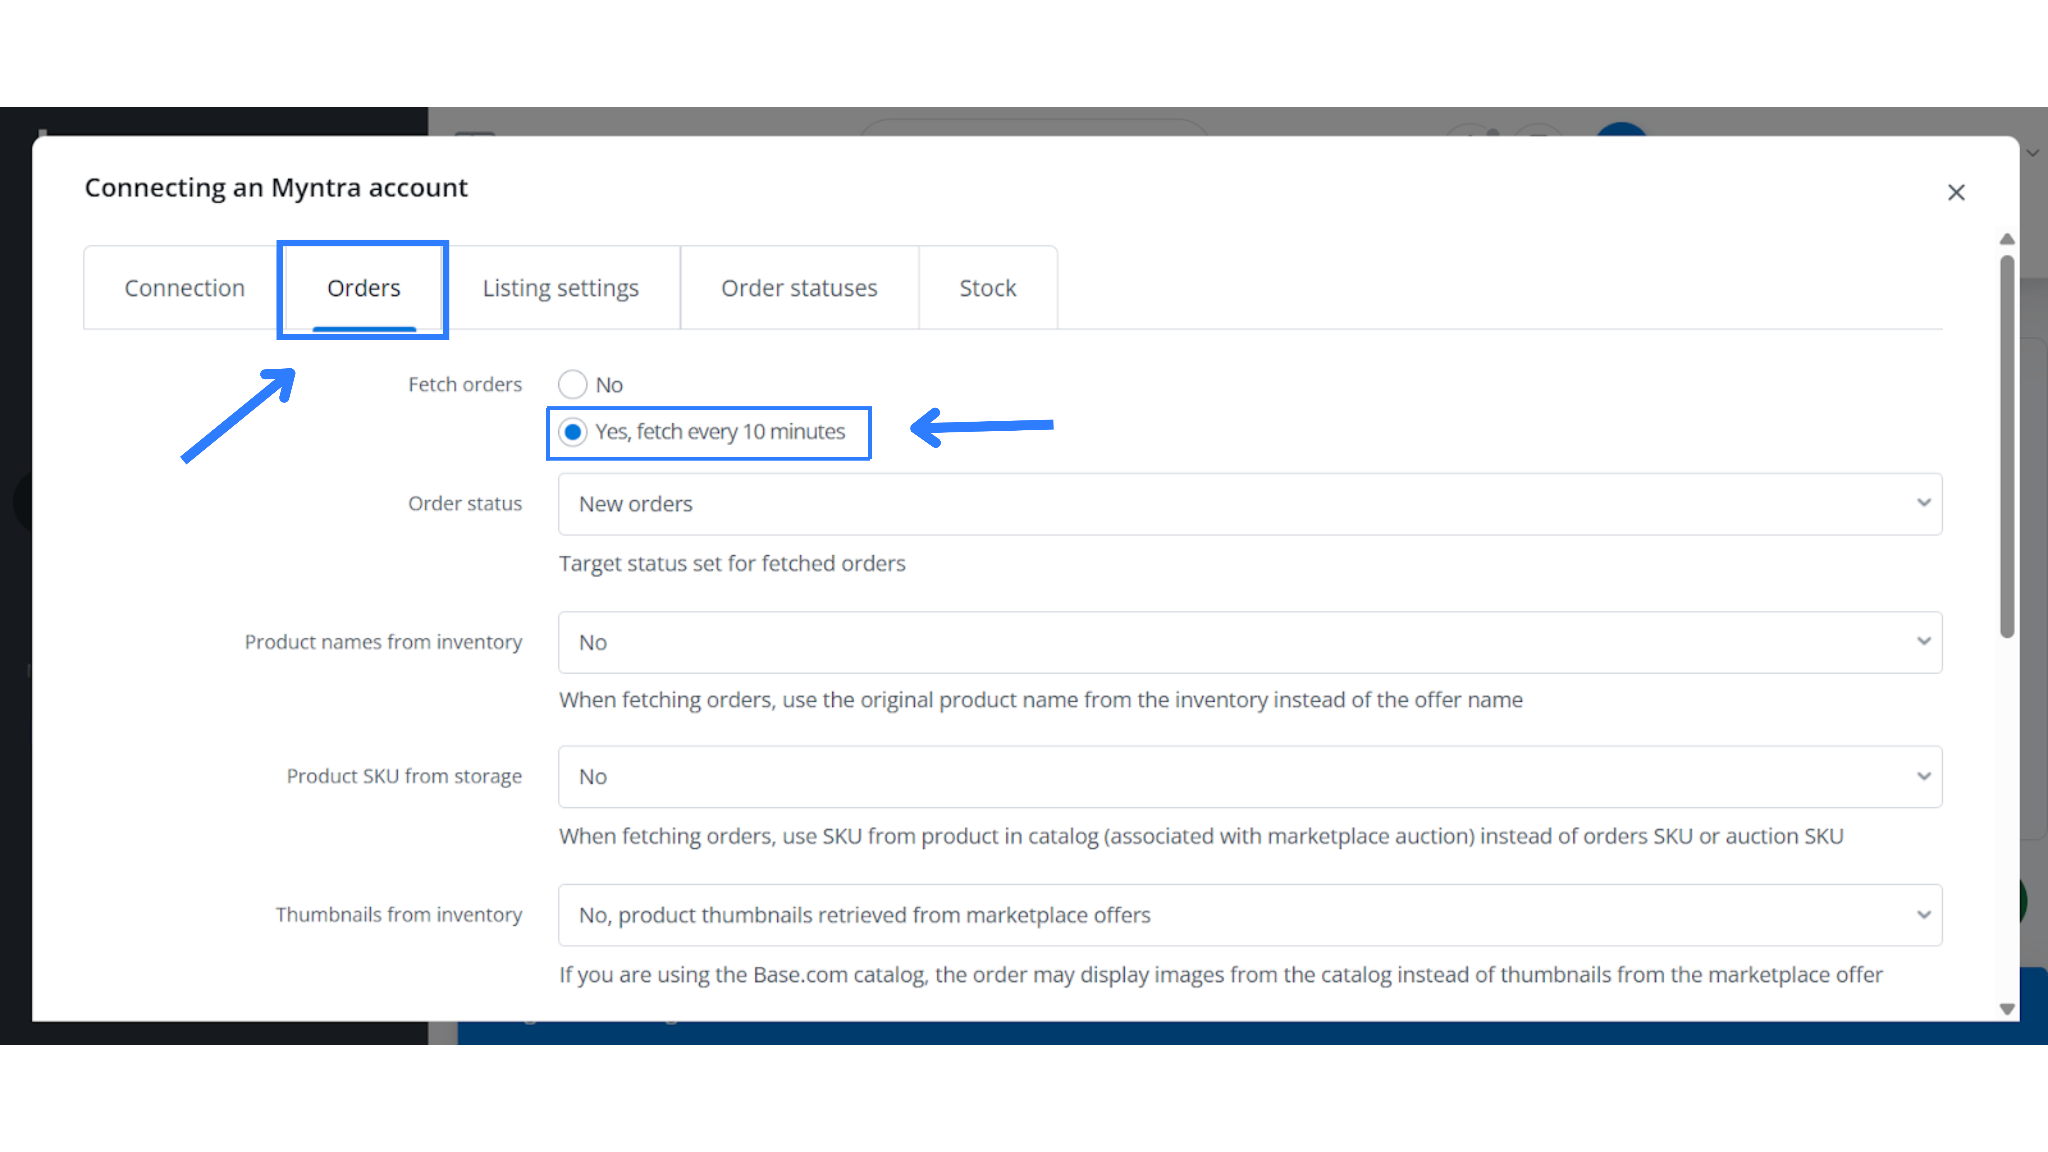
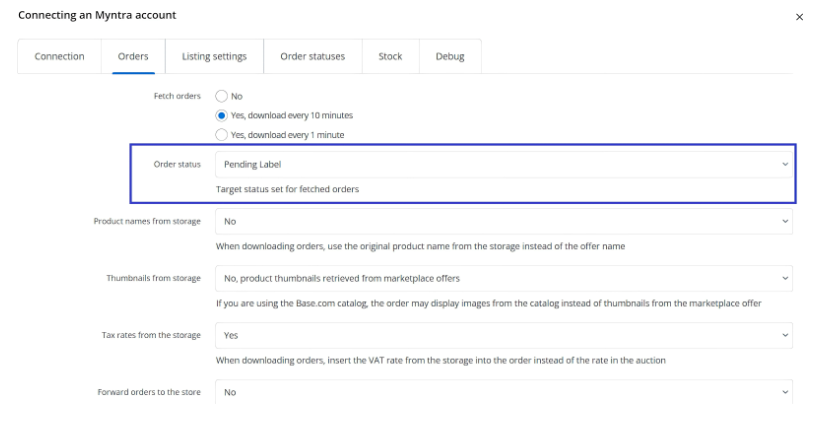
| Fetch Orders | No / Yes (every 10 minutes) | Automatically pulls new orders from Myntra every 10 minutes into Base.com for processing. |
| Order Status | New Orders | Fetches only newly placed or unfulfilled orders from Myntra. |
| Target Status for Fetched Orders | [Custom Status] | Sets a default status (e.g., “Pending labels/ New orders”) in Base.com for all new orders imported from Myntra. |
| Product Names from Inventory | Yes / No | Uses product name from your Base catalog instead of the product title provided in the Myntra order. |
| Product SKU from Storage | Yes / No | Replaces the order’s SKU or listing SKU with the SKU stored in your Base catalog (useful for SKU consistency). |
| Thumbnails from Inventory | Yes / No | Displays product images from your internal Base catalog rather than from Myntra’s offer thumbnails. |
| Tax Rates from Storage | Yes / No | Pulls VAT/GST rates from your Base inventory, overriding any tax data from Myntra’s order. |
| Forward Orders to the Store | Yes / No | Forwards fetched orders from Myntra to a connected ecommerce platform (e.g., Shopify) for central processing, if enabled. |
| Tag Loop Enabled | Yes / No | Enables internal automation rules based on tags applied to order items (used for filtering or workflow triggers). |
| Download Order Product Name from Offer | Yes / No | Uses the product name directly from the Myntra offer, instead of your catalog. |
| Download Order Product MRP | Yes / No | Fetches MRP (Maximum Retail Price) from Myntra for pricing, invoicing, and margin tracking. |
| Download Order Product Style ID | Yes / No | Retrieves the product Style ID used by Myntra for fashion/apparel SKUs, essential for matching inventory and reconciling variants. |
Step3: Myntra Listing Settings – Base.com
Myntra requires highly structured product listings with accurate inventory, pricing, and variant mapping. Base.com allows sellers to manage how these details are sourced and sent to Myntra, ensuring accurate listings, consistent catalogs, and compliance with platform standards. 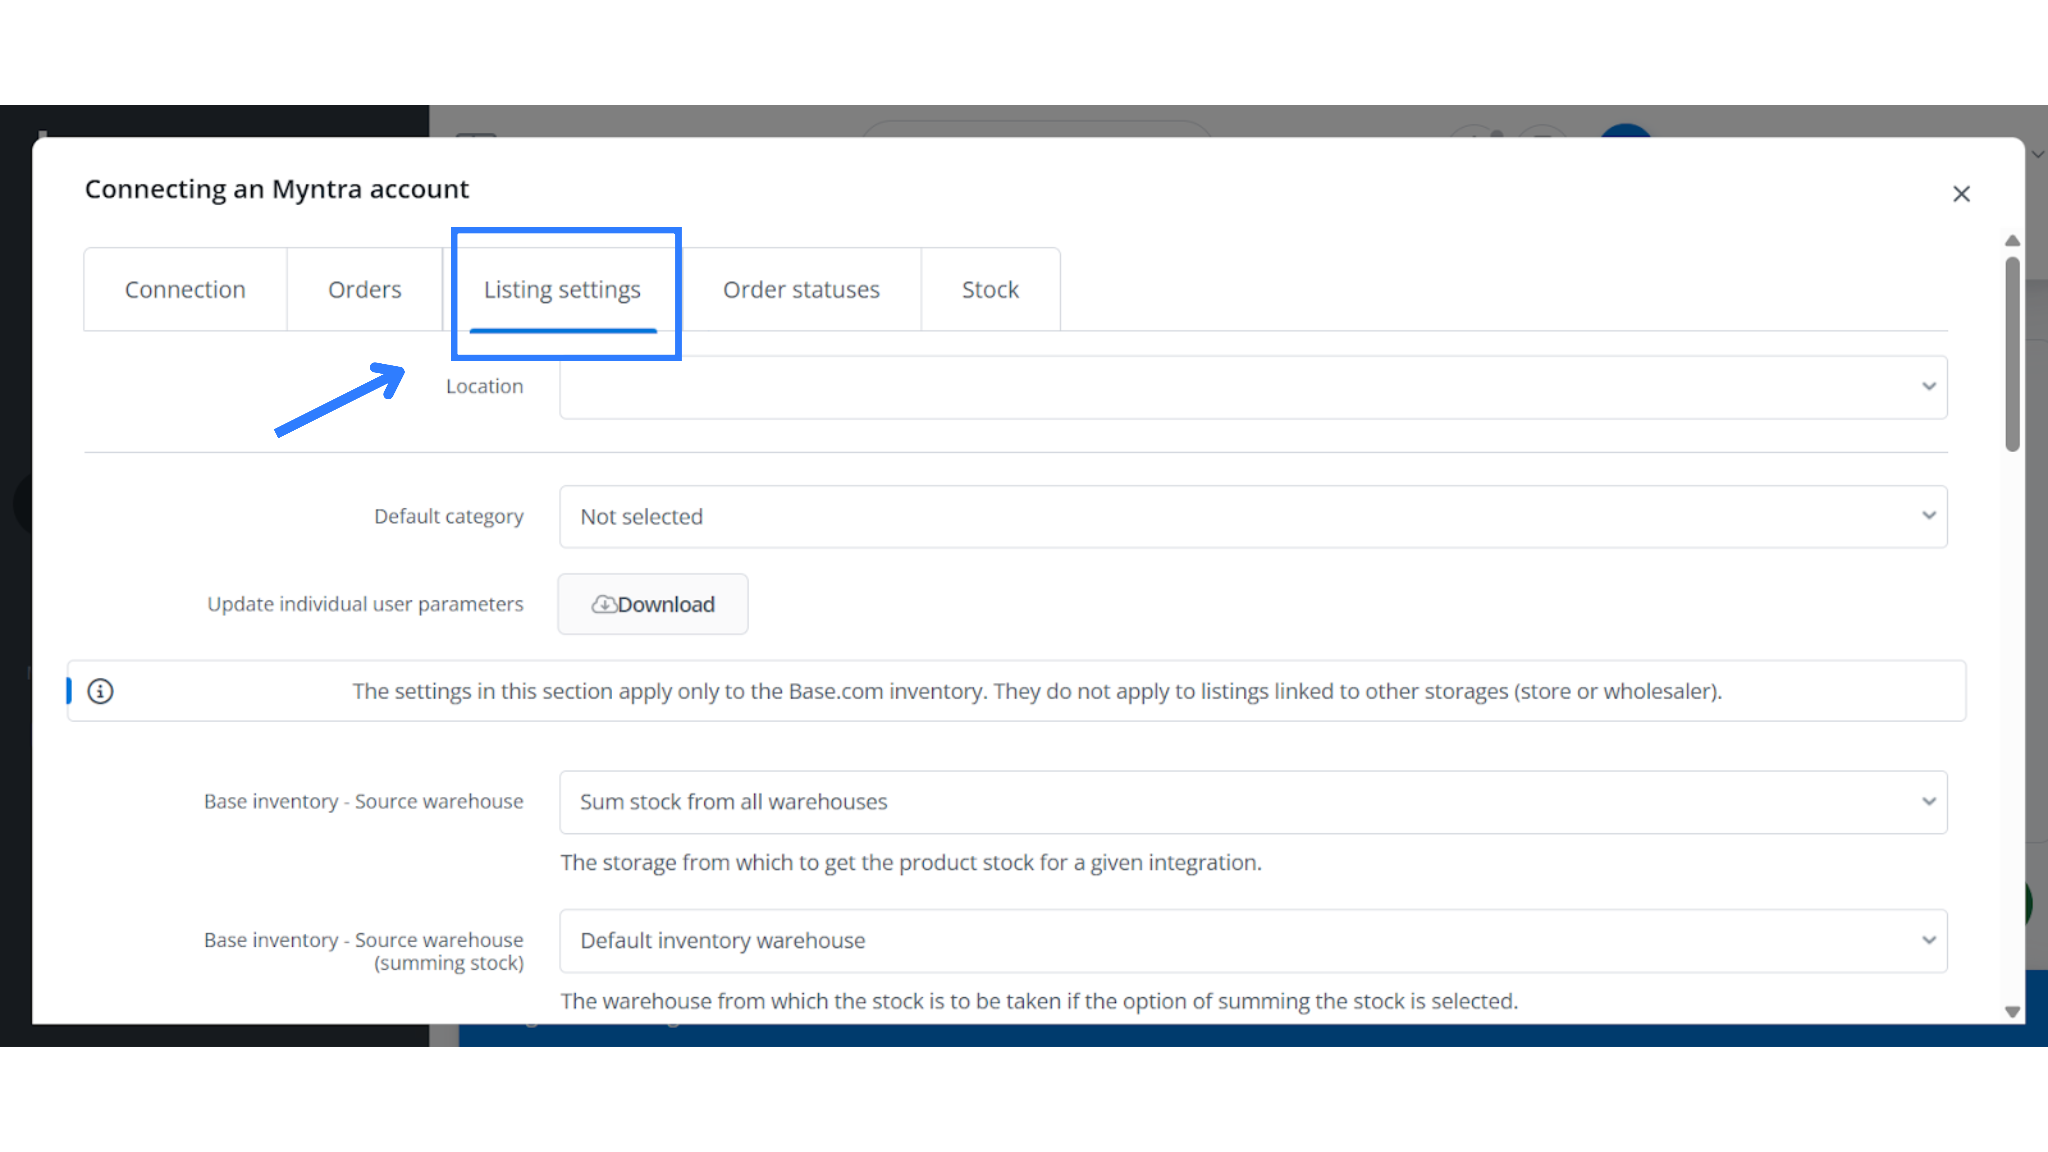
Listing Configuration Table
| Setting | Description |
| Location | The physical dispatch location (e.g., warehouse) from where the Myntra orders will be shipped. It must match the configuration in the Myntra Partner Portal. |
| Default Category | Optional fallback category for products being listed to Myntra. This is useful when no category is defined at the item level. |
| Update Individual User Parameters | Applies only to Base.com inventory. Does not affect products pulled from stores or wholesalers connected to your Base account. |
| Base Inventory – Source Warehouse | Sets which warehouse is used to pull available stock for each listing. |
| Sum Stock from All Warehouses | Combines inventory from multiple warehouses to calculate total available quantity for listing purposes. |
| Default Inventory Warehouse | The primary warehouse used when stock summing is enabled. |
| Bundles – Sum Stock | Calculates stock availability for product bundles by summing across all warehouses. |
| Base Inventory – Price Group | Assigns the default price group (standard selling price) for products being listed on Myntra. |
| Promotional Price Group | Optional setting to define a separate group for discounted or campaign pricing. If not set, the system uses standard prices. |
| Price Multiplier | Automatically increases or decreases the listing price before sending it to Myntra (e.g., add 10% margin). |
| Expanded Sections | Controls whether listing parameters (attributes, variants, etc.) are auto-expanded in the interface during offer creation. |
| Image Gallery – Image Order | Define the sequence of images in the gallery, based on your catalog setup. |
| Image Gallery – Number of Images | Specifies how many images should be uploaded to Myntra (e.g., only the first image). |
| Include Spaces in Gallery | If enabled, allows white space/margins in product images. Myntra typically requires plain backgrounds without borders. |
| Apply to Variants | Determines whether the above listing settings (images, price, etc.) also apply to variants. |
| Include Parent Product Images in Variants | If enabled, product variants (like sizes or colors) will inherit images from the parent item. |
| Maximum Available Quantity | Defines the upper limit of inventory that can be shown per product on Myntra. Prevents overselling in case of rapid demand. |
| Quantity Settings – Stock Limit | Ensures listings do not display more than actual available stock. Critical for avoiding stockouts or cancellations. |
| Variant Name | Controls how variant names (e.g., Size, Color) are constructed. “Default” uses standard formatting unless customized. |
| Copy SKU from Main Product | If a variant lacks its own SKU, this option copies the SKU from the main (parent) product. |
| Copy EAN from Main Product | Same logic as above, but for EAN/barcode fields; useful when all variants share a single barcode. |
| Name Filter | Customize product titles using tags like [auction_name], [sku], or [manufacturer]. Helps enforce consistent naming across listings. |
| Convert Name Case | Allows conversion of product title case (e.g., UPPERCASE, lowercase, Title Case). Default is “No change.” |
Step 4: Catalog Integration and Offer Mapping
To sync your catalog from Myntra into Base:
- Log into your Myntra seller panel and download the Operational Listing Report. This may take 2–3 hours to generate.
- In Base, go to Integrations > Myntra > Listing Management.
- Under Import Offers, select Import Now and upload the downloaded listing file.
- Alternatively, you can input SKUs manually (comma-separated) or select Download Offer from the dropdown and run the import.
Automatic Offer Mapping
Base will automatically attempt to associate imported listings with your inventory using:
- Product Name
- SKU
- EAN (barcode)
This uses a similarity index to map listings. Once the process is complete and stock sync is enabled, your catalog goes live on Myntra with real-time inventory updates.
Step 5: How to run Auction Import in Base.com
Myntra prevents sellers from directly fetching promotions and discounts from the seller panel. Therefore, importing Auctions is an essential step before initiating the Order Lifecycle. This ensures that all product data, offers, and discounts are properly synced, allowing the order process to run smoothly from the start. This falls under the Catalog Integration process:
- Obtain the Listing Report from the Myntra Seller Panel as part of the Catalog Integration process.
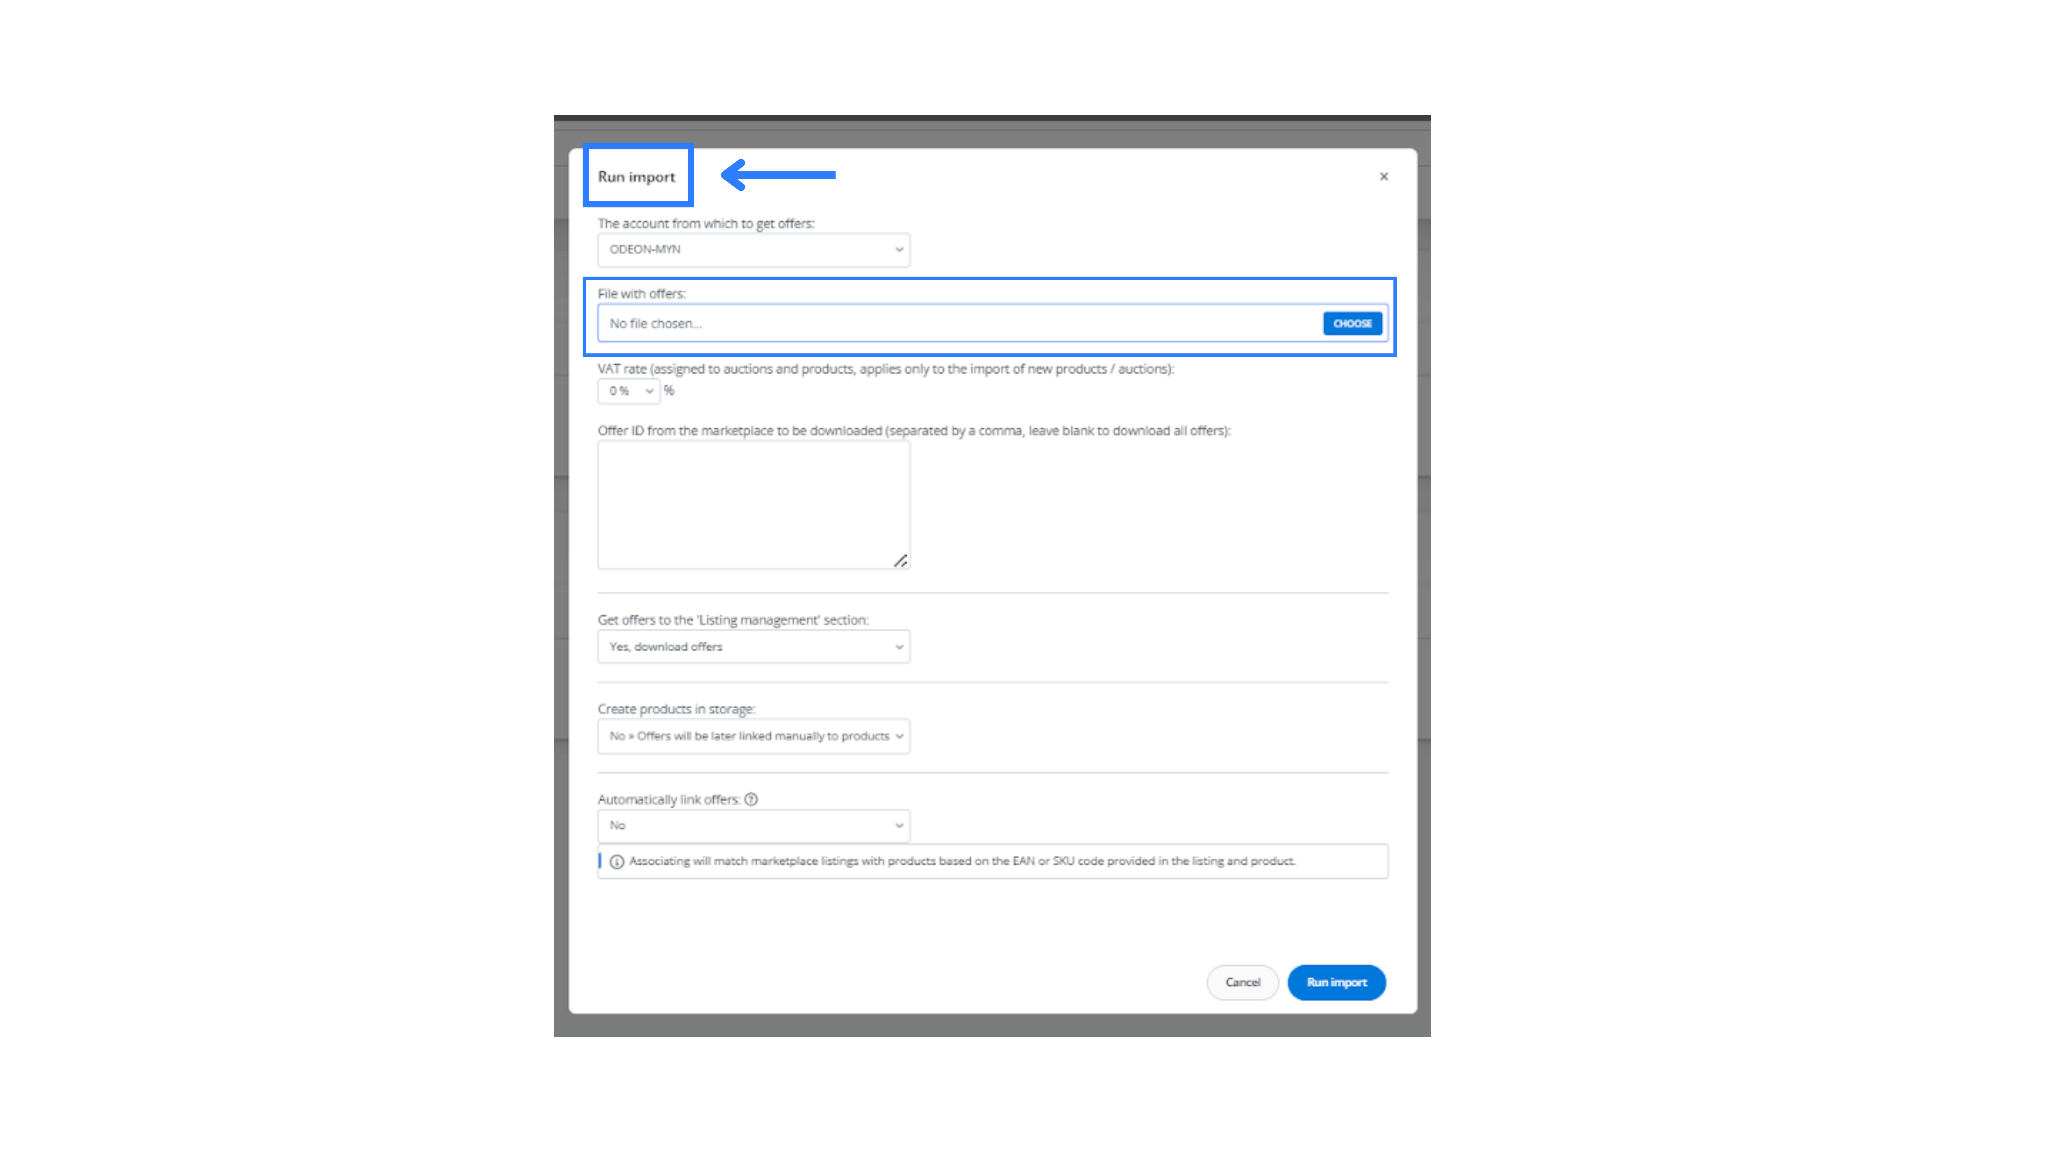
- Import the Listing File into the Myntra Listing Management Section by navigating to Import Now → File with Offers. The import process takes approximately 3 – 4 hours. Once completed, the products will be available in the Listing Management section.
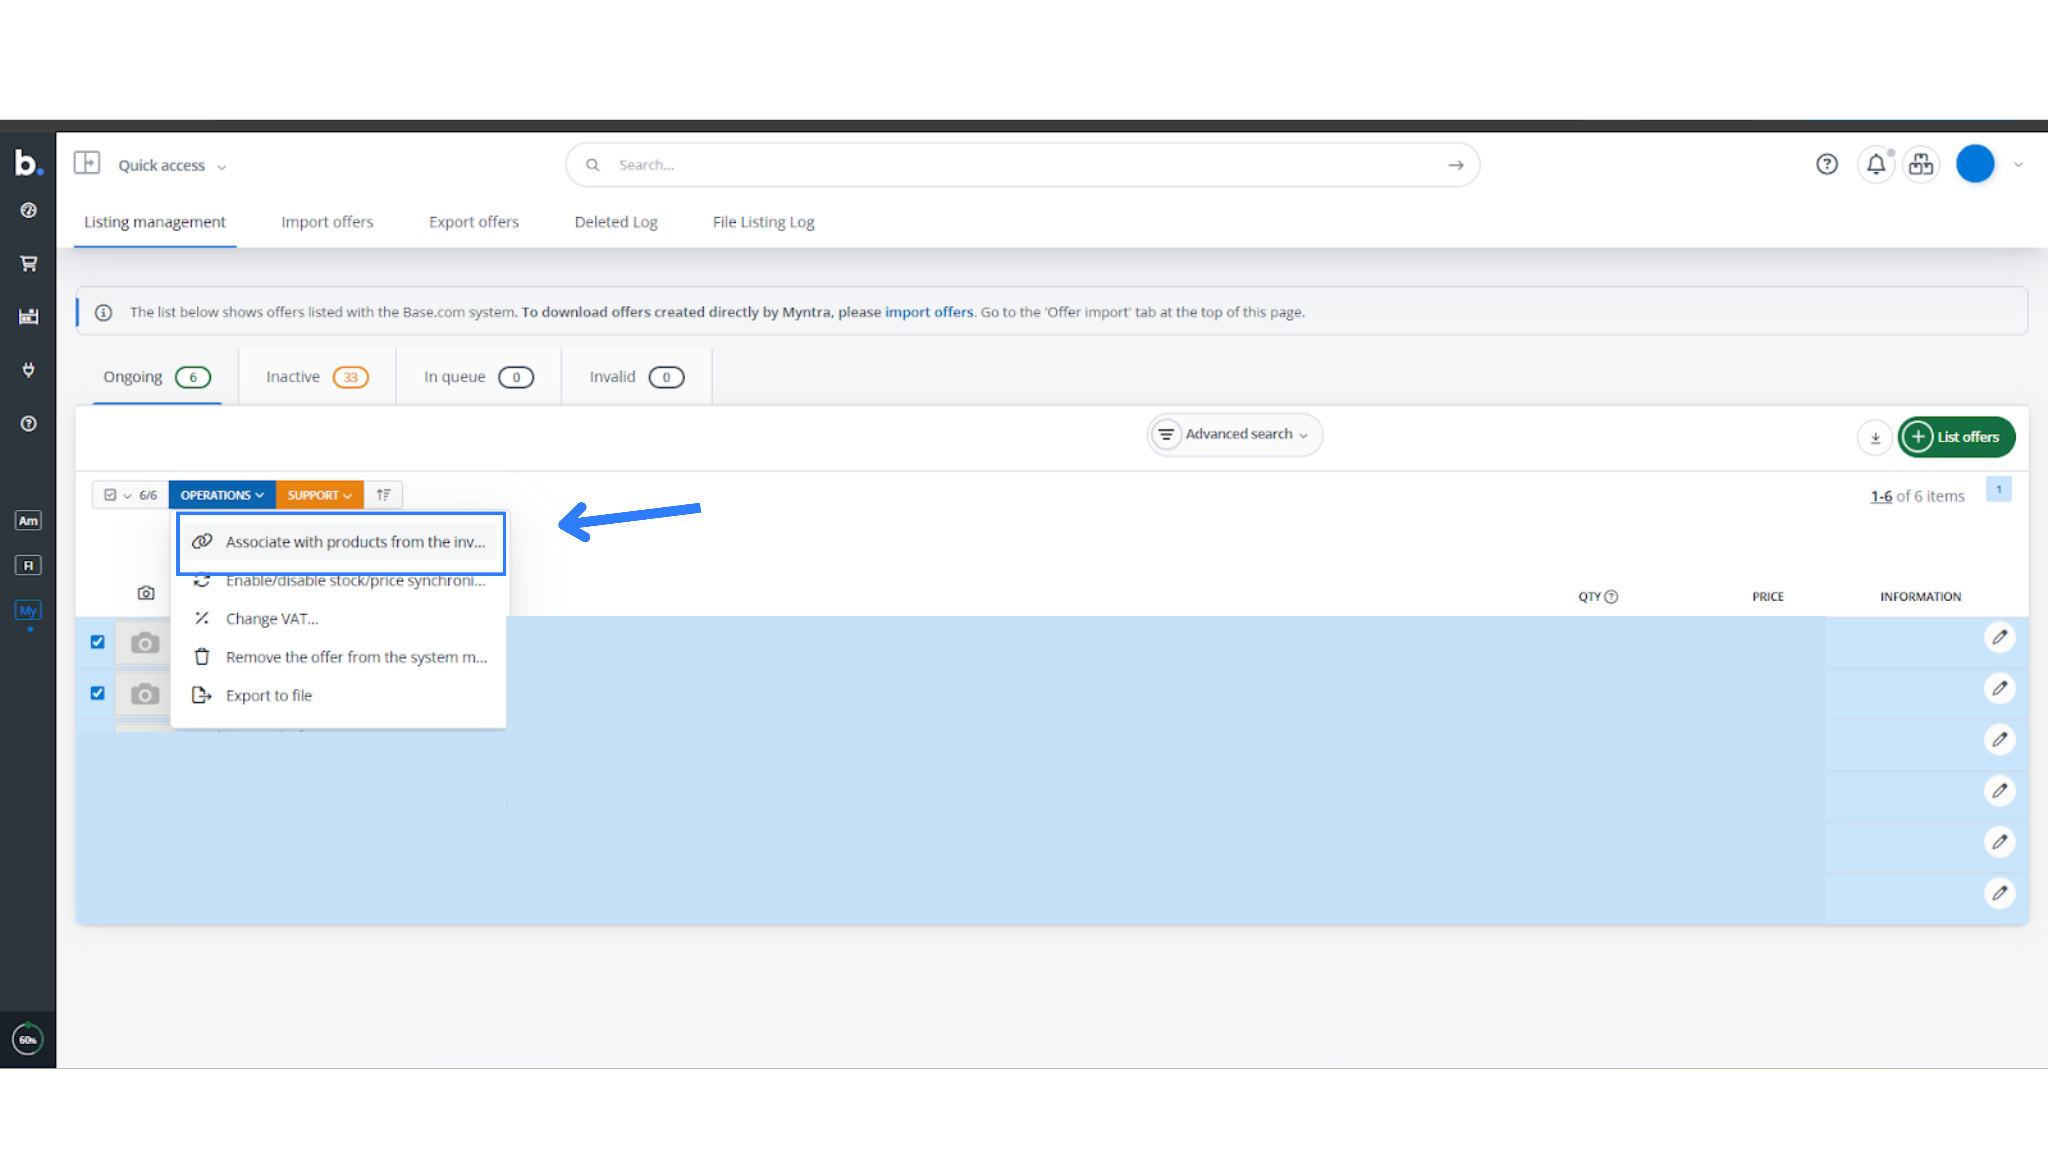
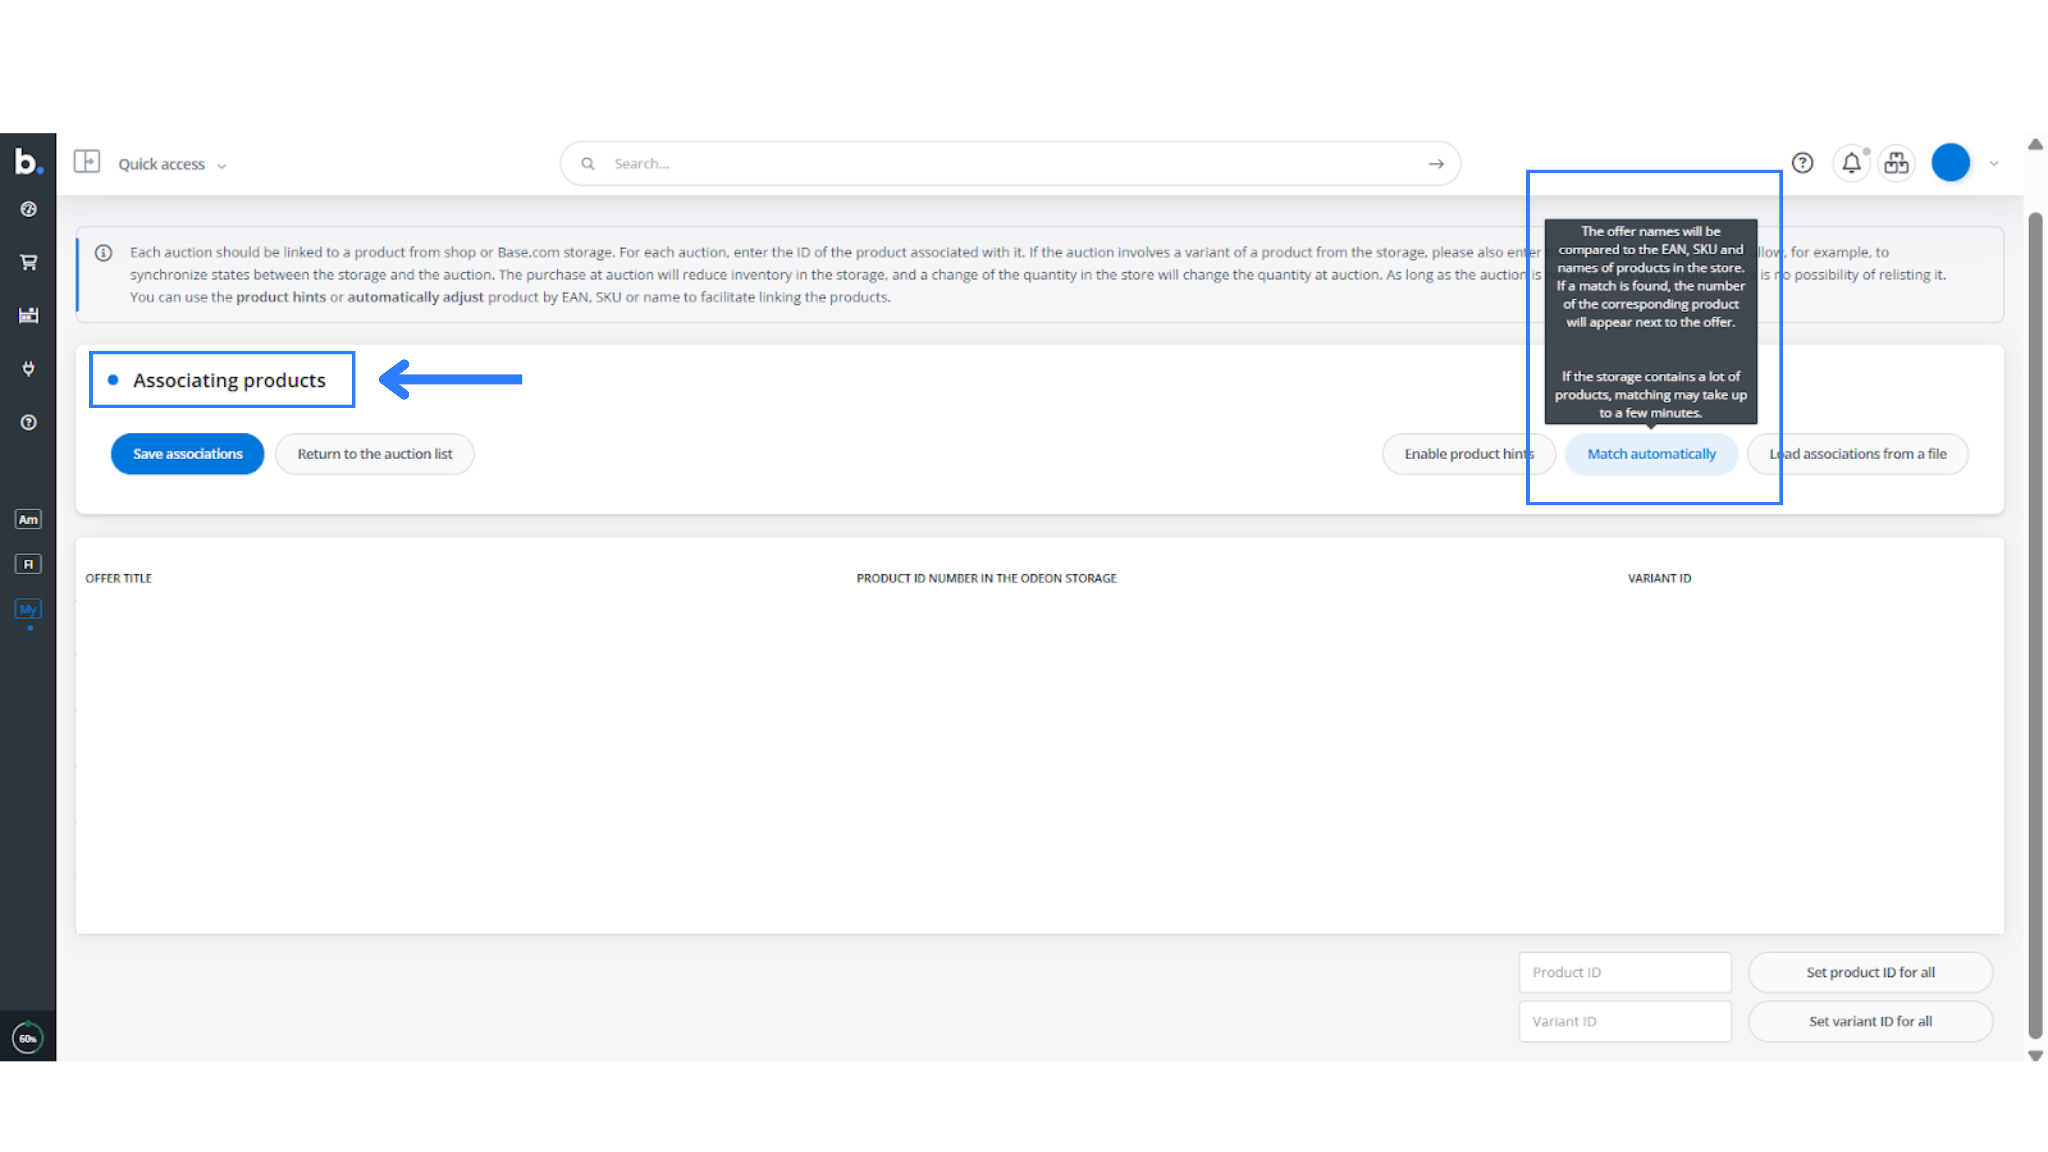
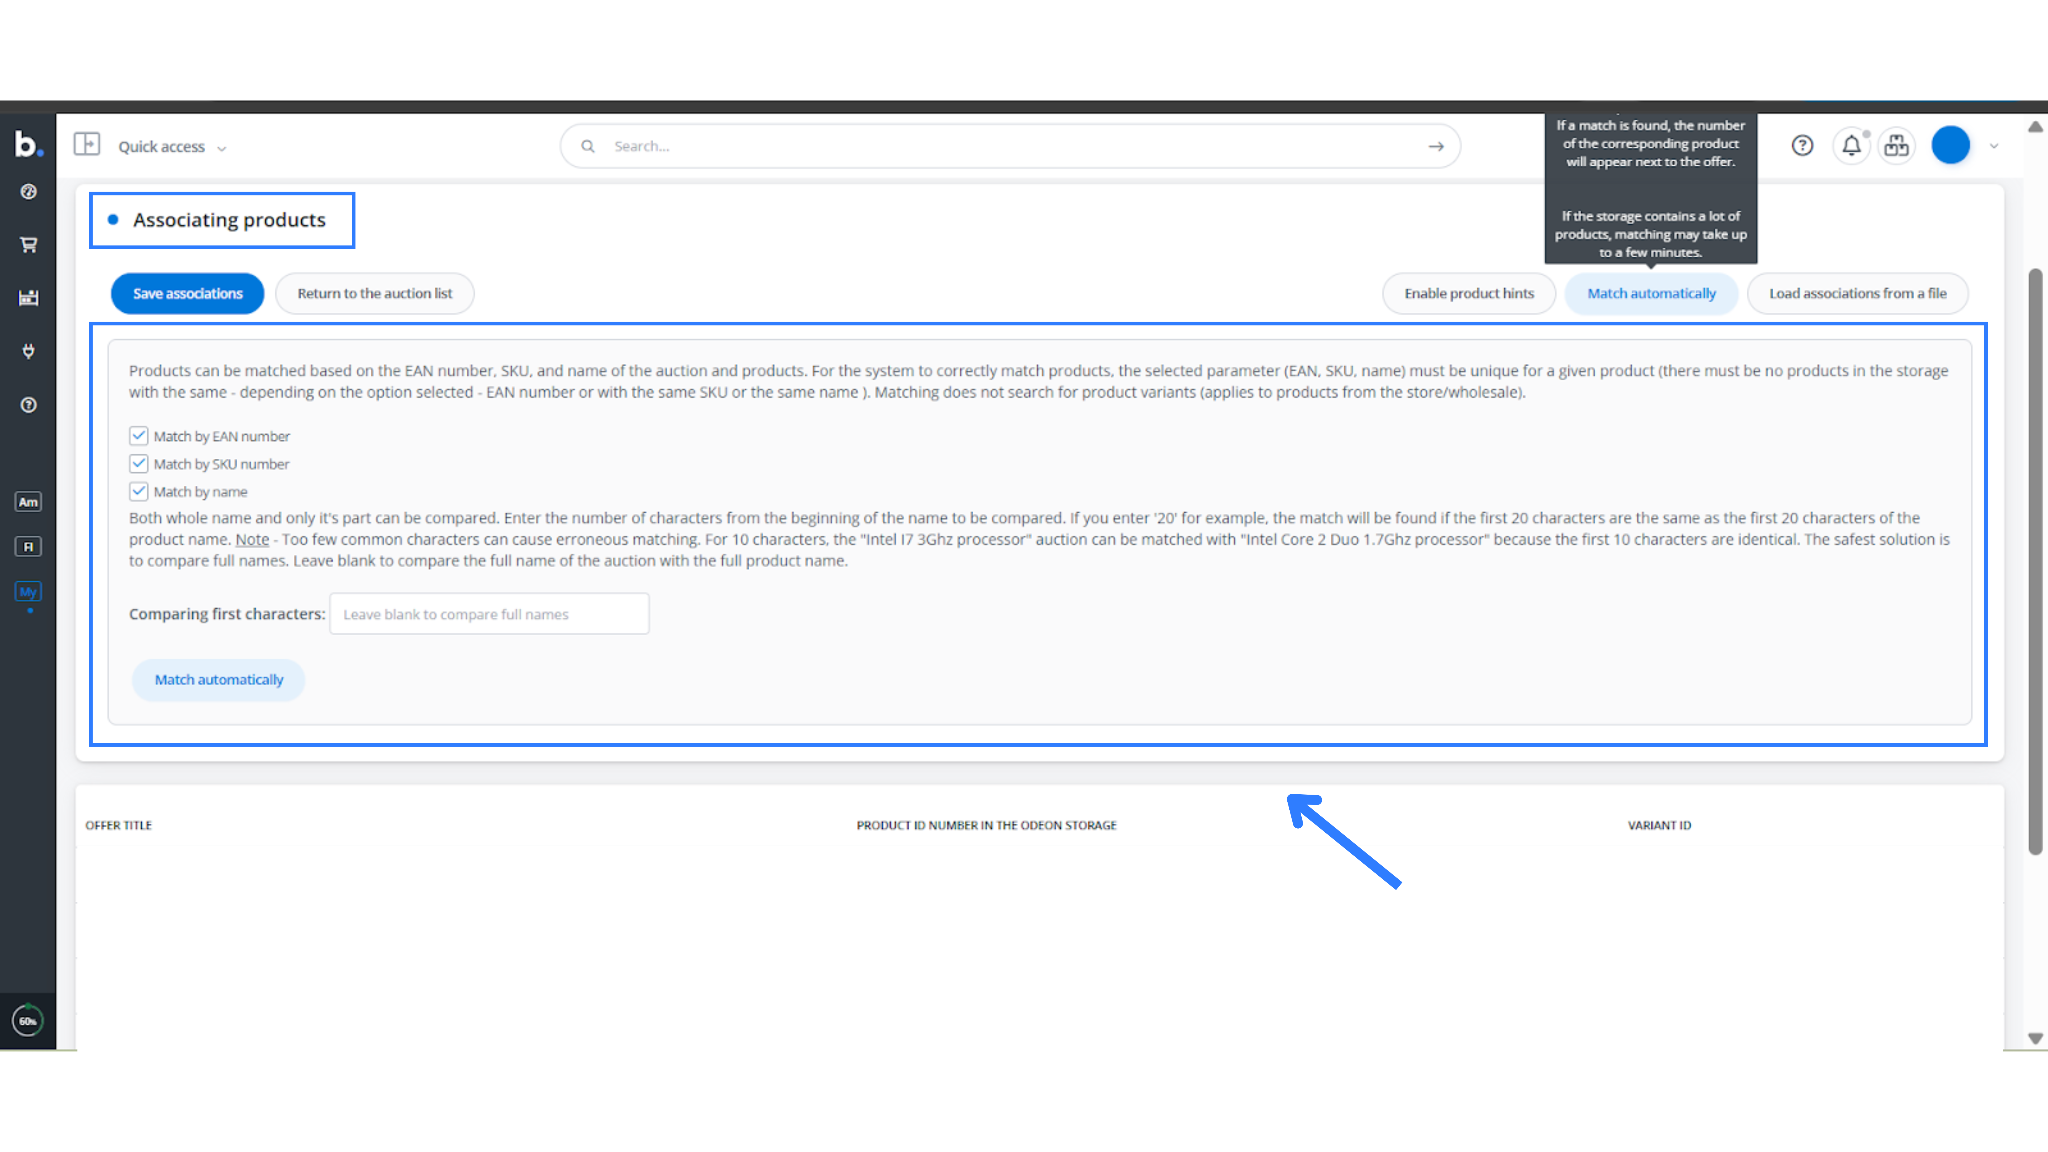
- Associate Products with Inventory by selecting the products in the Listing Management Section and navigating to Operations → Associate with Inventory → Match Automatically → Save Associations. Review and edit the automatic offer mapping as required.
Step 6: Order Workflow
Once integrated, orders from Myntra will start flowing into Base.
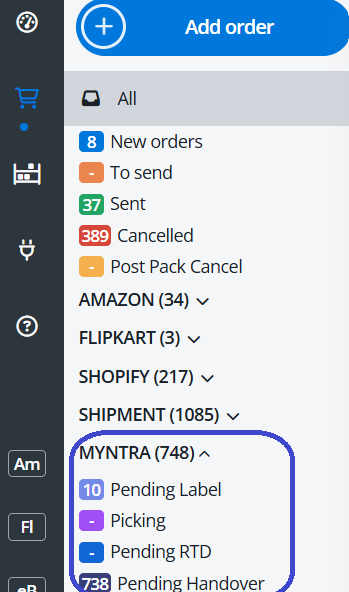
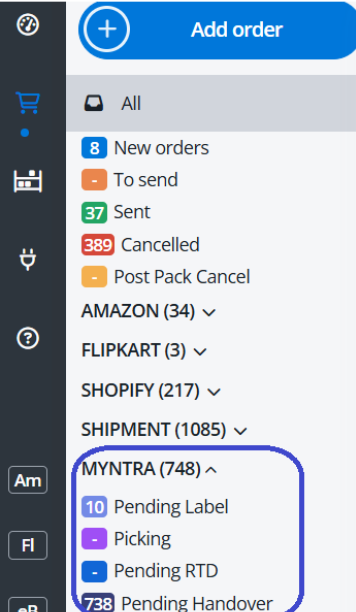
Order Status Flow:
- Pending Label: Order received, awaiting label generation
- Picking: Optional step based on your setup
- Pending RTD: Ready to Dispatch
- Pending Handover: Awaiting pickup by Myntra
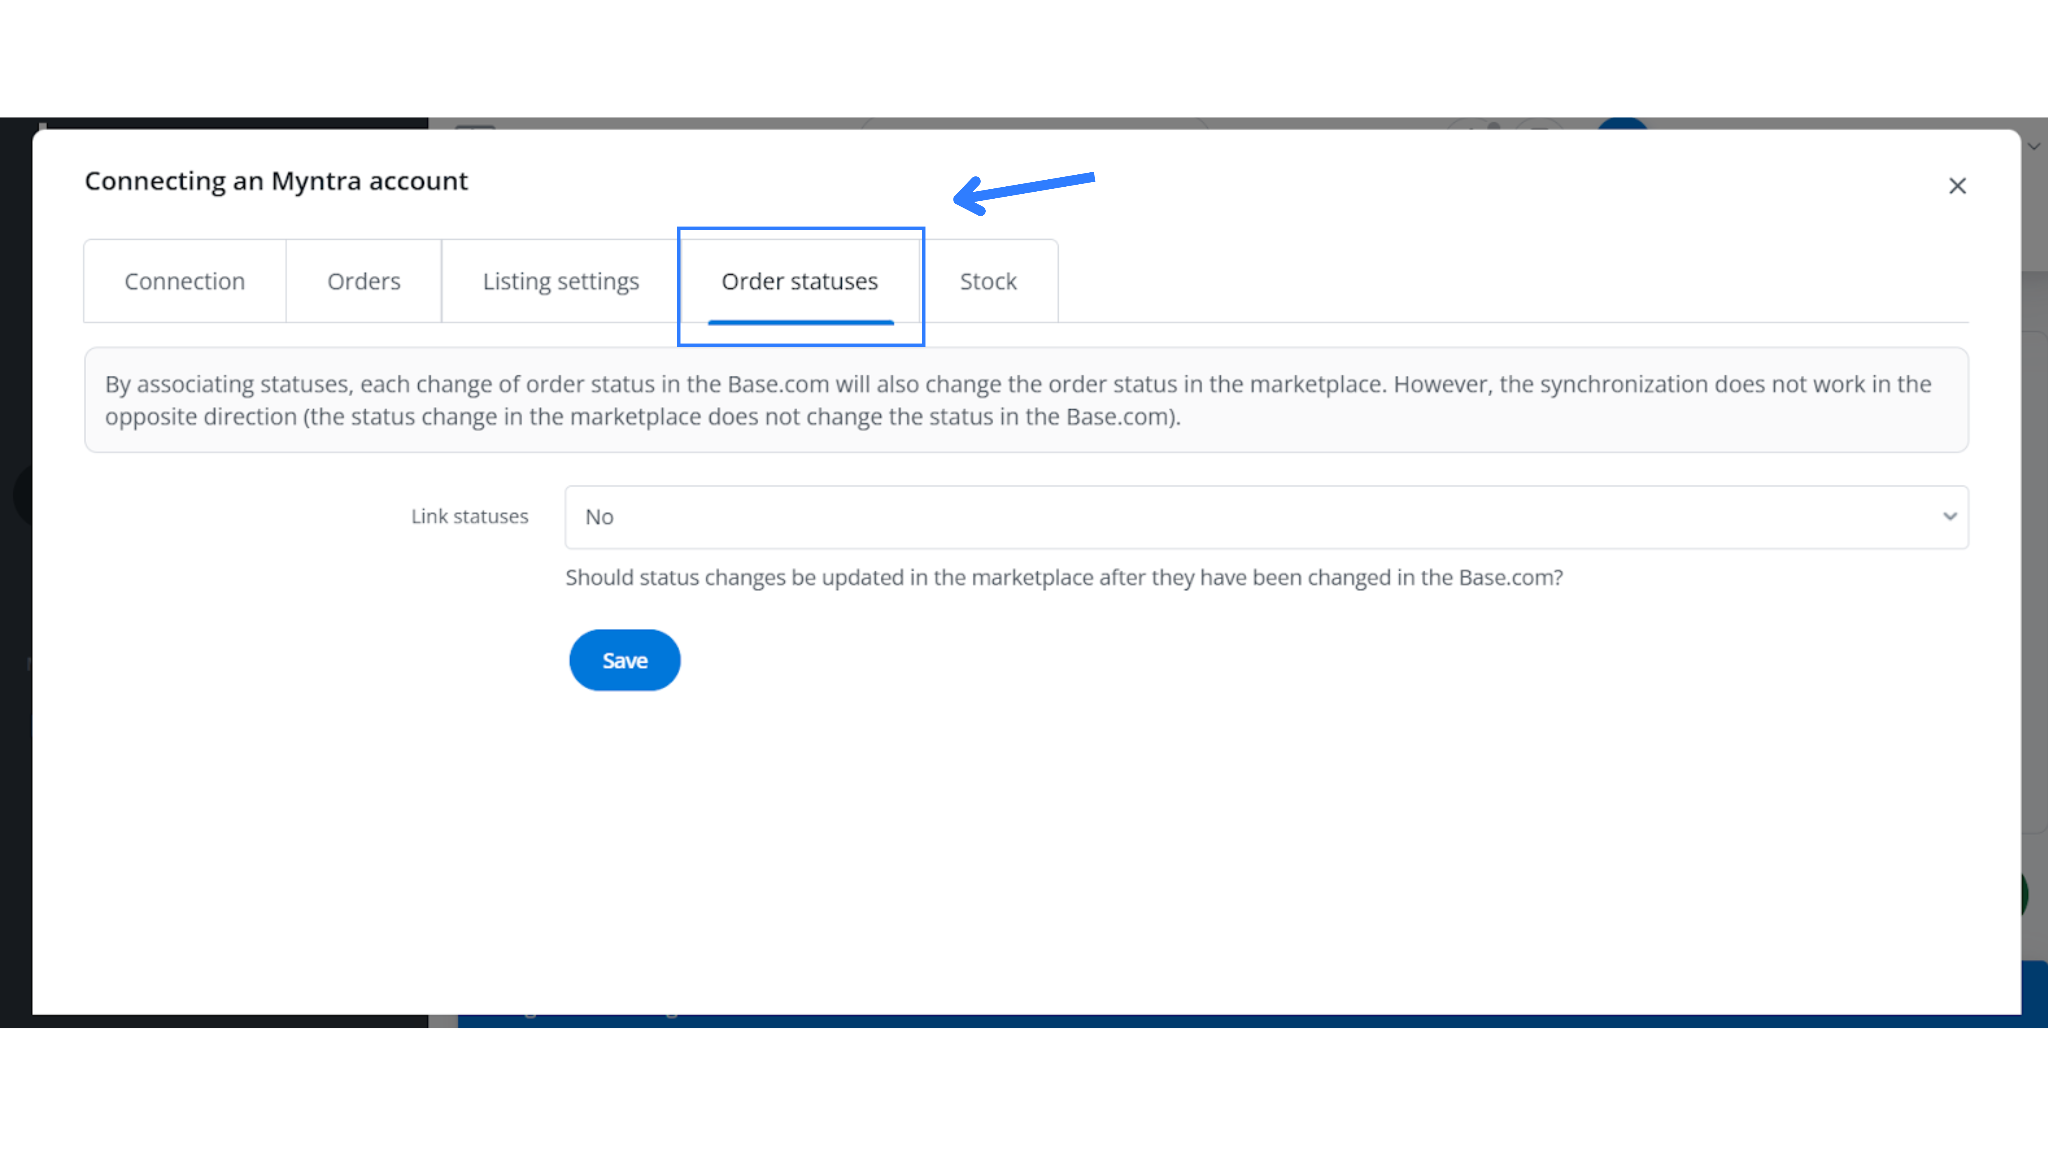
Status Mapping in Base for Myntra PPMP:
- Navigate to Orders > Statuses in your Base dashboard
- Map the following statuses:
- RTD → Pending Handover
- Cancelled → Cancelled
- Labels are generated automatically once an order is created.
- After label creation, Base triggers the RTS (Ready to Ship) call to Myntra automatically
You can configure automatic actions based on the Shipping Date within the order details.
Label and Invoice Generation:
- Base automatically generates labels and invoices after shipment creation.
- You can print these documents individually or in bulk using the Base.com Printer installed on your system.
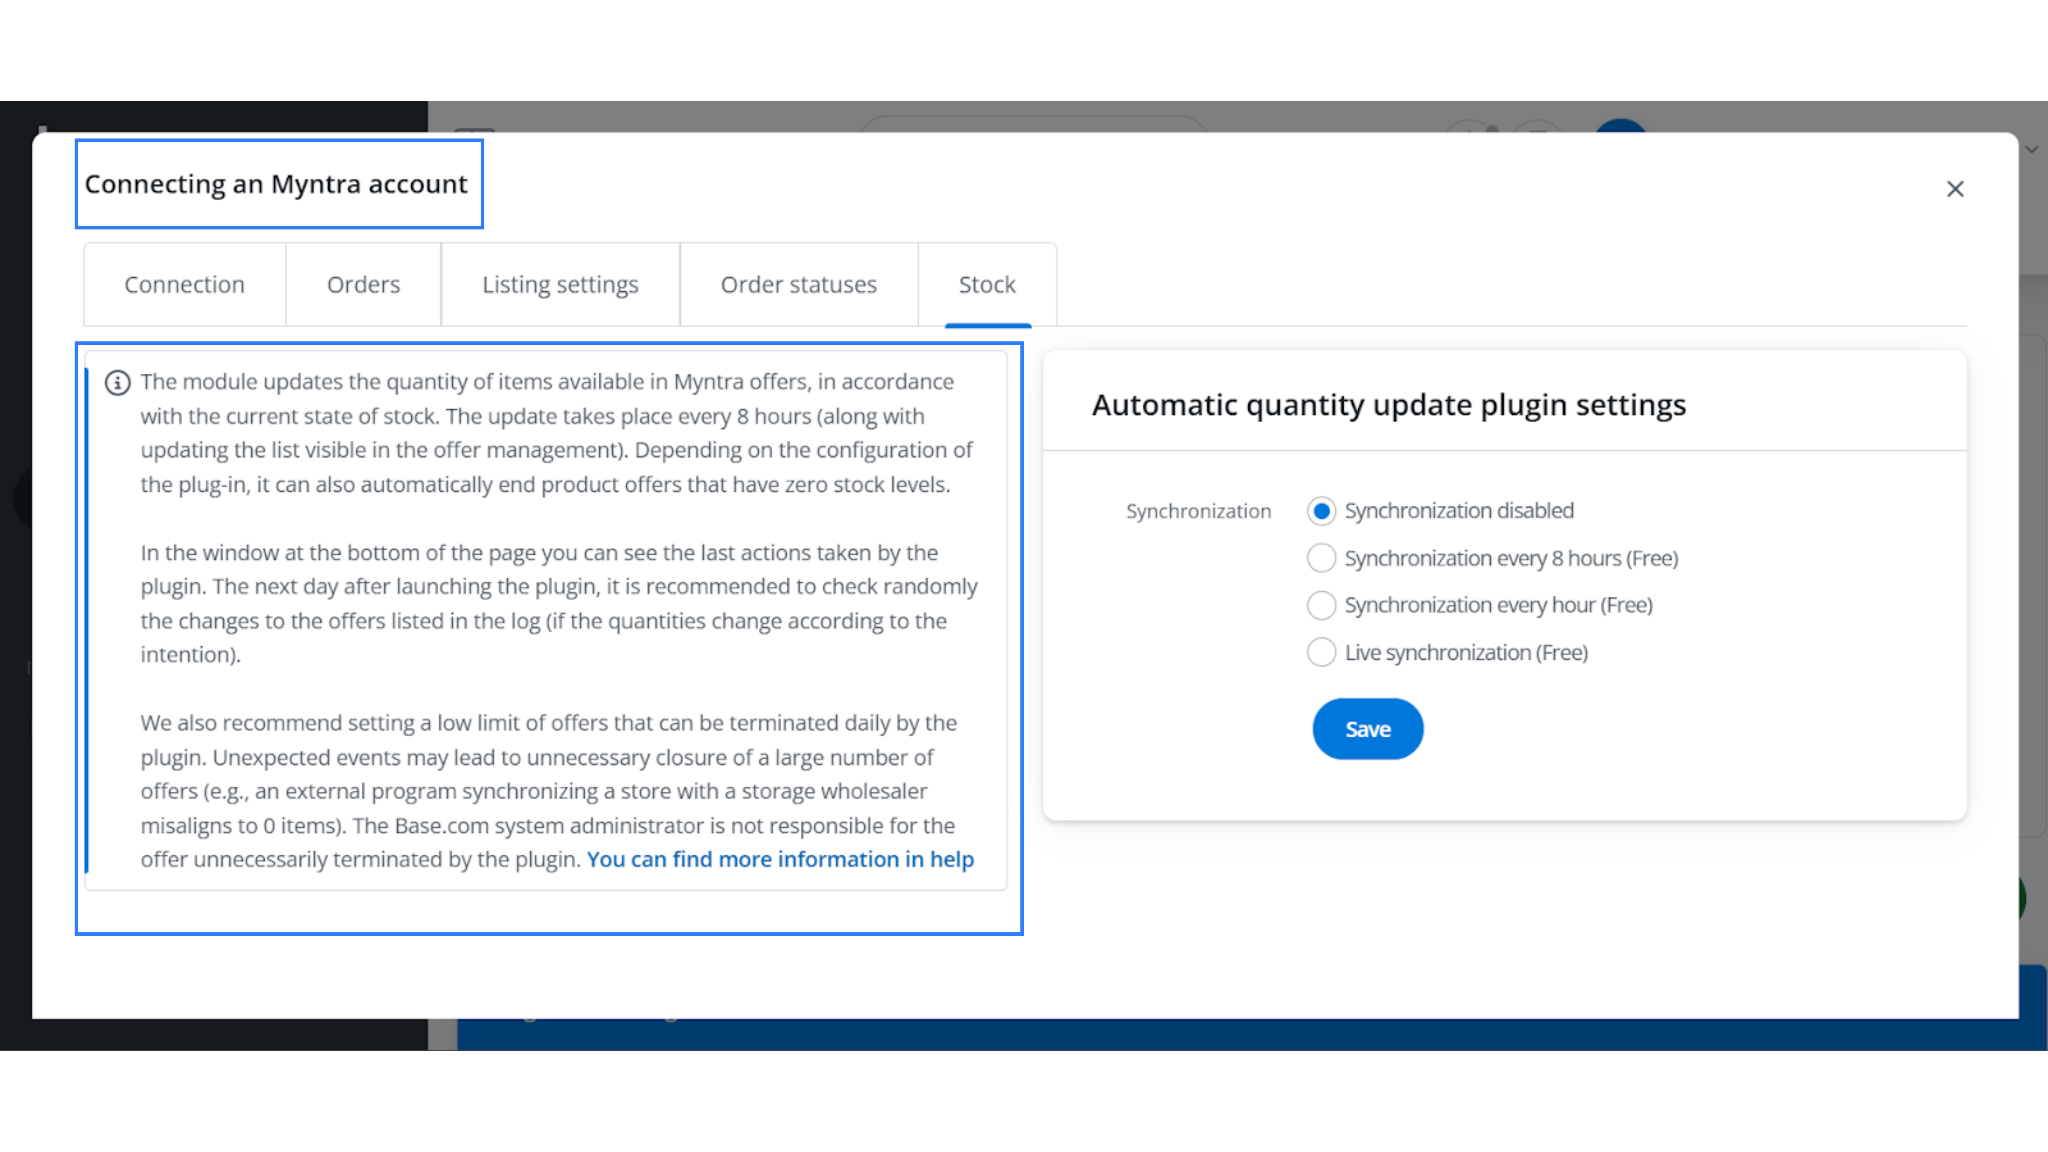
Step 7: Inventory Sync and Real-Time Updates
- Go to the Stock tab in Base.
- Enable Live Synchronization to keep inventory levels updated in real time between Base and Myntra.
Step 7: Add Myntra Logistics
Since PPMP is a managed model, Myntra handles both pickup and delivery. Self-ship is not applicable.
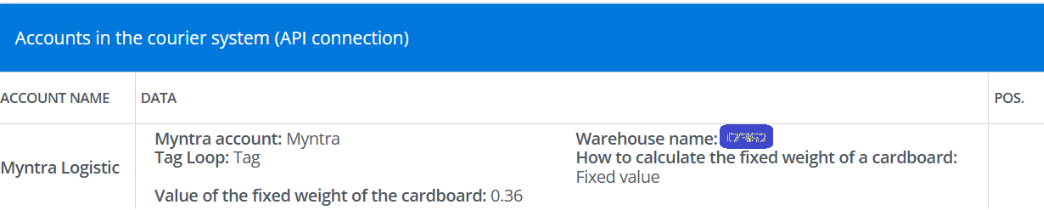
To configure logistics:
- Go to Integrations > Logistics Partners in Base.
- Add Myntra Courier as a logistics partner.
- Use the warehouse code provided by Myntra. If you don’t supply a code, Myntra assigns a random one, which then syncs between Base and Myntra.
Notes: API and Token Configuration
To ensure data sync between Base and Myntra:
- Base to Myntra: Share the Base-generated Access Token with the Myntra team.
- Myntra to Base: Myntra will use this token to establish API connectivity from their side.
This step is necessary to enable seamless two-way communication between systems.
Additional Configuration (Optional)
- Configure Tagloop values and additional fields if required
- Enable the Picking step in the workflow if applicable to your operations
Summary
Your Myntra PPMP setup with Base is now complete.
Automate your orders, sync inventory in real time, and ship faster than ever. Sign up and streamline your entire D2C business from one powerful dashboard.
FAQs: Myntra (PPMP) Integration with Base.com
1. How do I get my Store Code, Merchant ID, and Client Secret for Myntra integration?
You will receive these credentials in the response to your OMS migration ticket raised with Myntra. Make sure to request them clearly in the ticket. Once provided, enter them in Base under Integrations → Myntra (PPMP).
2. Where can I find my Warehouse ID and Merchant ID?
Both are generally available in the Operational Reports on the Myntra Seller Panel. However, in addition, Myntra also shares them in the OMS migration ticket response. Myntra activates the Warehouse ID only after processing your ticket.
3. Why do I need to import Auctions before starting the Order Lifecycle?
Myntra does not allow direct fetching of promotions and discounts. Before orders start flowing in, importing Auctions ensures that Base correctly syncs your product listings, offers, and discounts. Without this step, your catalog mapping may remain incomplete.