The competitor module allows not only monitoring the prices of other sellers but also automatically adjusting the prices of your own listings—according to the rules you set.
The repricing feature is available for the following platforms: Allegro, eMAG, Amazon, Empik, Cdiscount and Ceneo. With it, you can quickly respond to market changes and maintain competitiveness without the need to manually update each listing.
Enable the module in your account settings
Before you can start using price automation (repricing), you need to activate the competitor monitoring module for the selected marketplace account.
-
Go to: Integrations → [selected marketplace account] → Competition tab
-
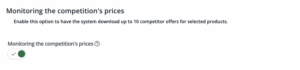
In the Competitor price monitoring section, switch the toggle to Enabled
-
Once monitoring is enabled, the option to activate Price Automation will appear.
Enabling monitoring is a required step in order to use automatic price adjustments.

Select products for price automation
For the system to automatically adjust prices (repricing), you first need to enable competitor monitoring for the selected listings. You can do this in two ways:
Bulk activation for multiple listings
-
Go to: Marketplace → Offer management
-
Select the desired products
-
Click: Actions → Competitor price check → Enabled
-
The option to enable Price Automation will then become available.
Single activation in offer details
-
Open the offer details
-
Go to the Competition tab
-
Check the option Enable competitor price monitoring
In the same place, you will also find the Price Automation option – activate it and configure the rules according to which the system will adjust prices.
Configuring pricing rules
After enabling price automation in the offer details, you can define how the system should react to changes in competitor prices.
Choose the operating method:
-
Lower prices only – when cheaper competition appears.
-
Raise prices only – when no competitors are available.
-
Lower and raise prices – dynamic adjustment in both directions.
Define system behavior in boundary situations:
-
When the price is below the minimum – choose: set the minimum price, apply the default margin, do not change the price, or use the warehouse price.
-
When the price exceeds the maximum – set the maximum price, apply the default margin, do not change the price, or use the warehouse price.
-
When no competition is found – apply the default margin, do not change the price, or use the warehouse price.
-
When your offer is already the cheapest – decide whether the system should still recalculate the price according to the rules or leave it unchanged.
Setting price conditions
Price conditions help you avoid situations where the system sets your price too low or too high. Defining these parameters is mandatory, because without them the system will not change the prices of your listings.
Based on the following settings, the system will calculate:
-
the minimum price – below which it will not go,
-
the maximum price – above which it will not go, and then adjust the price to competition if it falls within this range.
Parameters to set
Base price
The reference point for further calculations. You can select a price from the Base warehouse – e.g., purchase, sales, or another price linked to the product.
Note: works only for offers linked to the Base catalog.
Fixed reserve (optional)
A fixed amount added to the base price before applying the margin.
Example: base price 100 + reserve 10 = new price: 110
Percentage reserve (optional)
A percentage value added to the base price.
Example: 100 + 10% = new price: 110
Minimum margin
The minimum markup – defines the lowest acceptable selling price.
Example: 110 × 1.3 → min. price: 143
Maximum margin
The maximum markup – defines the highest possible price for the offer.
Example: 110 × 1.5 → max. price: 165
Default margin
Applied when the system cannot find competition.
Example: 110 × 1.2 → price: 132
Minimum difference – percentage
Defines by what percentage your offer should be cheaper than the competitor’s. Applied only if it fits within the defined margins.
Minimum difference – fixed amount
Defines by what fixed amount your offer should be cheaper than the competitor’s. Works only within the allowed margins.
Rounding (optional)
You can set how the final price should be rounded (e.g., to full .99 values).
Ceneo Repricing
For the Ceneo platform, the newly calculated price is not sent directly to the marketplace, as it is on other platforms (e.g., Allegro, eMAG, Amazon). On Ceneo, the new price is saved in the selected price group within the system. To ensure the process works correctly, it is necessary to properly configure both the repricer and the integration.
“Buy now” option on Ceneo – sending prices to Ceneo only
These settings apply if you only want to update prices in Ceneo without affecting the store prices.
What do you need to do?
-
Create a price group, e.g., Ceneo (repricing).
-
Repricer prices will be saved in this group.
-
This group cannot be used as the base price in any repricer or on any other marketplace.
-
Remember not to select the same price group as the base price for this or other repricers, as it may cause the system to malfunction.
-
Assign the group in the Ceneo integration: Integrations → Ceneo → Listing settings → Price group.
From this price group, prices will be sent to Ceneo in the product feed (XML).

- Enable competitor tracking and price automation: Integrations → Ceneo → Competition → Competitor price check → Enabled.
- Set your store name. It must be entered exactly as it appears on Ceneo (case-sensitive).
Example: if your store on Ceneo is namedBase.com, enter it exactly the same – notbase.comorBASE.COM.

- (Optional) Add ignored sellers whose offers should be excluded from the analysis.

-
Assign the previously created price group for saving new prices, e.g., Ceneo (repricing).

-
Select the products for monitoring and price automation.
- Additionally, make sure that price synchronization to Ceneo is enabled. You can check this under: Integrations → Ceneo → Prices → Synchronization.
Option: Sending prices to the online store
This setting allows you to automatically monitor competitor prices on Ceneo and dynamically calculate your own prices based on their offers. The new price will then be sent both to the XML feed and to the online store.
What do you need to do?
-
Create a price group, e.g., Ceneo (repricing). This is where the new prices calculated by the repricer will be saved.
Remember not to select the same price group as the base price for this or other repricers, as it may cause the system to malfunction. Also, make sure that the target price group is not used as a base price group for repricers in other marketplaces.
-
Assign the group in the Ceneo integration settings: Integrations → Ceneo → Listing settings → Price group.
From this price group, prices will be sent to Ceneo via the XML feed and also used when synchronizing with the store.
-
Enable competitor tracking and price automation: Integrations → Ceneo → Competition → Competitor price check → Enabled.
- Set your store name. It must be entered exactly as it appears on Ceneo (case-sensitive).
Example: if your store on Ceneo is namedBase.com, enter it exactly the same – notbase.comorBASE.COM.
- (Optional) Add ignored sellers whose offers should be excluded from the analysis.
- Assign the previously created price group for saving new prices, e.g., Ceneo (repricing).
- Enable price synchronization with the store: Integrations → Online store → Prices.
a) Select the option: Synchronization from Base to store (sub-store).
b) In the Regular price – price group section, choose the previously created price group, e.g., Ceneo (repricing).
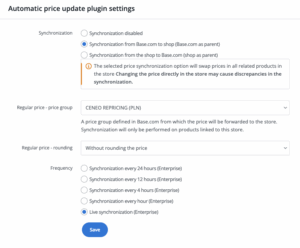
c) Click Save to activate the synchronization.
-
Select the products for monitoring and price automation.
The price monitoring and automation module in Base allows convenient filtering of offers and quick access to the most important information related to monitoring and price automation. Below you’ll find a description of the available filters and columns in the table. % Difference from / to – allows you to narrow the list of offers to those where your offer’s price differs by a specific percentage from the cheapest competitor offer or within a defined range. % Difference vs. minimum price – shows offers where the cheapest competitor’s price differs by a specific percentage from your minimum price (set in repricing rules). Price automation – allows filtering offers for which repricing is enabled. Competition – allows filtering offers with active competitor monitoring, depending on the comparison results. Overwritten value – shows offers for which the automatically calculated price or the competitor’s price differs from the configured settings in: Integrations → [marketplace account] → Price automation. This helps quickly spot exceptions in the configuration. Min price / Price / Max price – the price range defined in the repricer configuration: Min price – the lowest allowable price (green color: the current price is above the minimum). Price – the current offer price. Max price – the highest allowable price. Difference (green or red percentage value at the minimum price) – shows by what percentage the cheapest competitor’s offer differs from your minimum price (set in the repricer). Competition – the lowest competitor price considered in repricing. If the field is empty, it means there is no data or no competition. Filtering and columns in the Repricing module (Offer management)
Available filters for price automation options
Useful when you want to quickly catch offers that are approaching the lower price limit or have already exceeded it.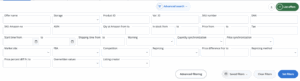
What do the columns in the offer list mean?