If you run a Shopify store and want to streamline your operations like orders, products, warehouses, couriers, customer support, integrating with Base makes it much easier. This guide walks you step by step from connecting your Shopify store to Base, through automating order flows, courier selection, multi‑warehouse handling, inventory & pricing sync, customer support, templates and more. It’s written so a seller can follow on their own without a deep technical background.
1. Adding Shopify Integration in Base
First you need to connect your Shopify store to Base so that Base can import orders and products, and push updates like shipment tracking back to Shopify.
What to do:
- Log in to your Base account.
- From the left‑hand menu, click “Integrations”.
- Press the green + Add Integration button.
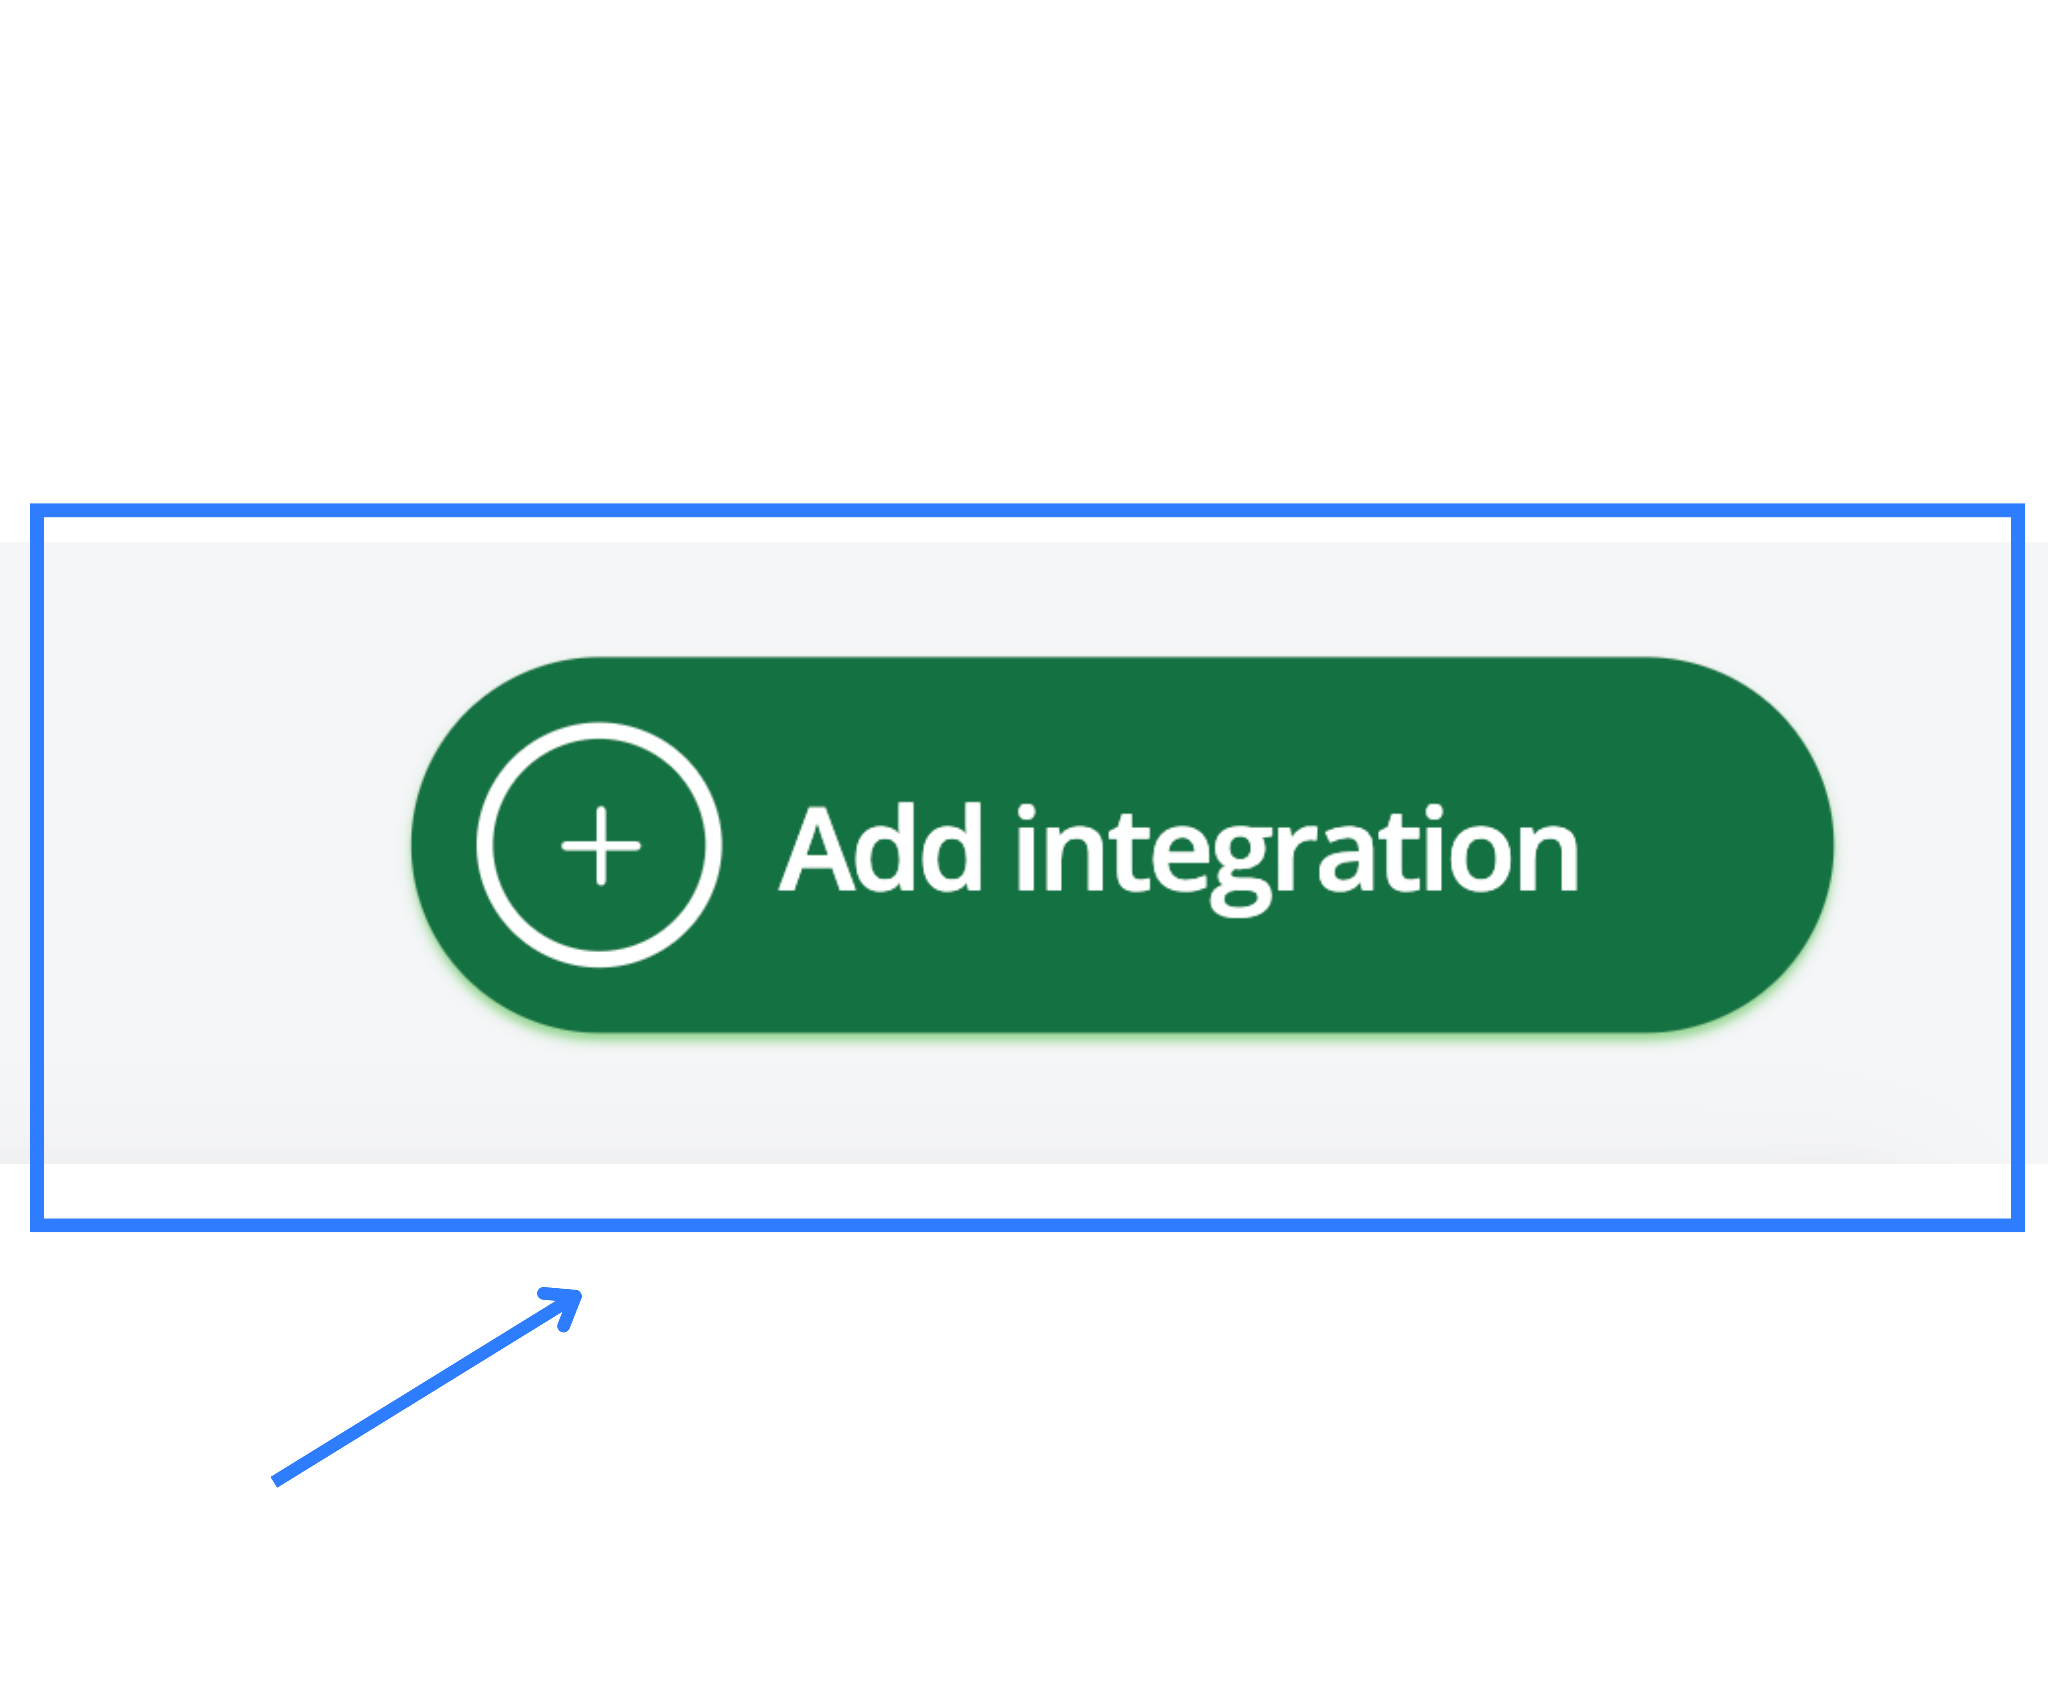
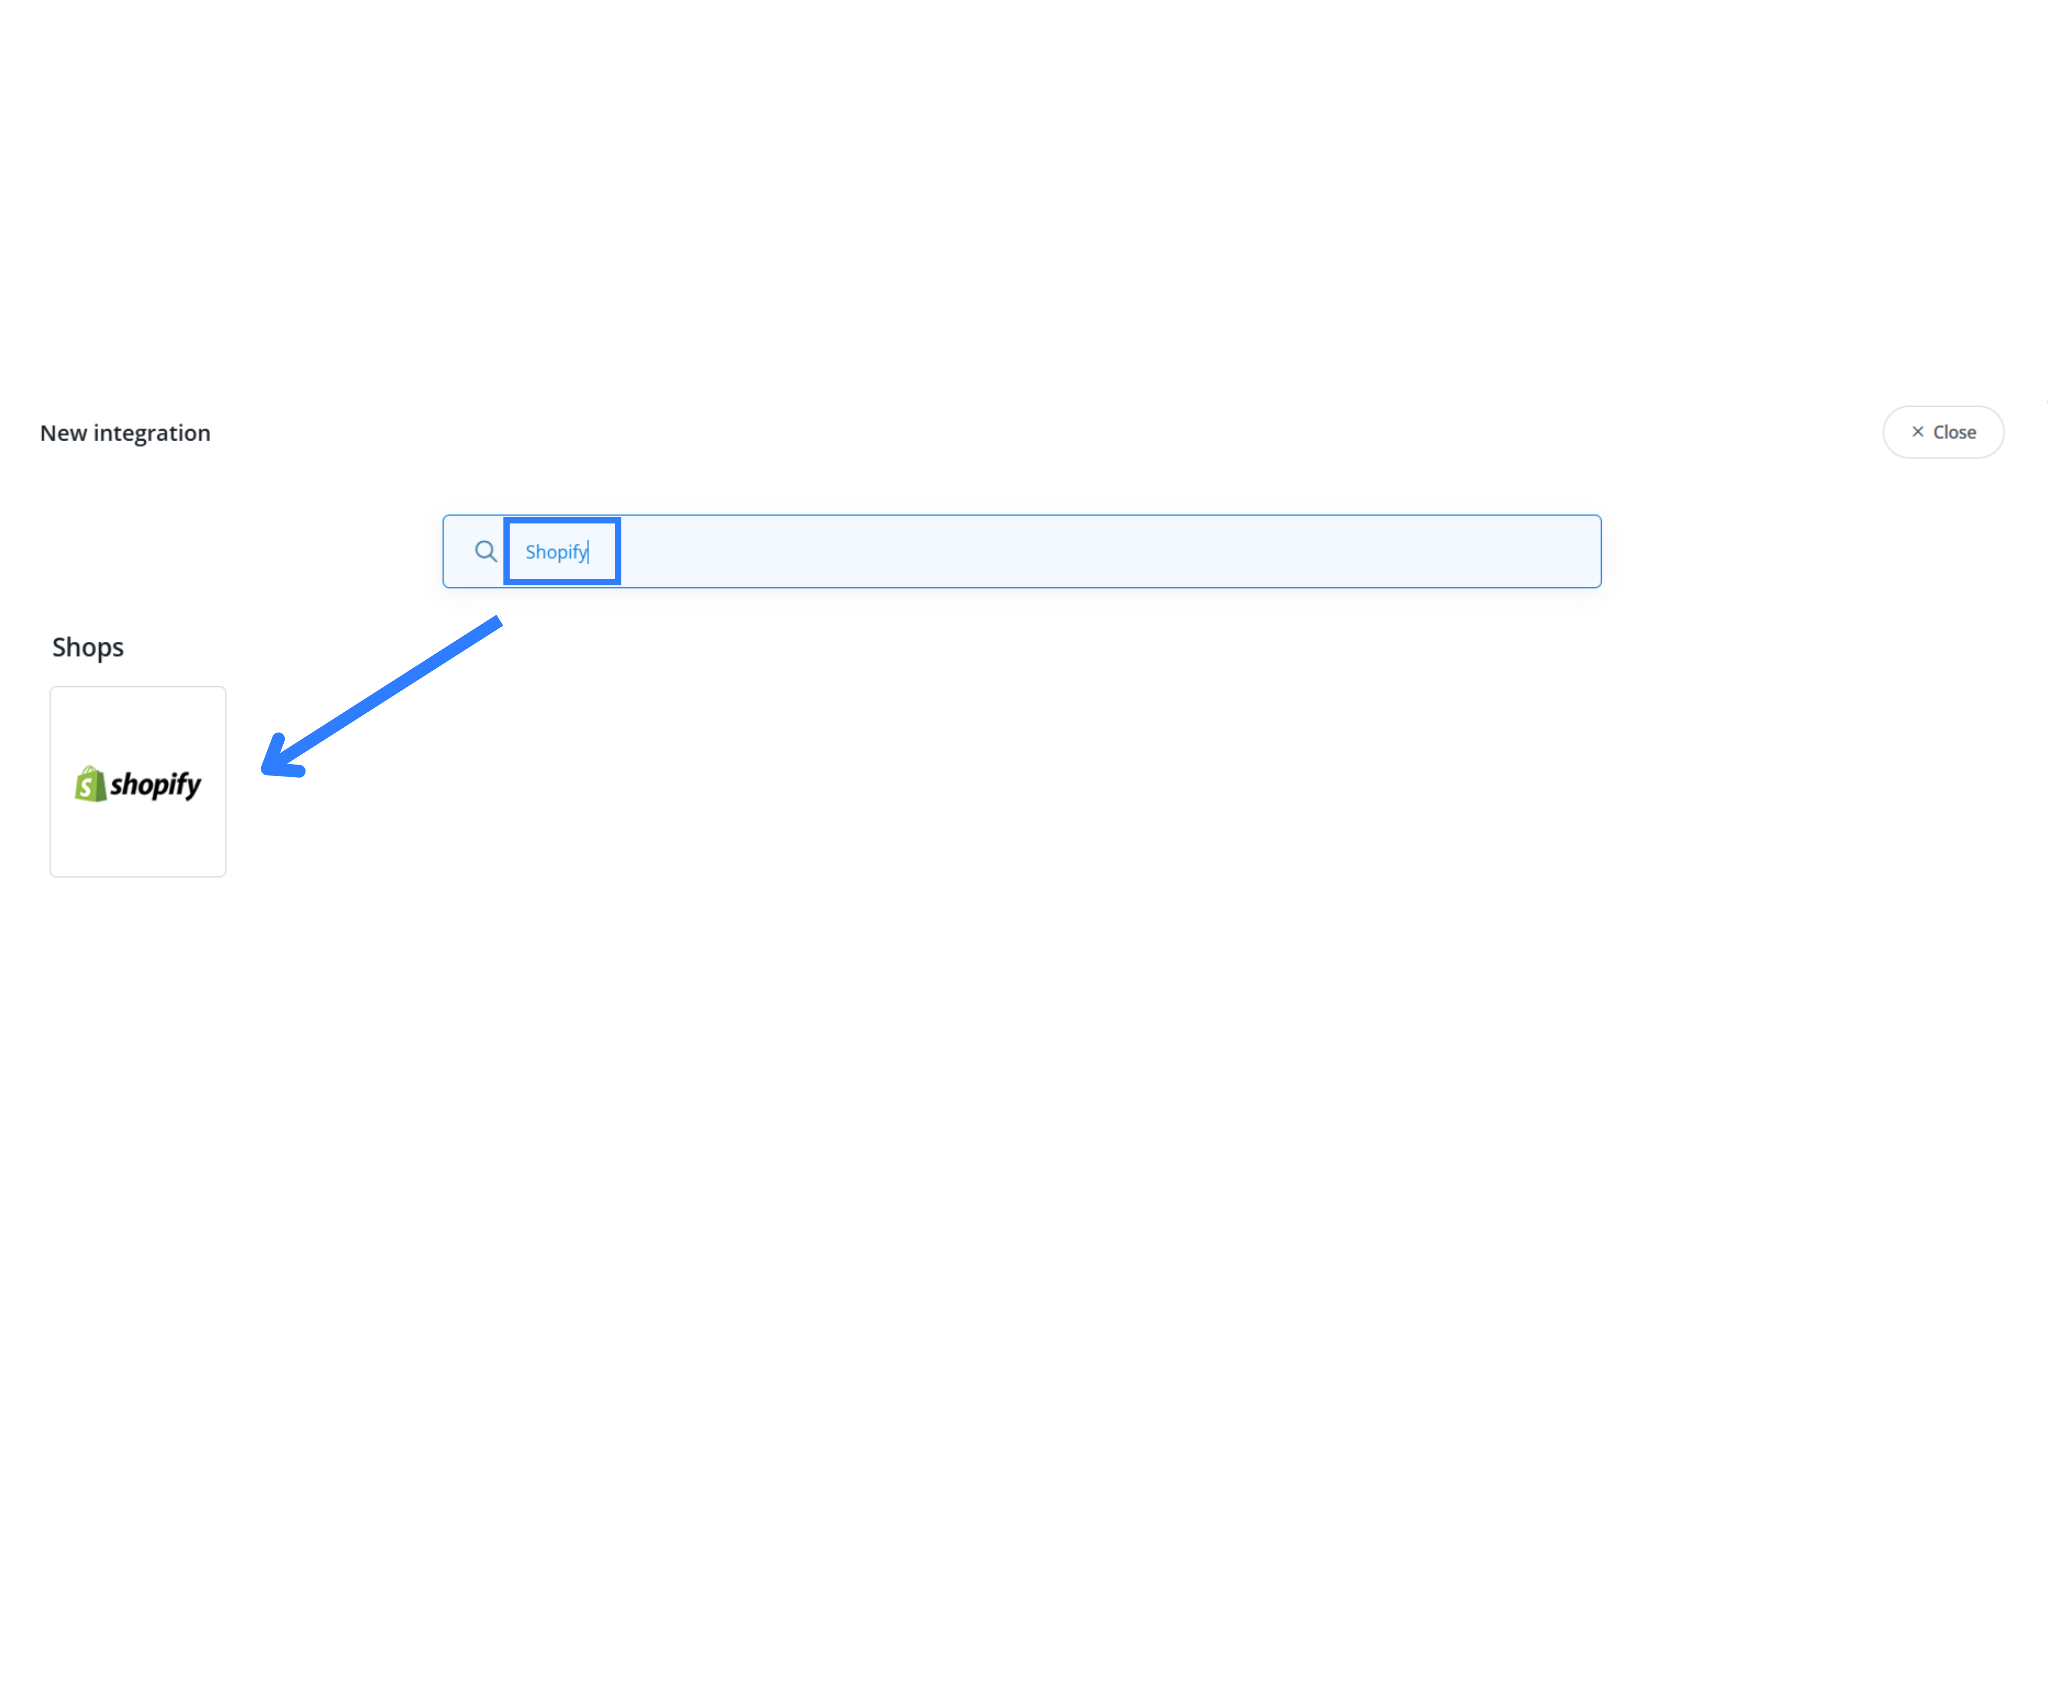
- In the search bar, type Shopify and select the Shopify tile when it appears.
Why this matters:
Once you add the integration, Base will know which store you want to connect. That allows Base to automatically pull in data from Shopify (orders, products) and enable you to send updates (like shipment tracking, status, payments) back to Shopify.
Note:
- Make sure you have admin access to your Shopify store.
- Be ready with your store URL (we’ll need it in the next step).
- Choose a meaningful Display Name (see next section) so you can identify this integration later, especially if you run multiple stores.
2. Filling in Required Shopify Integration Details
Next, in the Base integration screen you must provide details so Base knows how to talk to your Shopify store.
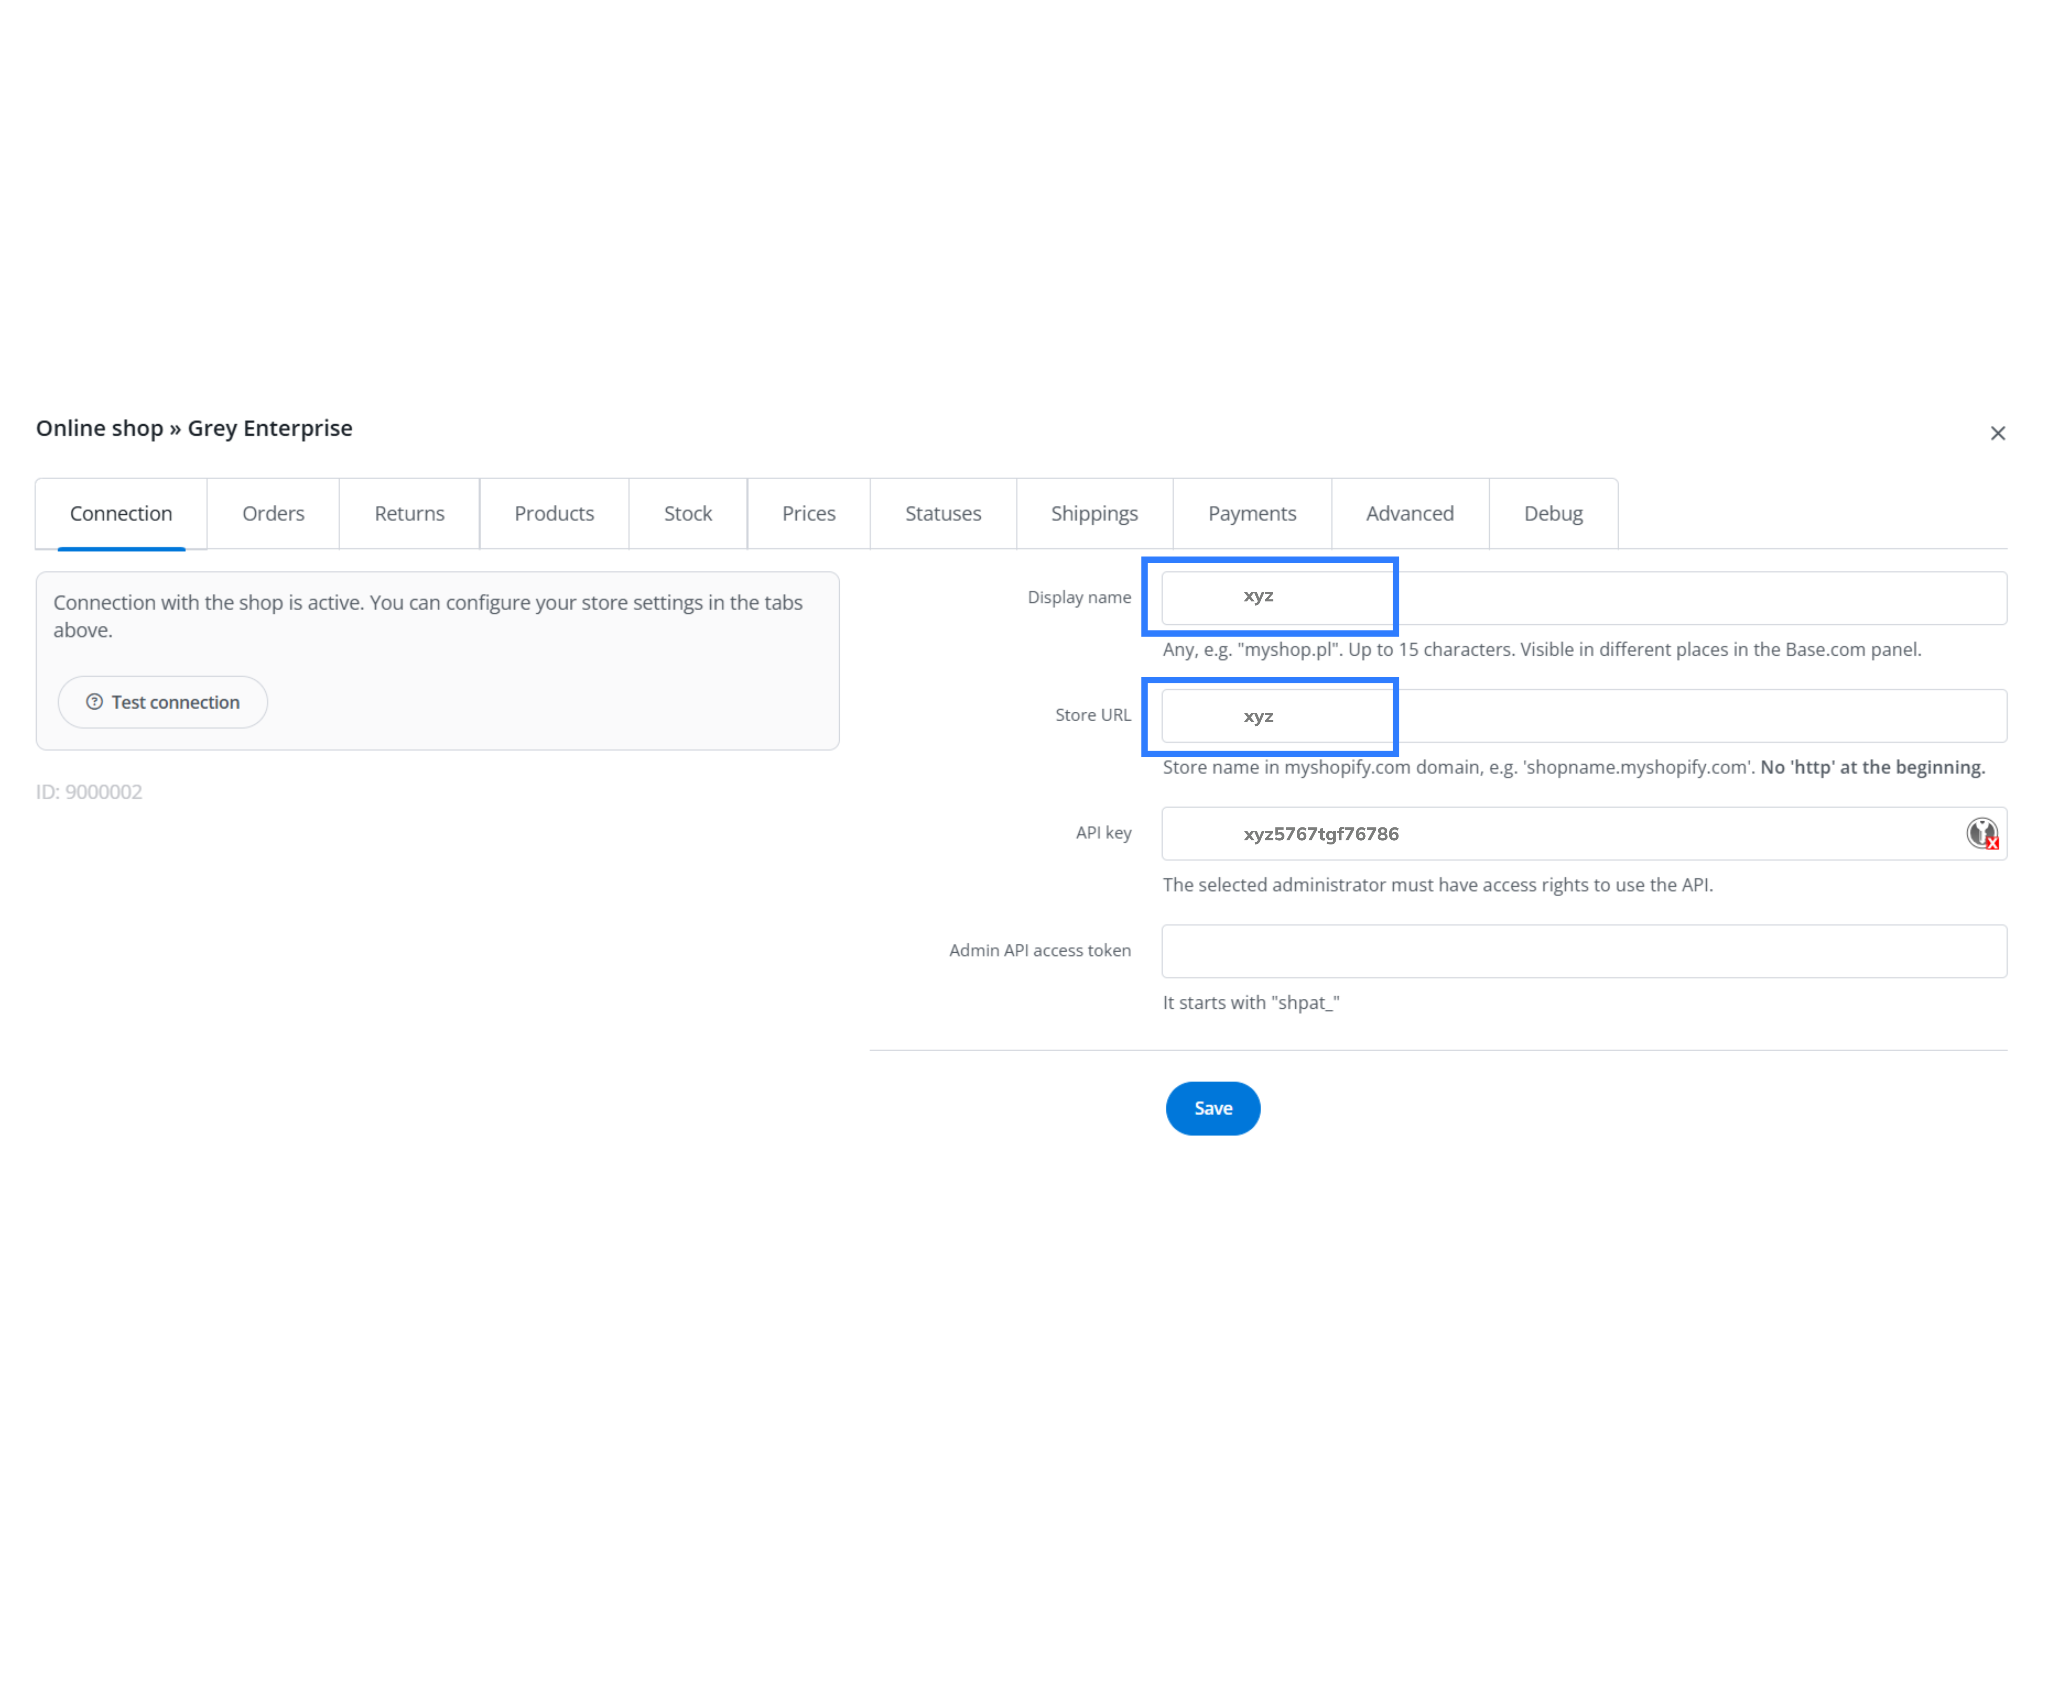
What to enter:
- Display Name: This can be anything you like – for example “My Shopify India Store” or “Workshop Shop – Shopify”. The purpose is simply to identify the integration inside Base.
- Store URL: Enter the full URL of your Shopify store without the http:// or https://. For example: myshopstore.myshopify.com. Do not prefix https:// or http://.
Why these details matter:
- The Display Name helps you visually recognise which store integration you are working with.
- The Store URL tells Base which Shopify store to connect to — this must match exactly so that credentials and data flow correctly.
Note:
- If you have a custom domain attached (e.g., store.mycustomdomain.com), make sure the URL you enter matches your Shopify admin address (not necessarily the public‑facing custom domain).
- Avoid typos in the URL – a mismatched domain will lead to errors when generating credentials or syncing data.
- If you plan to add more than one Shopify store (e.g., one for India, one for export), give each integration a clear Display Name.
3. Obtaining Your API Key and Password from Shopify
To connect Shopify with Base securely, you need to create a custom app in Shopify that grants API access. This step takes place inside your Shopify store’s admin panel.
Step‑by‑step inside Shopify:
- Log in to your Shopify Admin Panel.
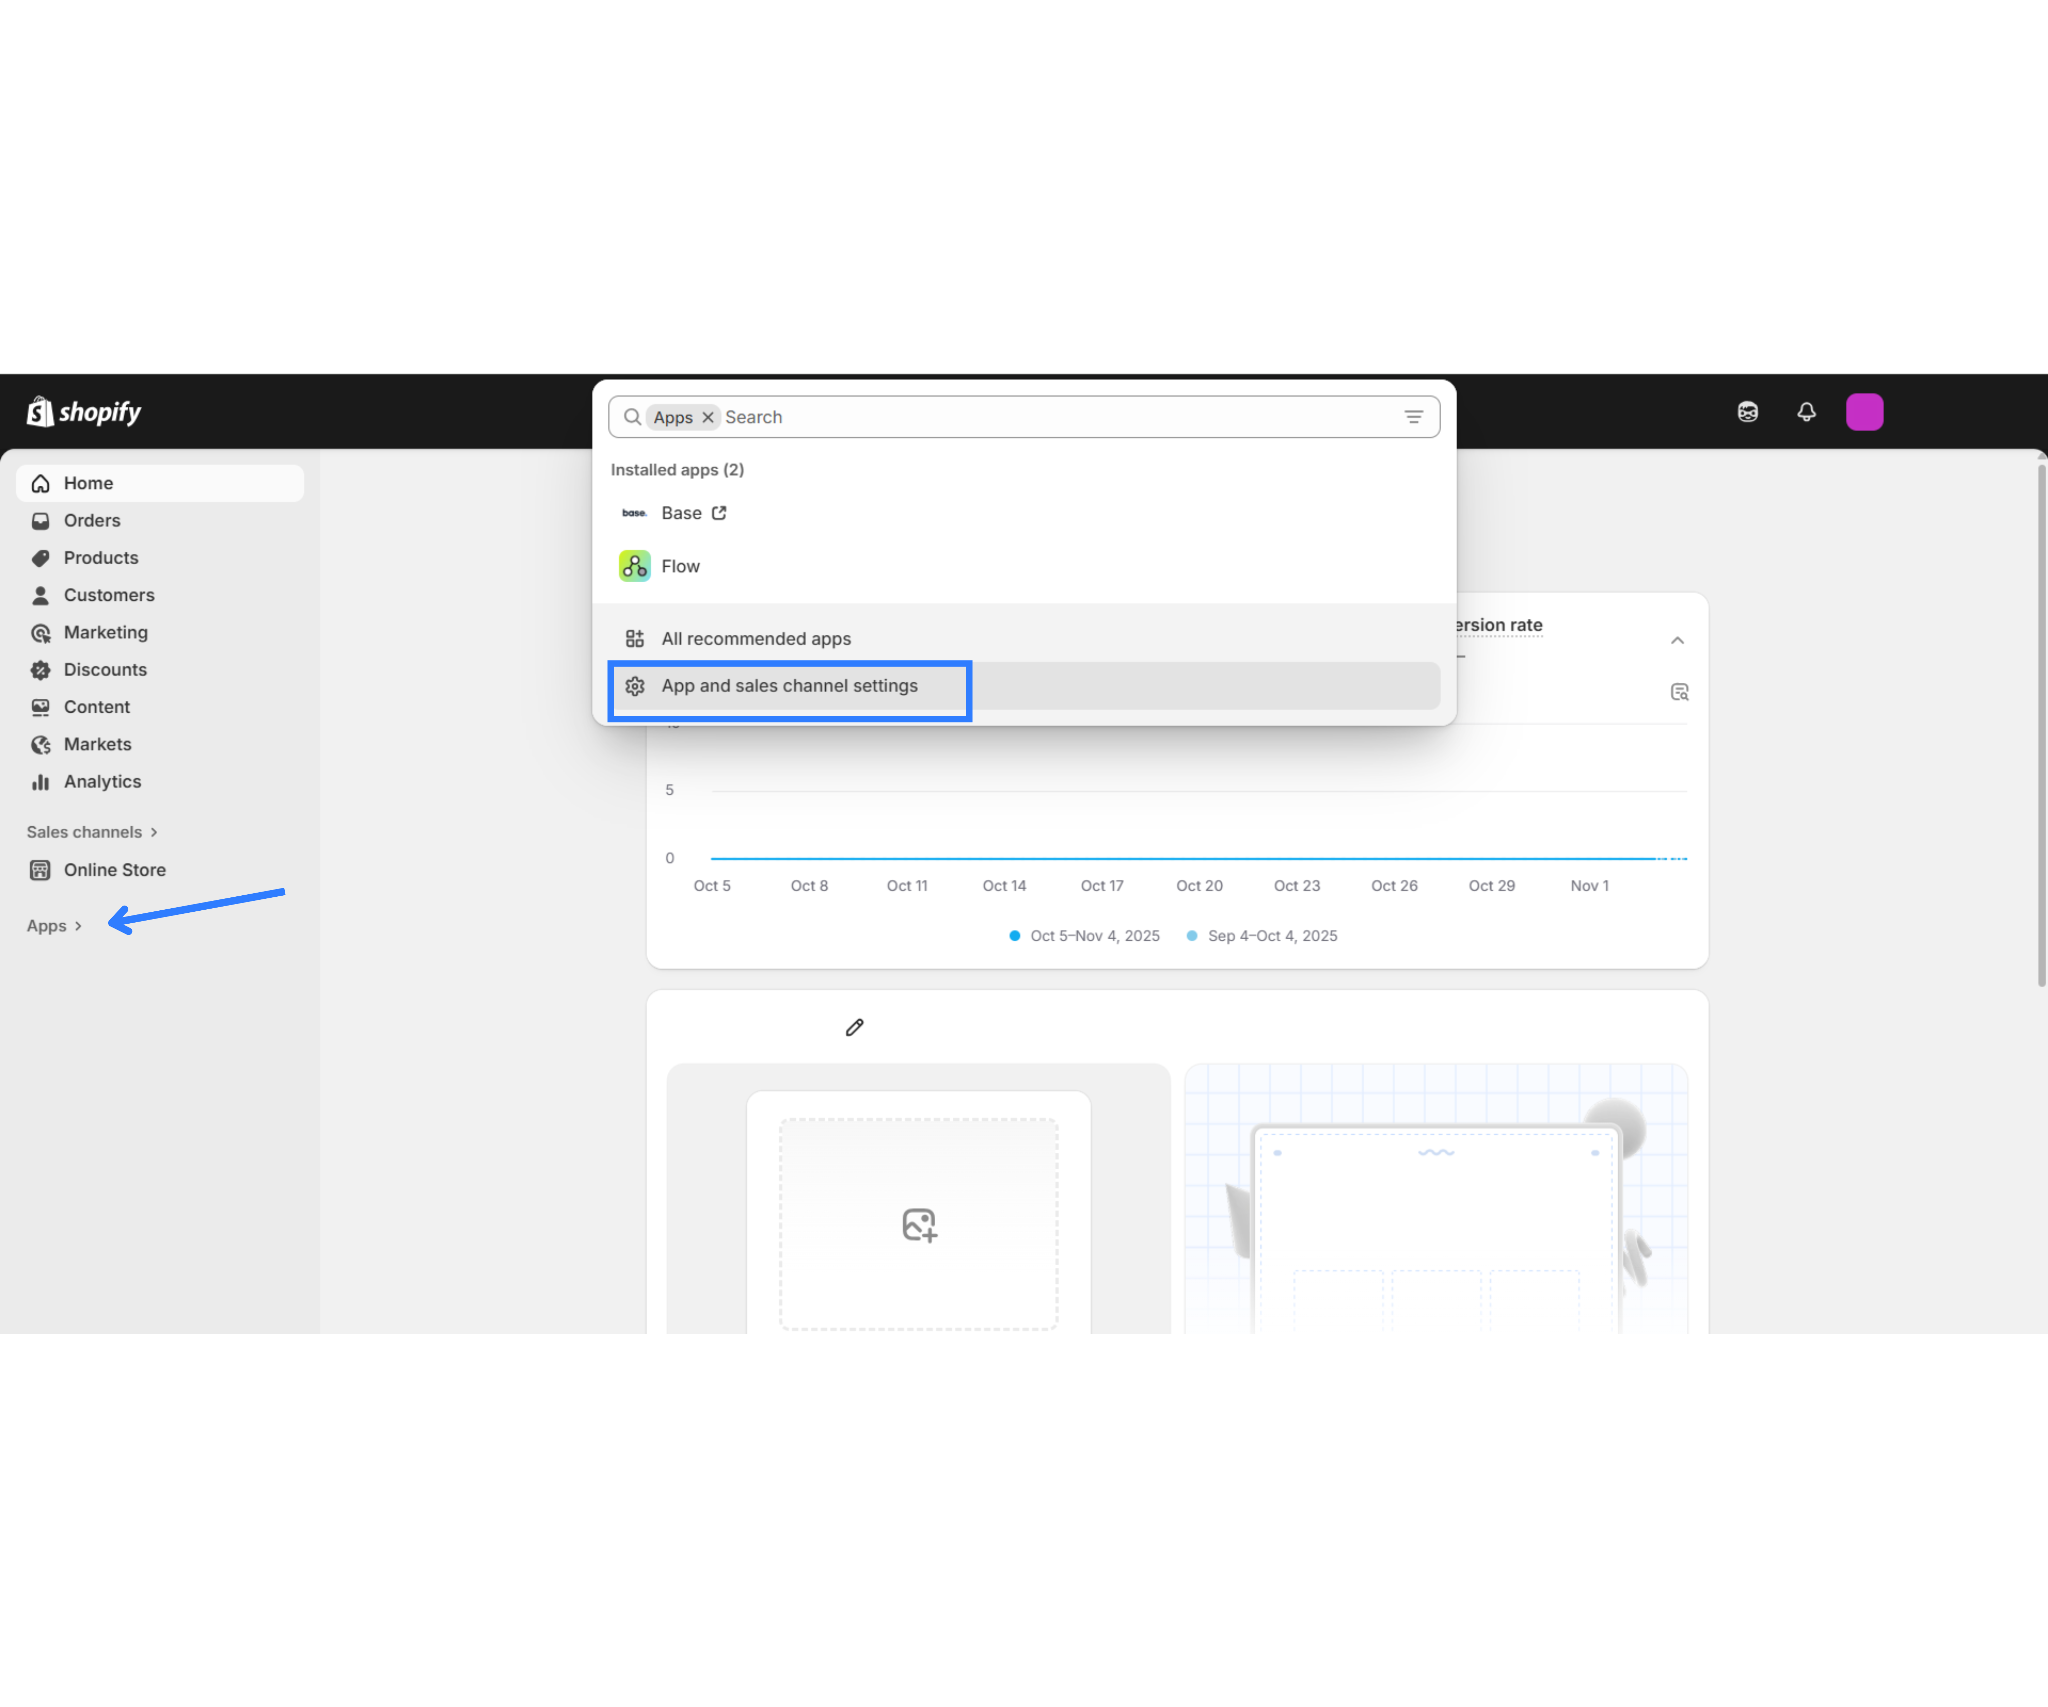
- In the left menu go to Apps > App and Sales Channel Settings.
- Scroll down and click Develop apps for your store.
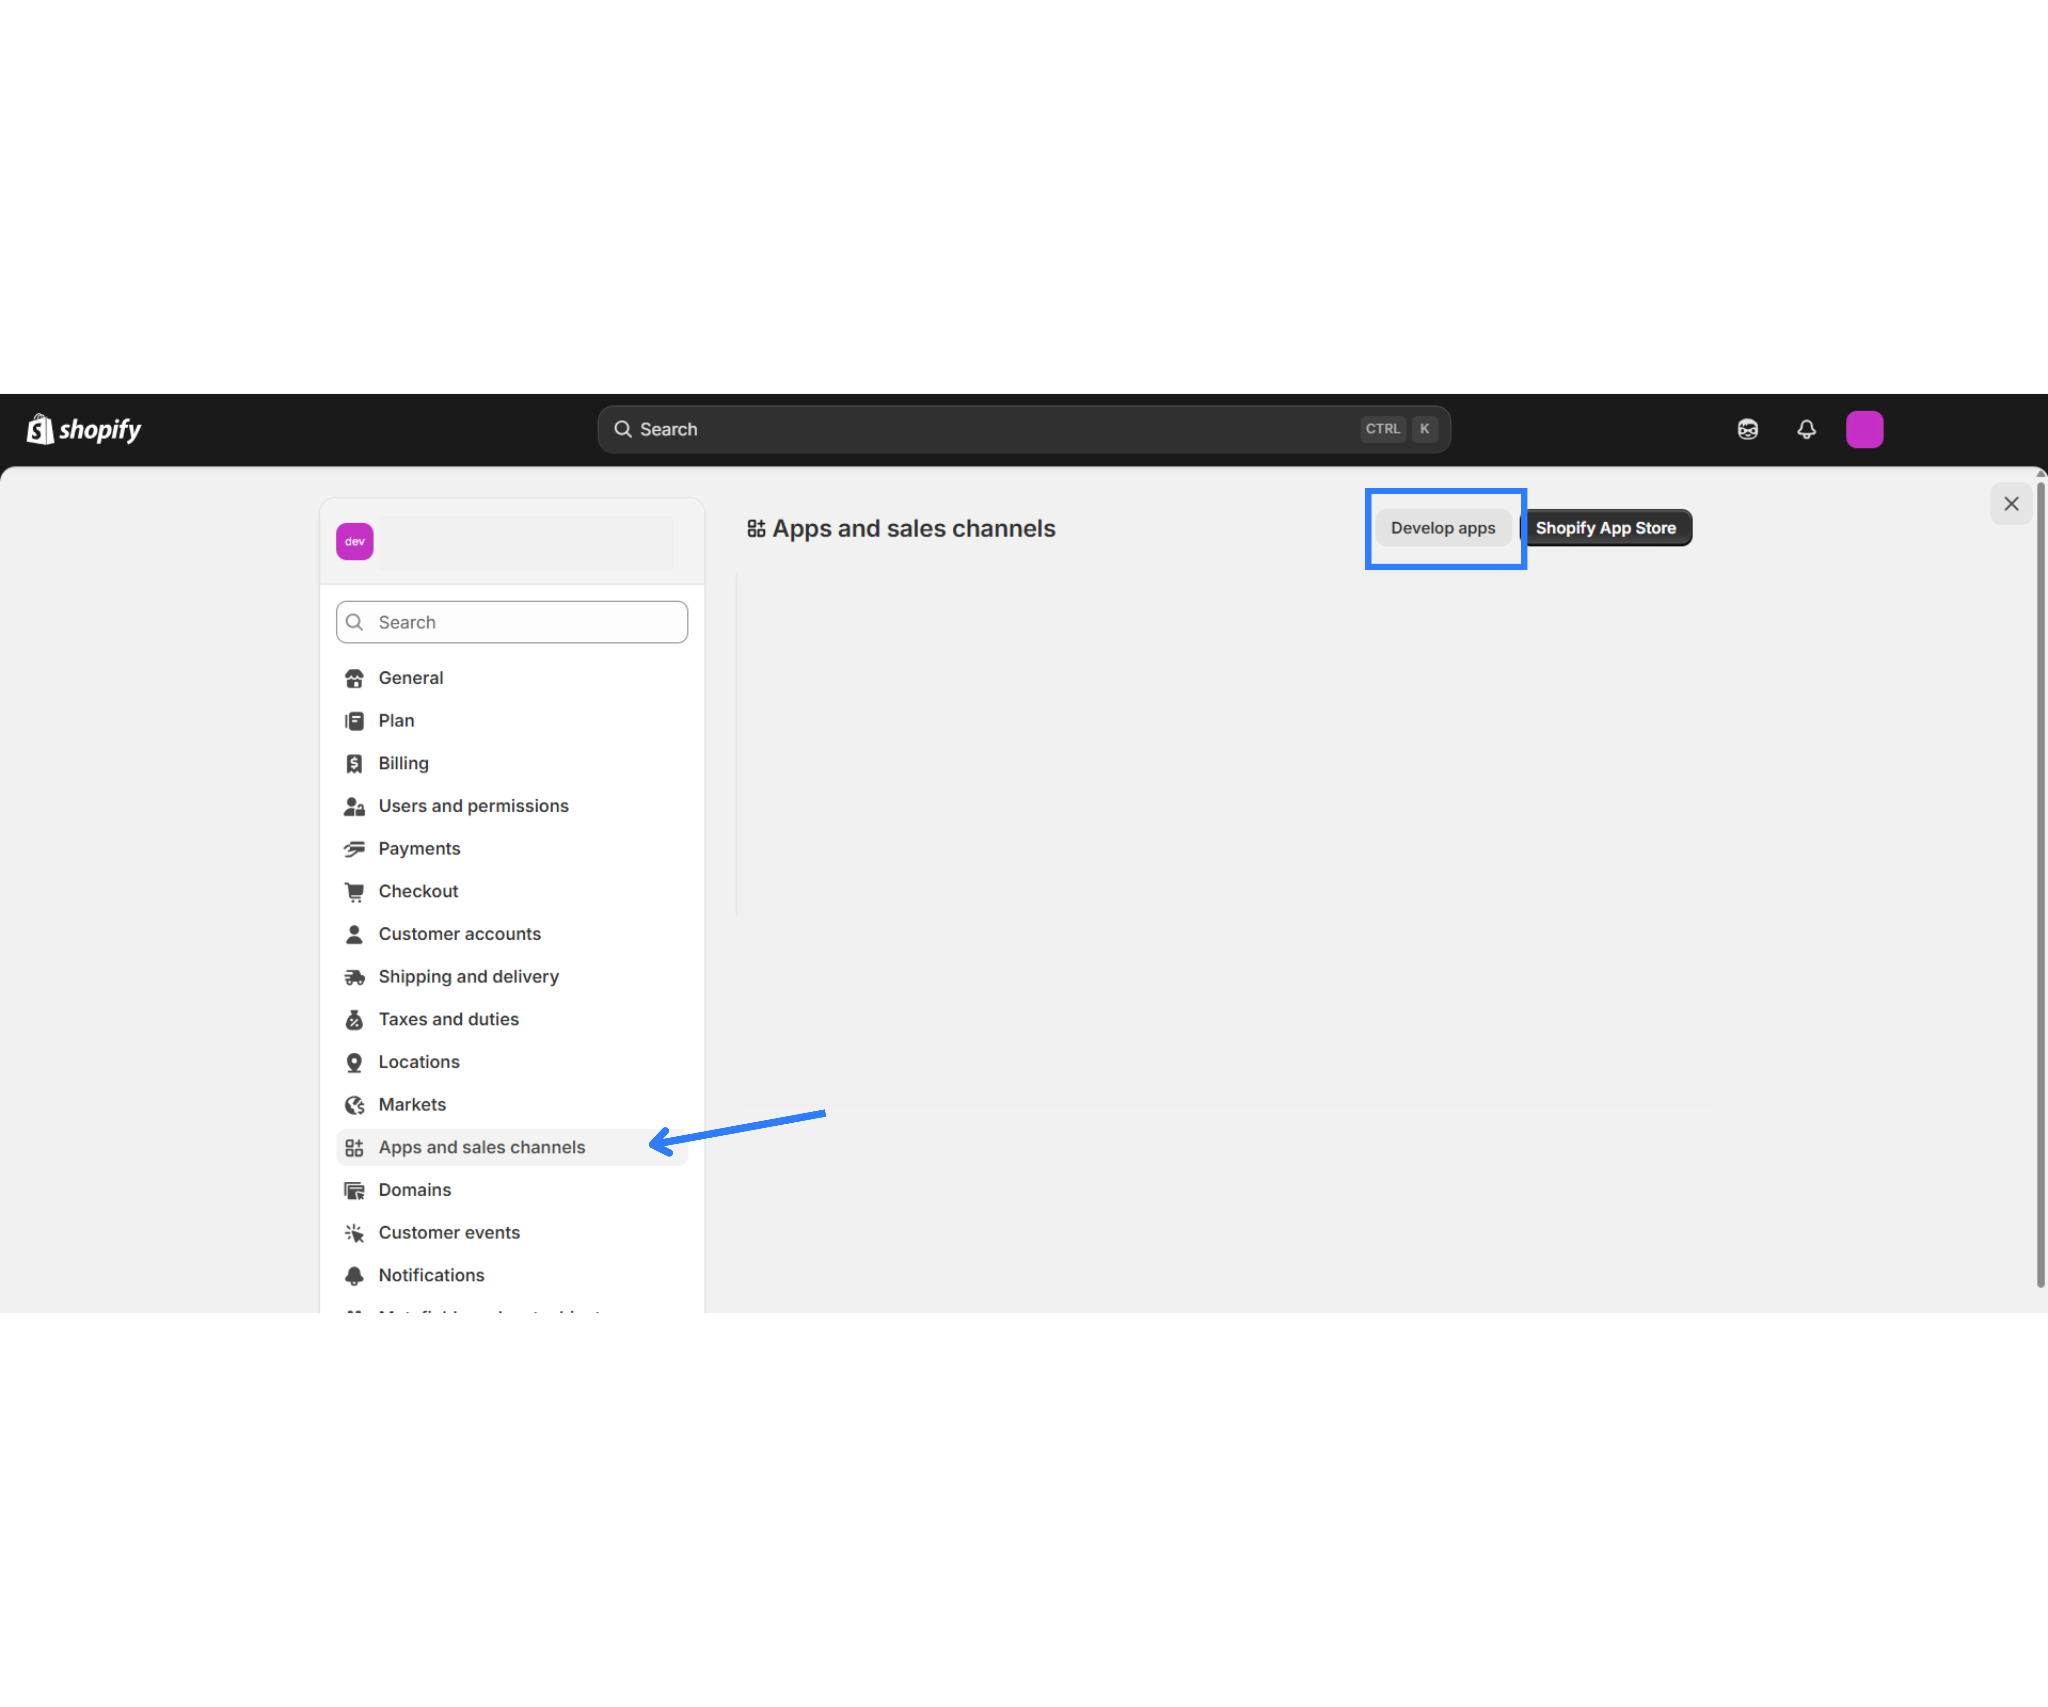
- If prompted, press Allow custom app development.
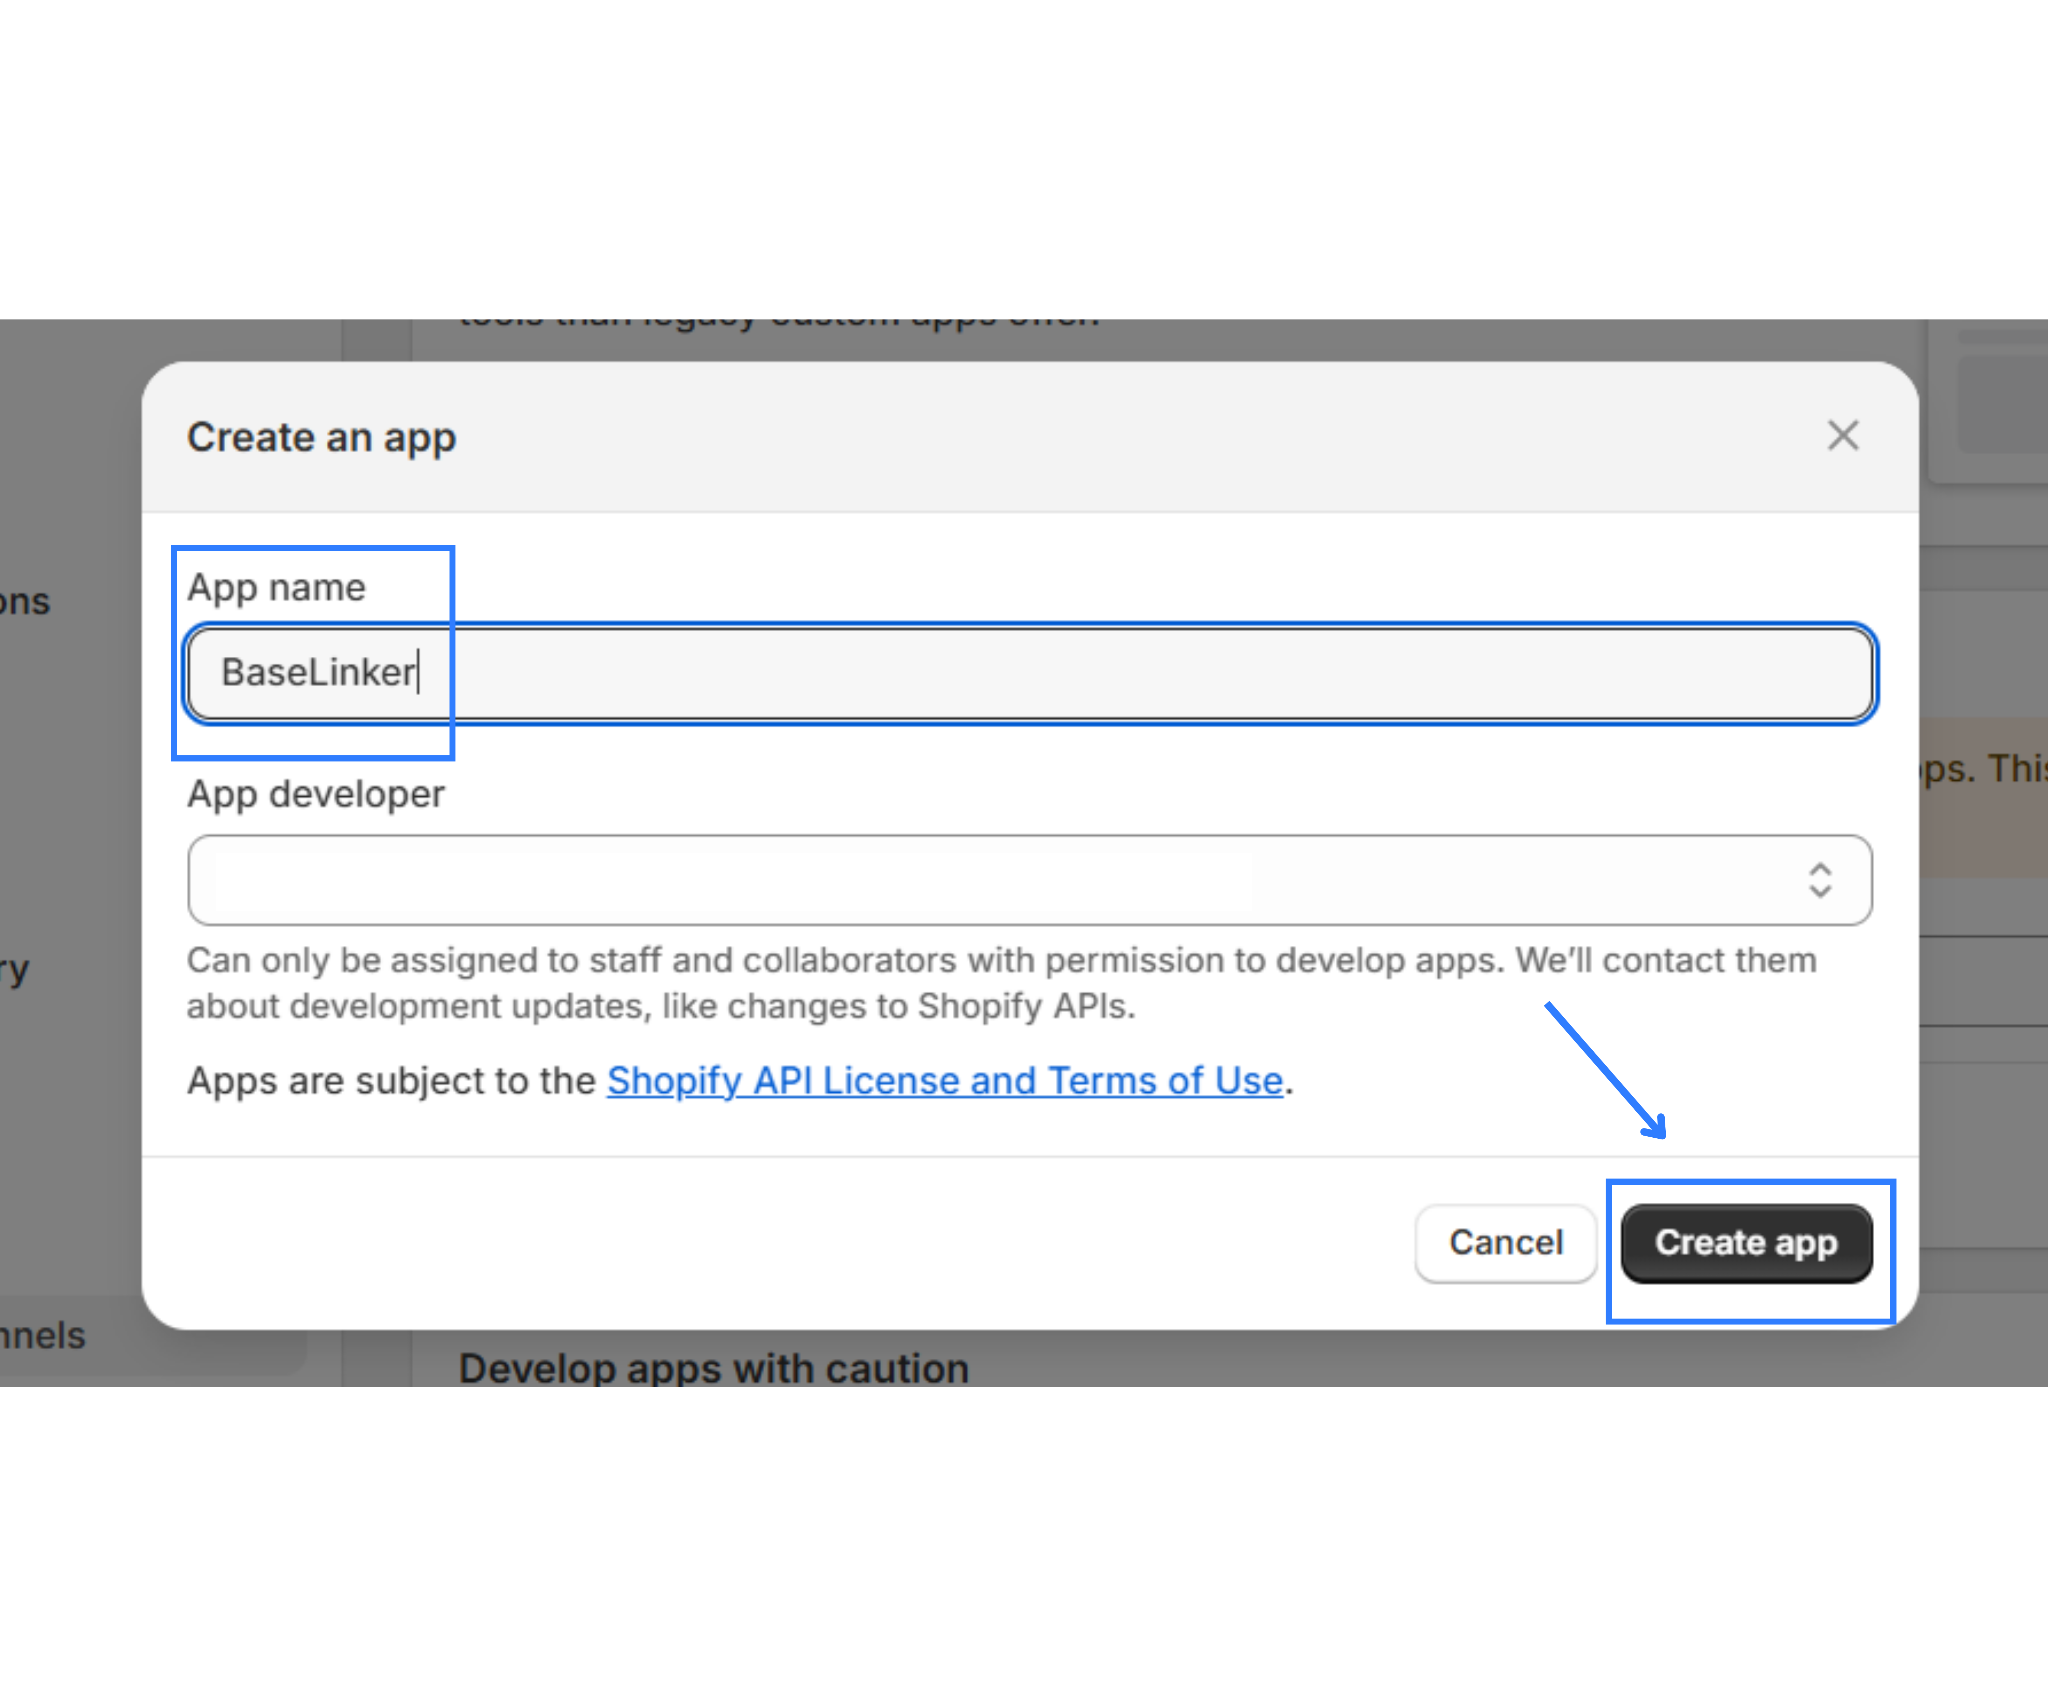
- Click Create an app, give it a name (e.g., “BaseLinker Connector”), then click Create app.
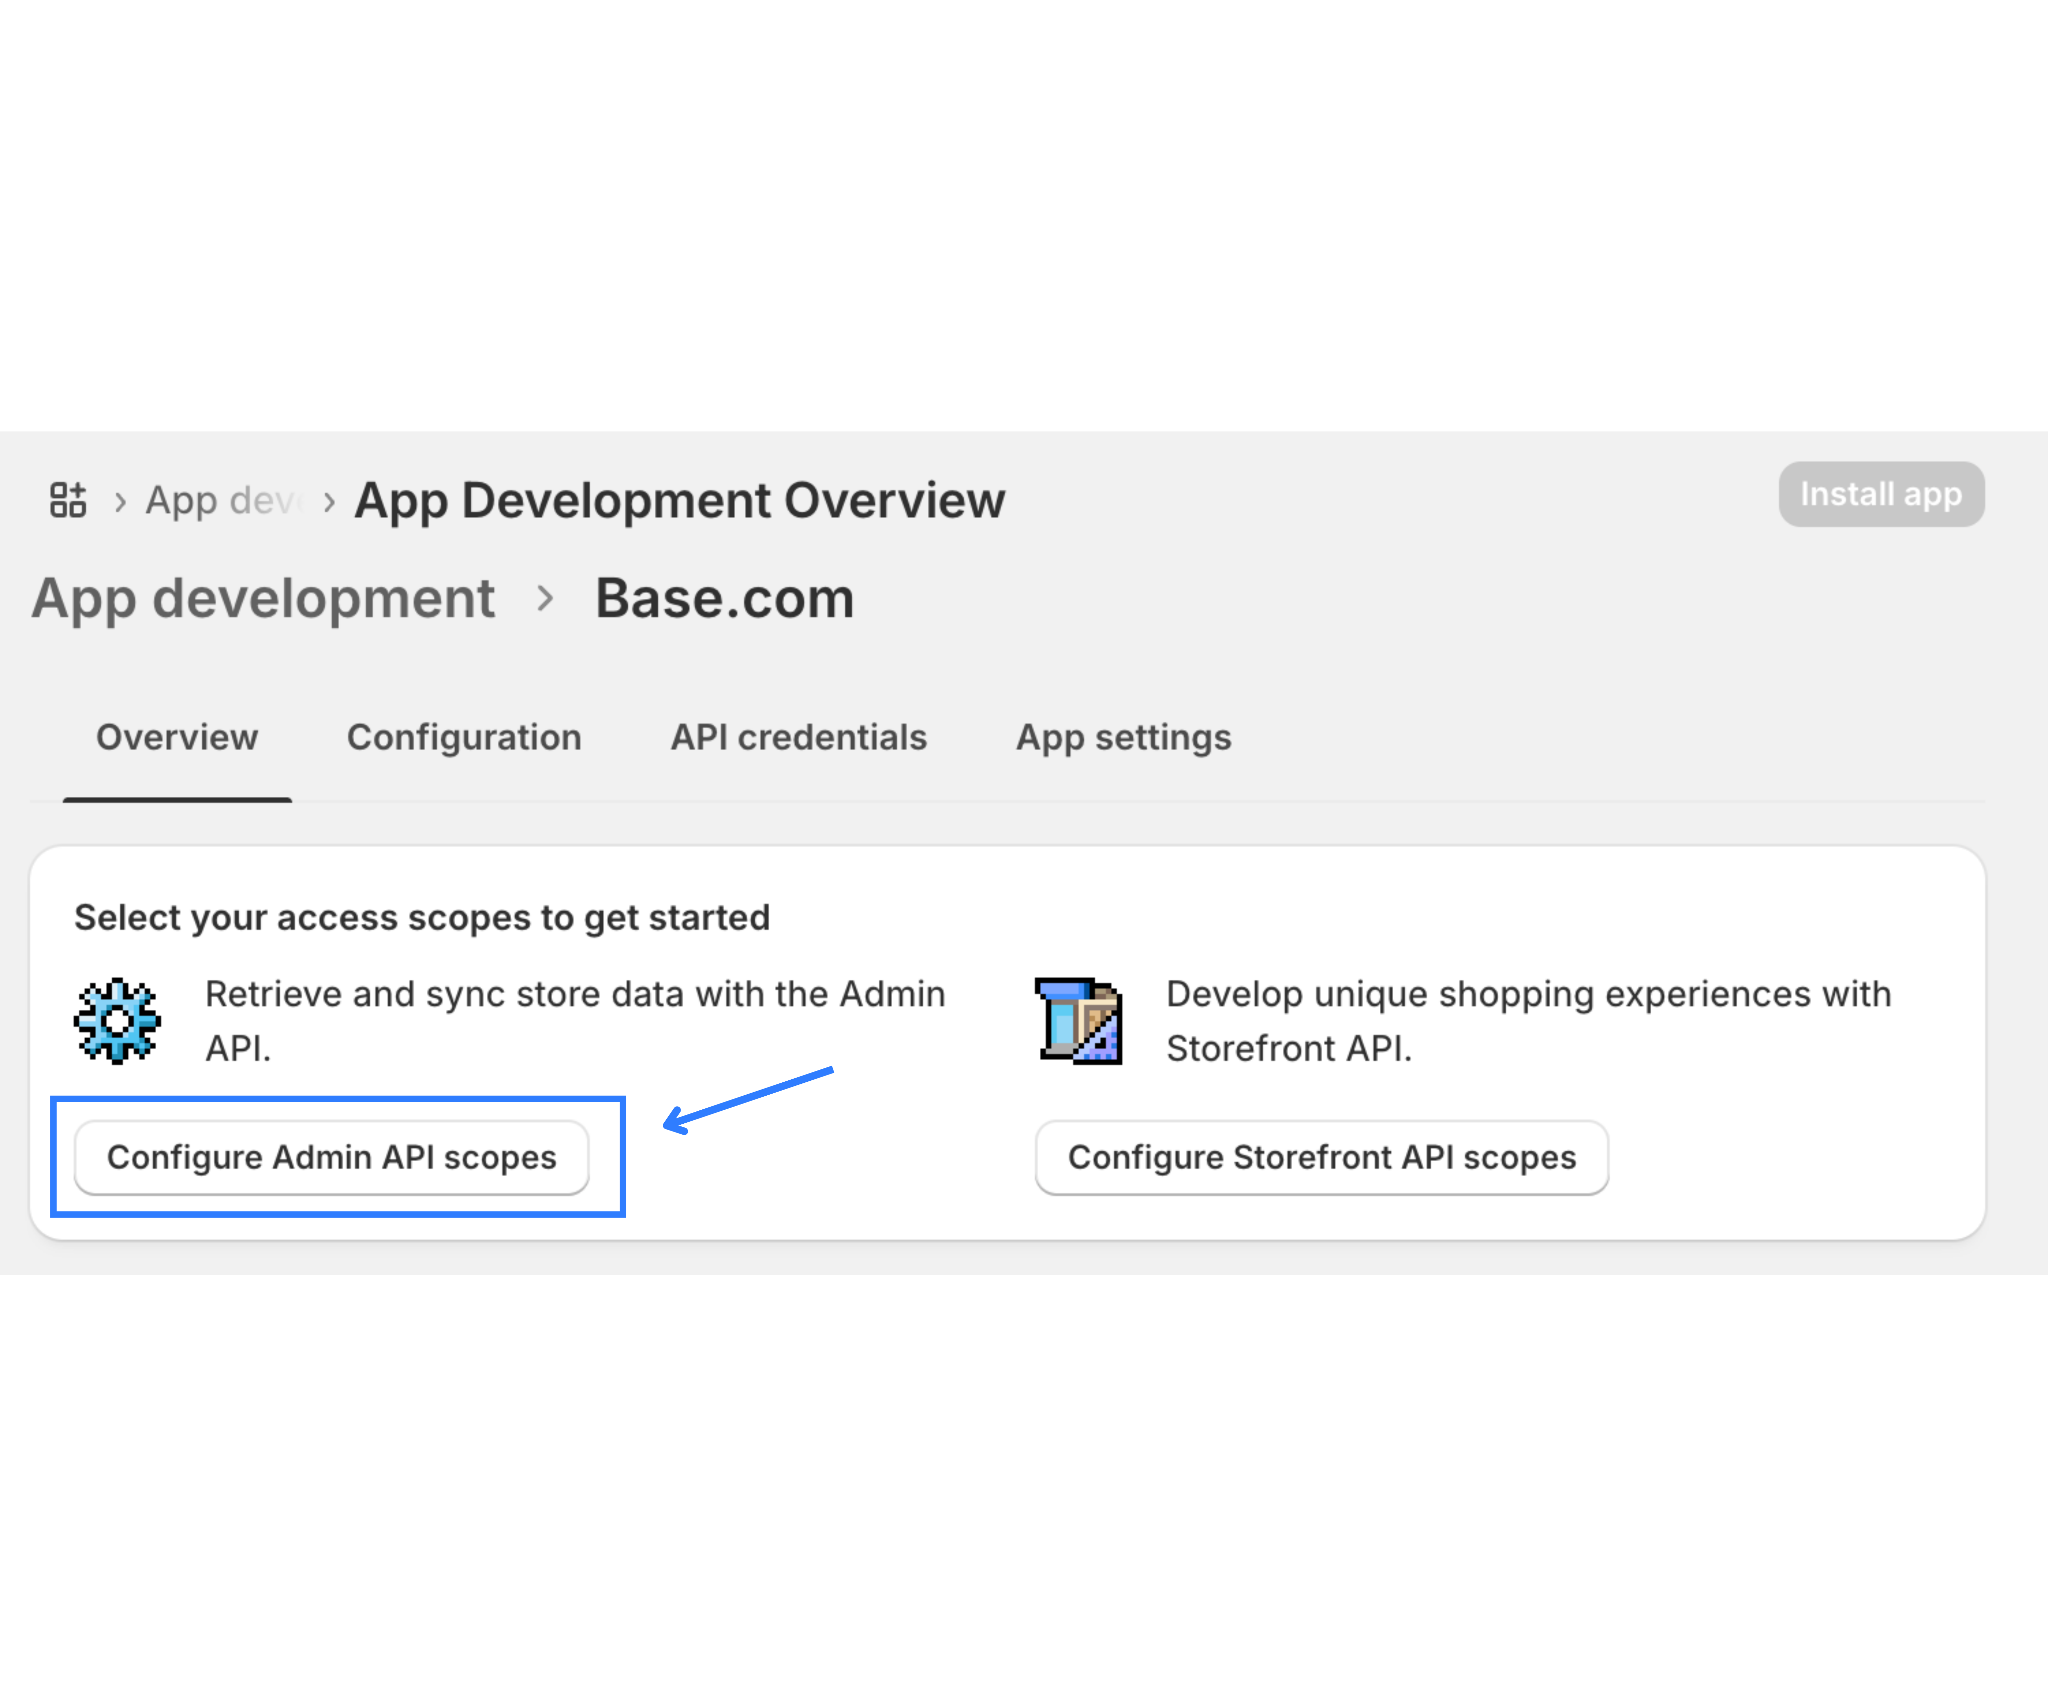
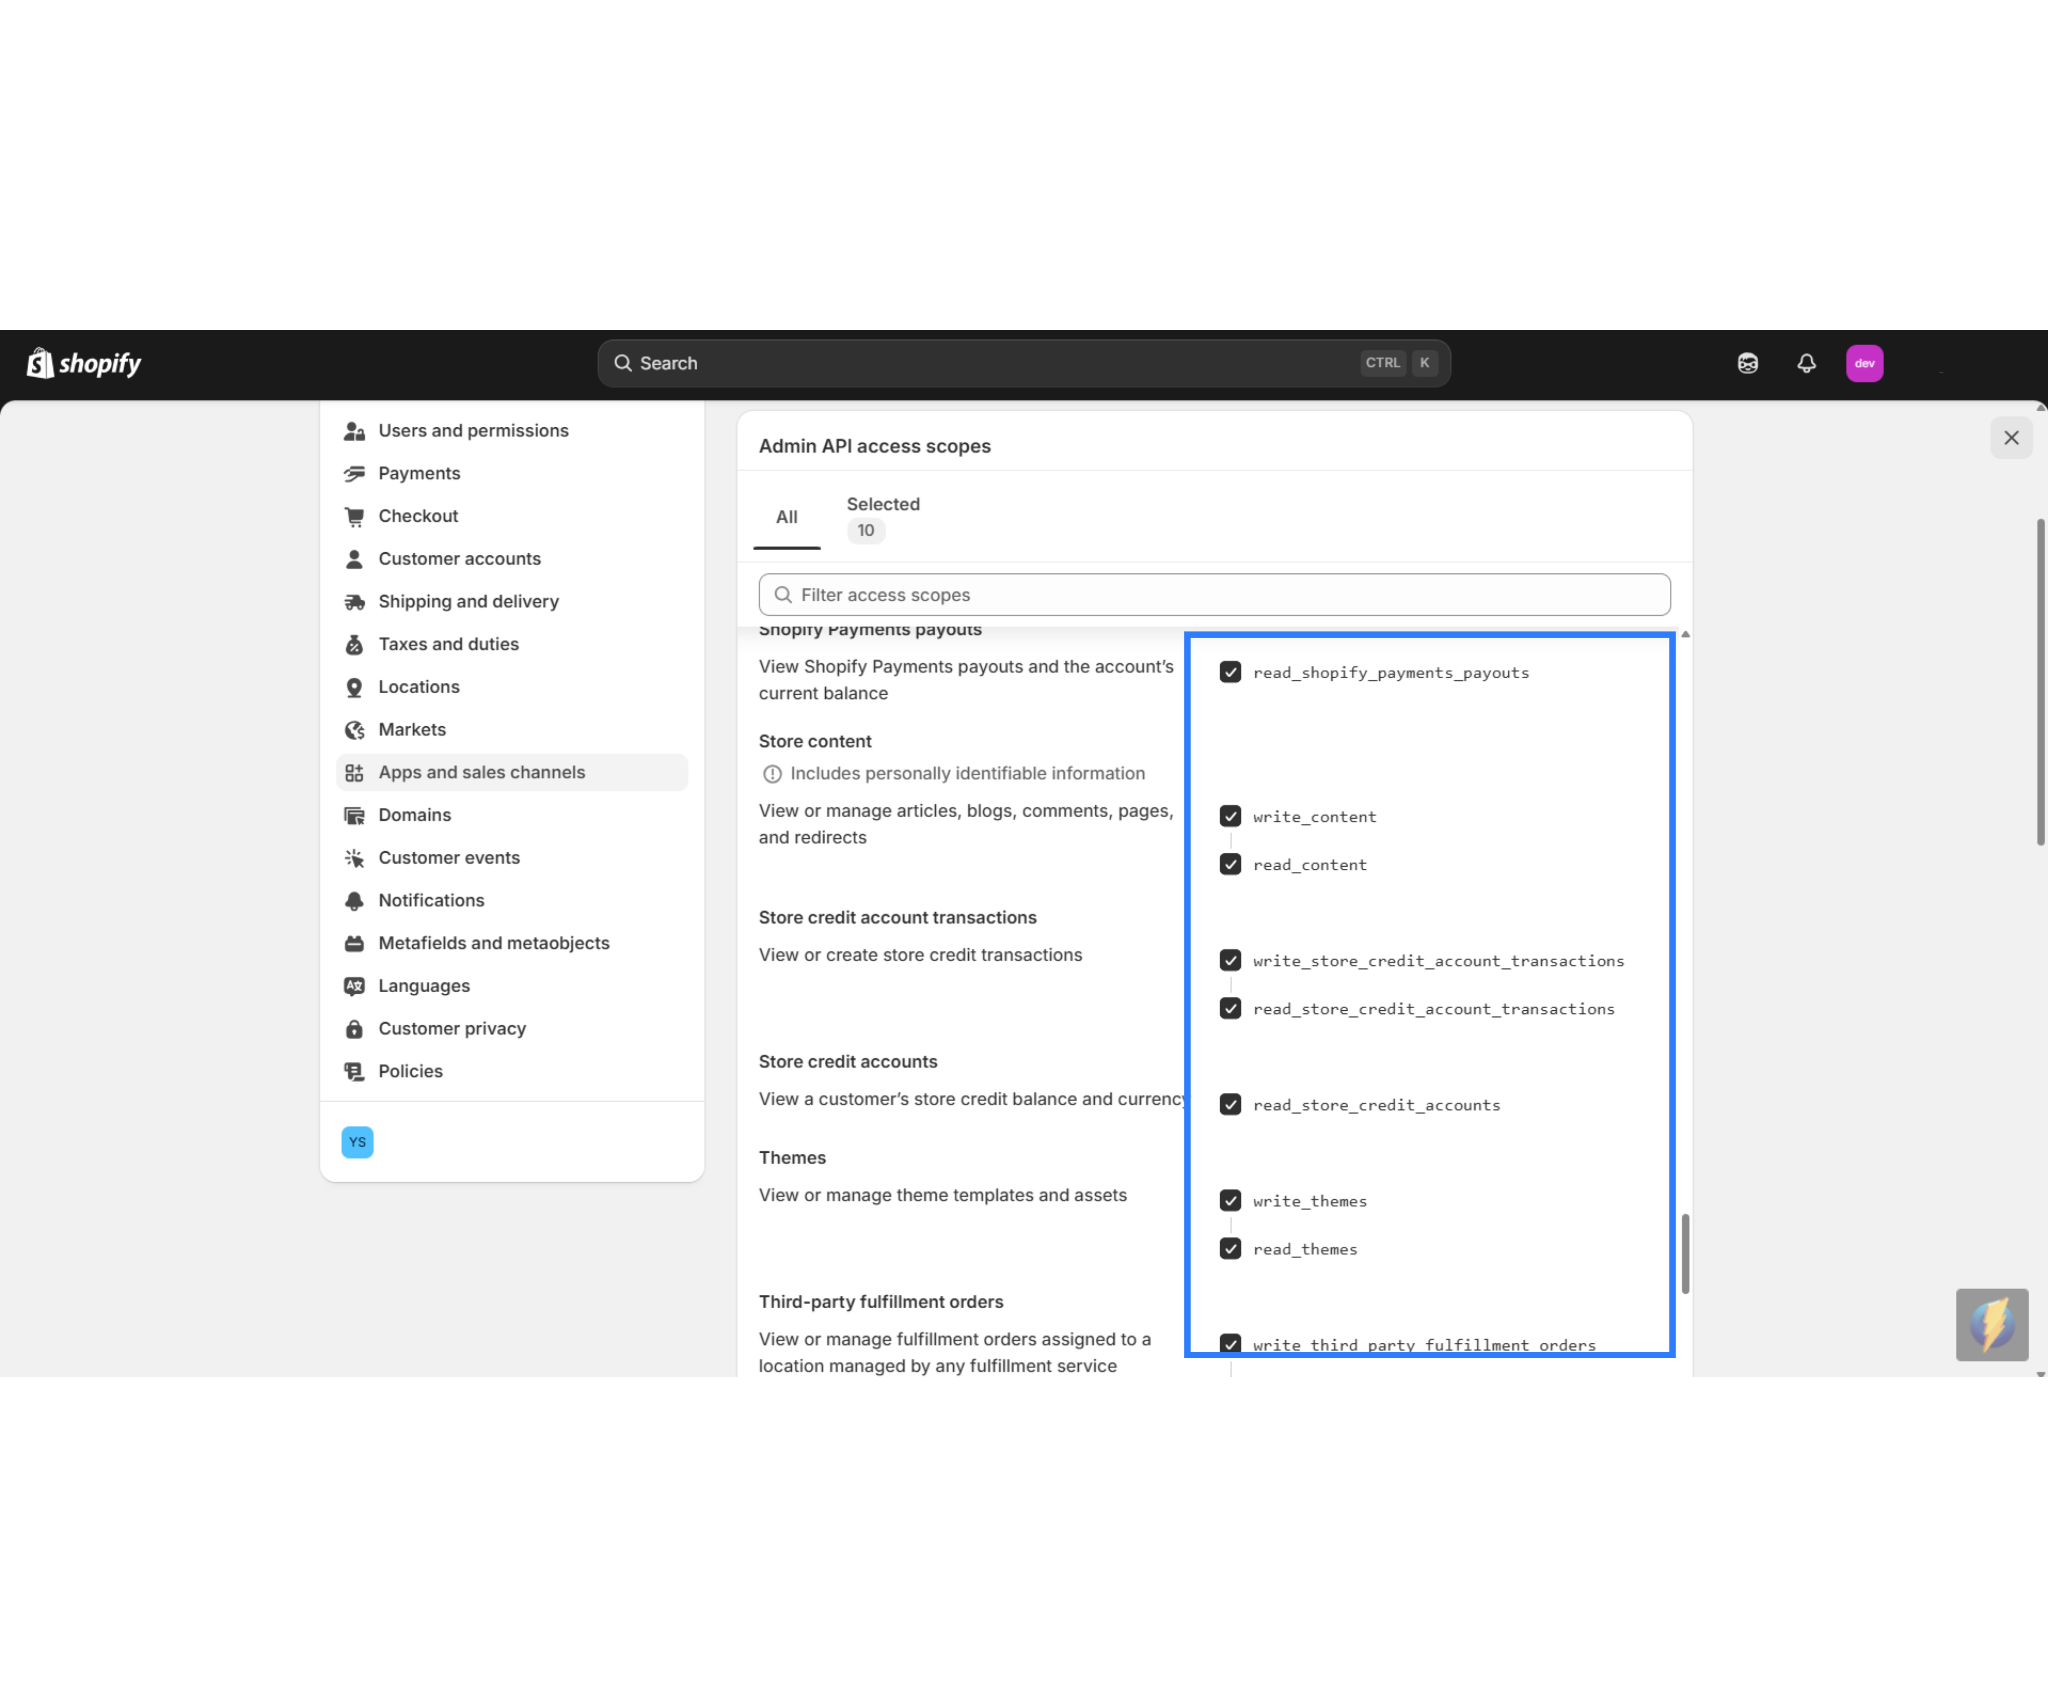
- Under the Configuration section, select Configure Admin API scopes. Grant access to all relevant API methods. Save the configuration.
Why you need this:
Creating the custom app gives you the credentials (API key and Admin API access token) that Base will use to read and write data to your Shopify store. Without this, Base cannot communicate with Shopify.
Note:
- When granting scopes (permissions), it’s a good idea to grant all the permissions required by Base (read/write orders, products, inventory, fulfilment) so nothing is blocked.
- Keep the credentials safe – they act like your password for API access.
- Make sure you use this custom app only for the Base integration, so you can track and revoke it independently if needed.
4. Installing the App and Generating Credentials
Once the custom app is created in Shopify, you need to install it and retrieve your API credentials.
Procedure:
- In the app you created, go to the API credentials tab.
- Click Install App.
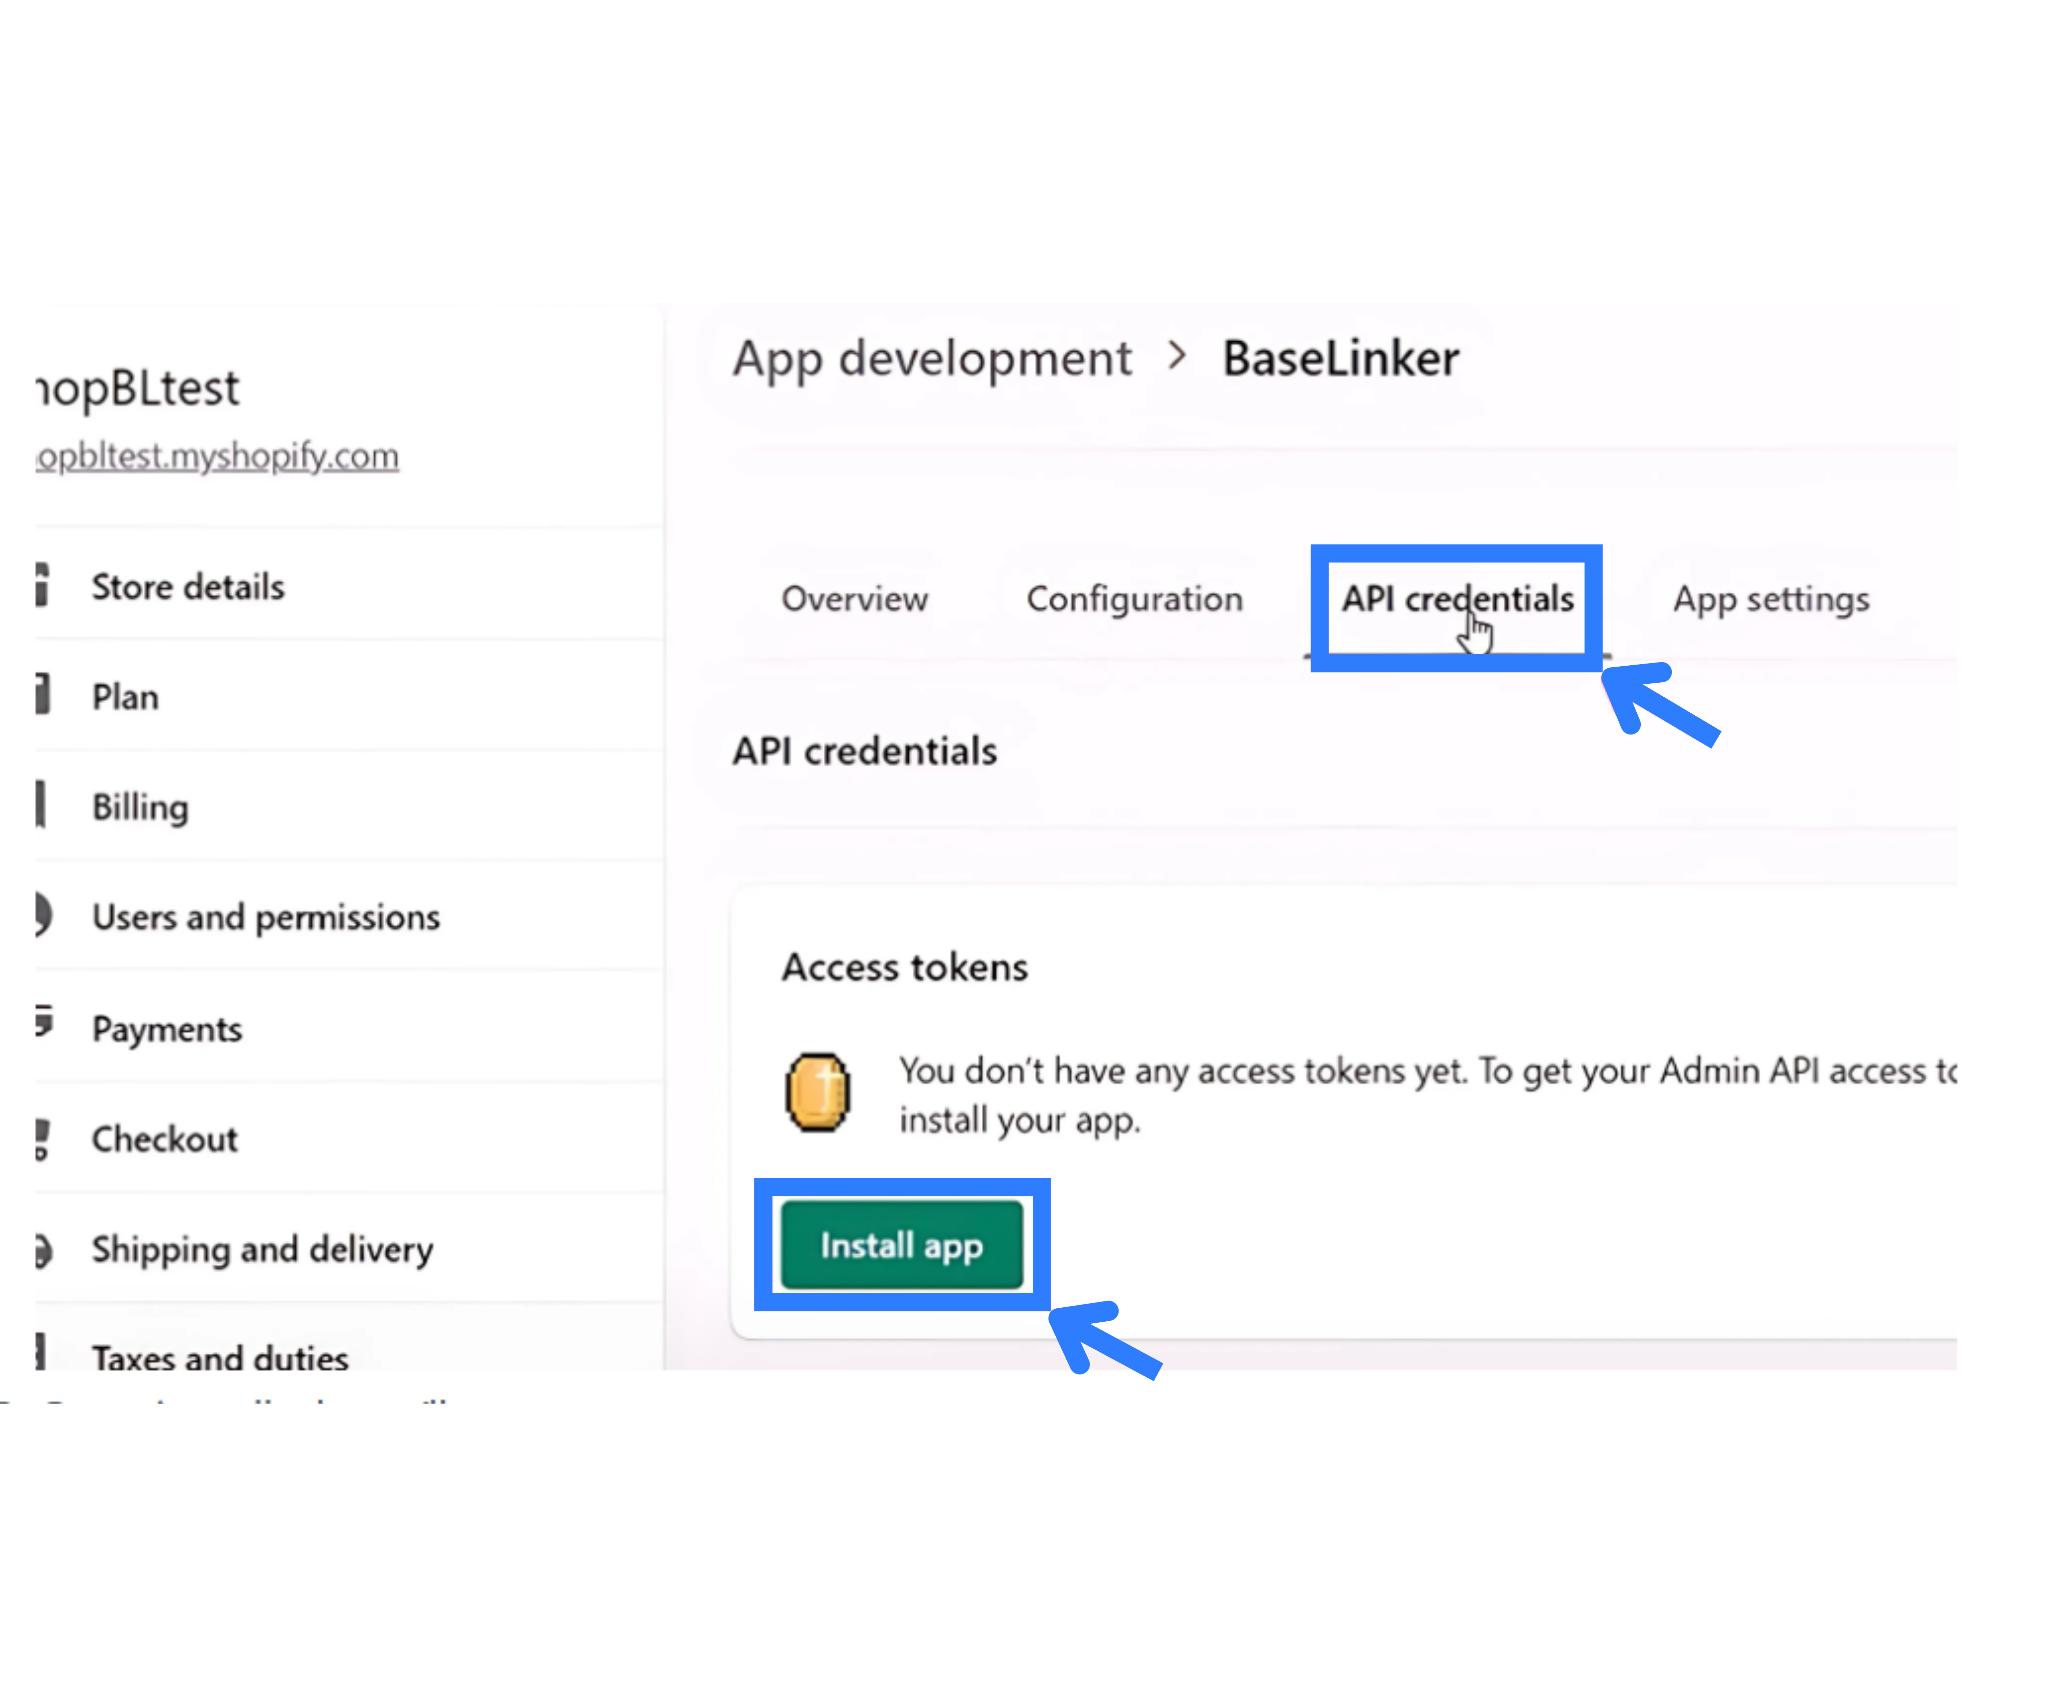
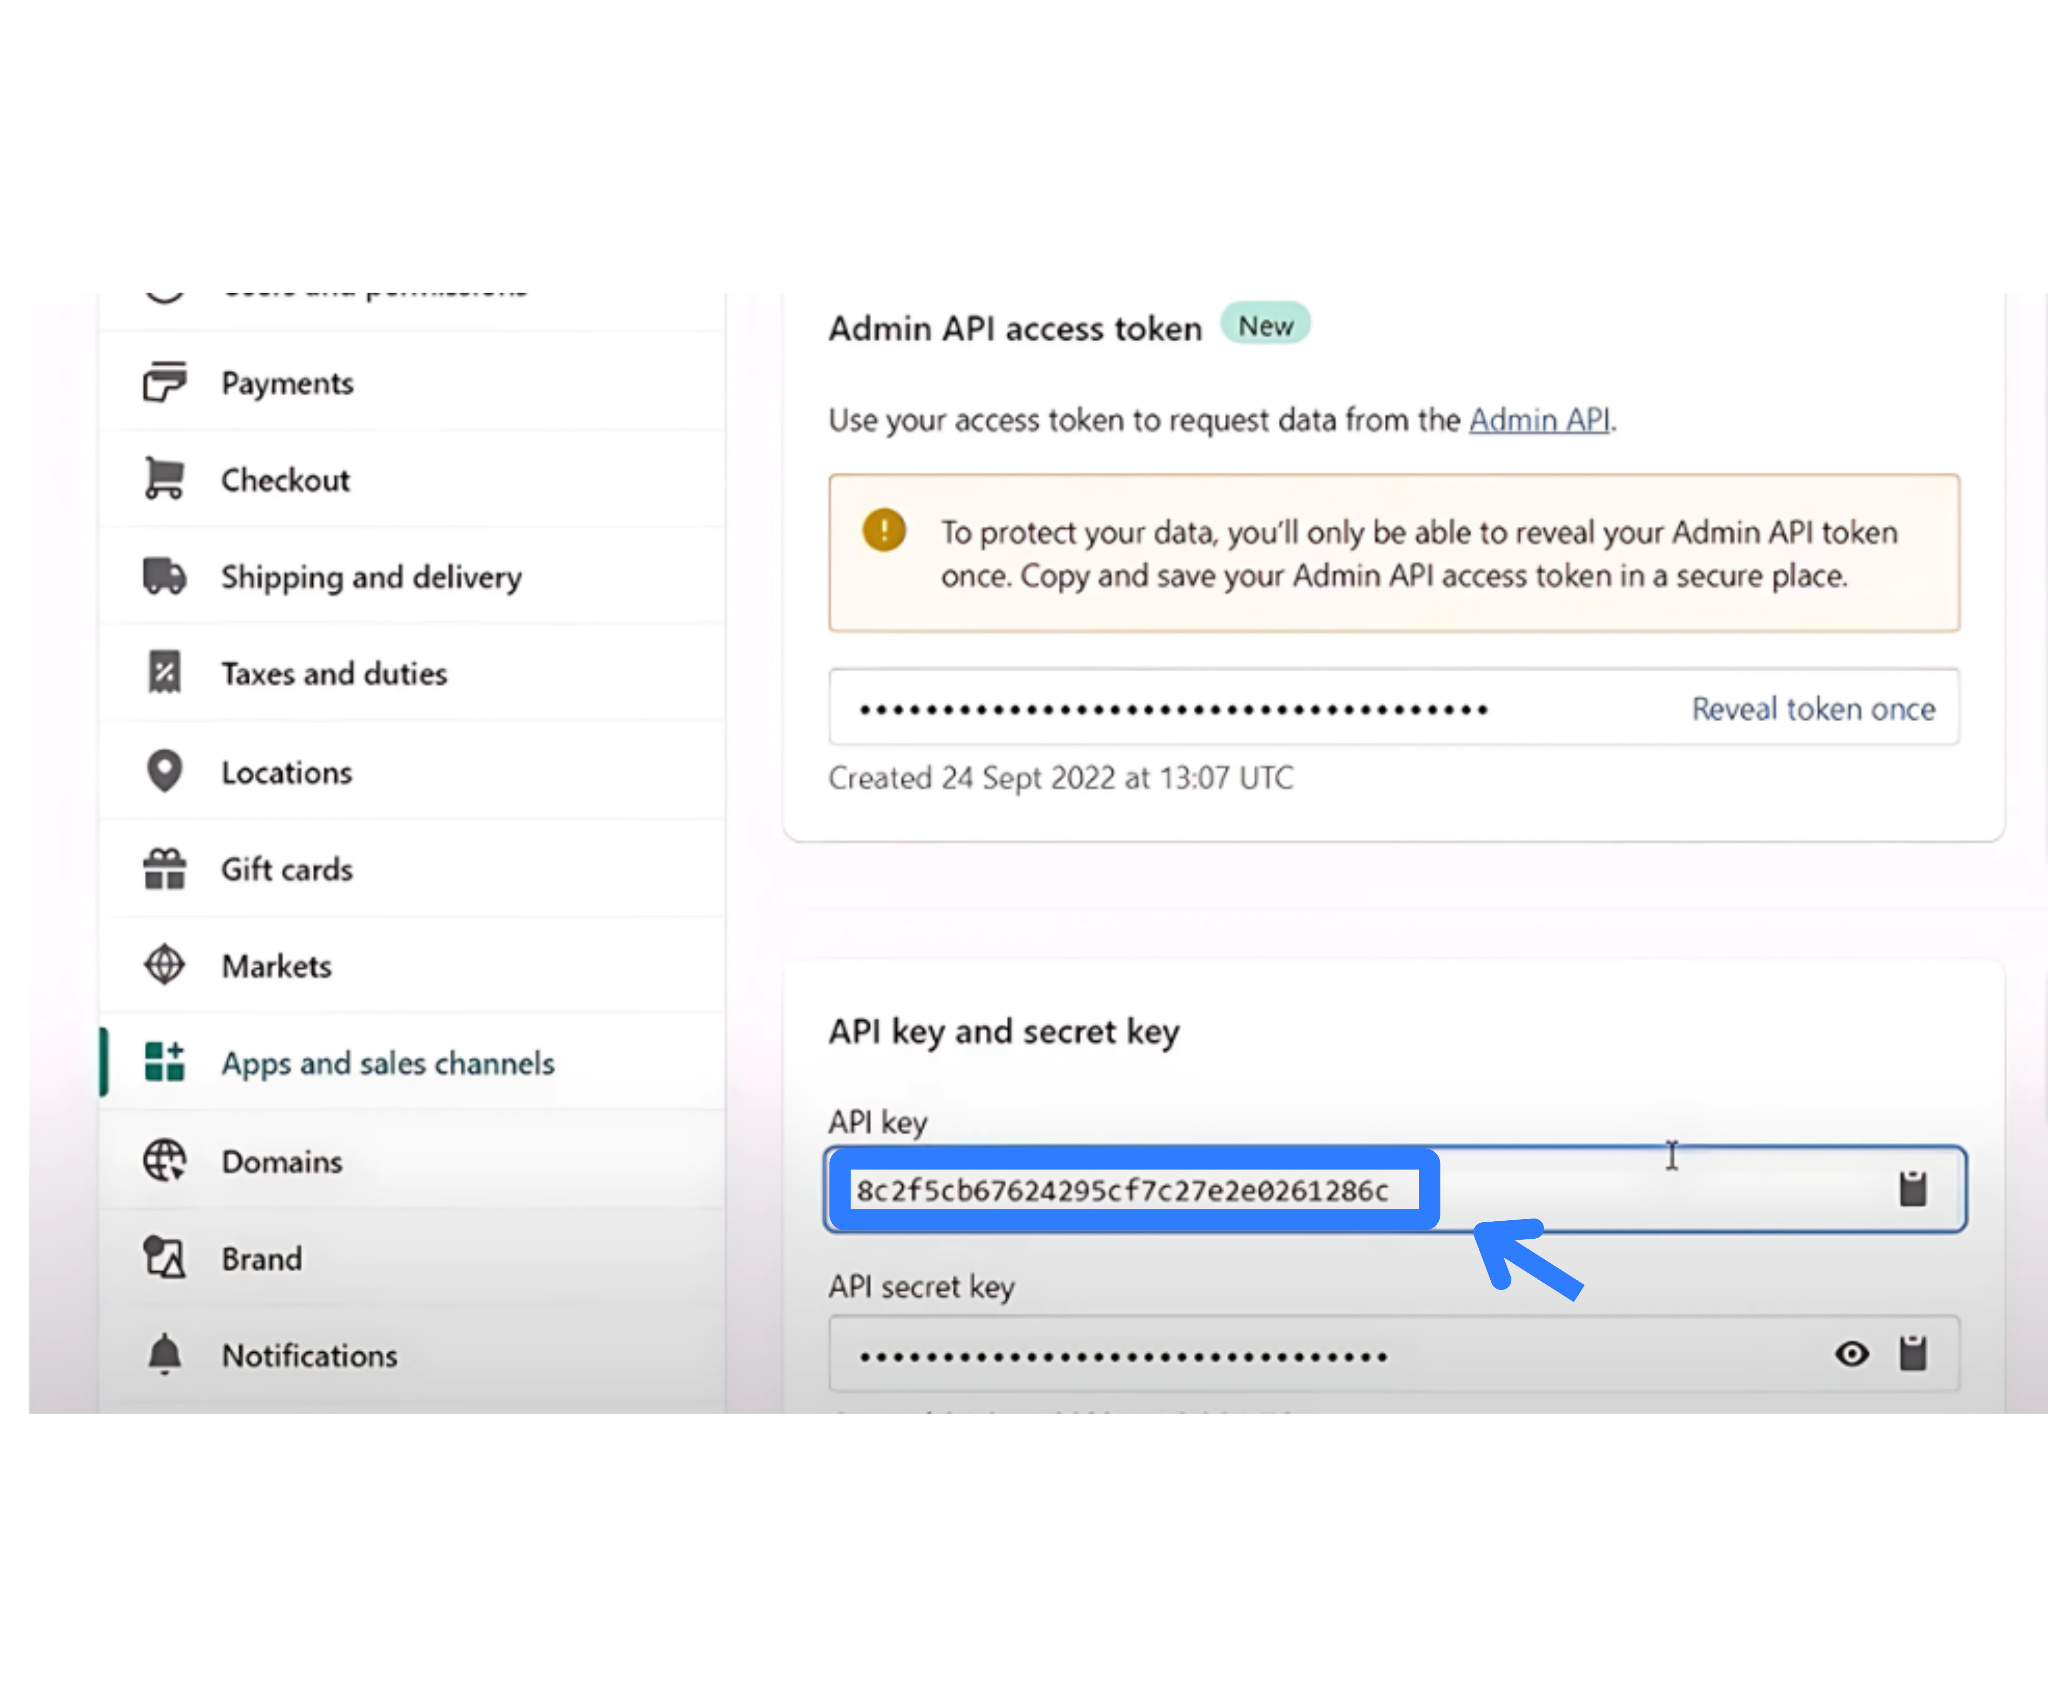
- After installation, you will be provided with:
- API Key
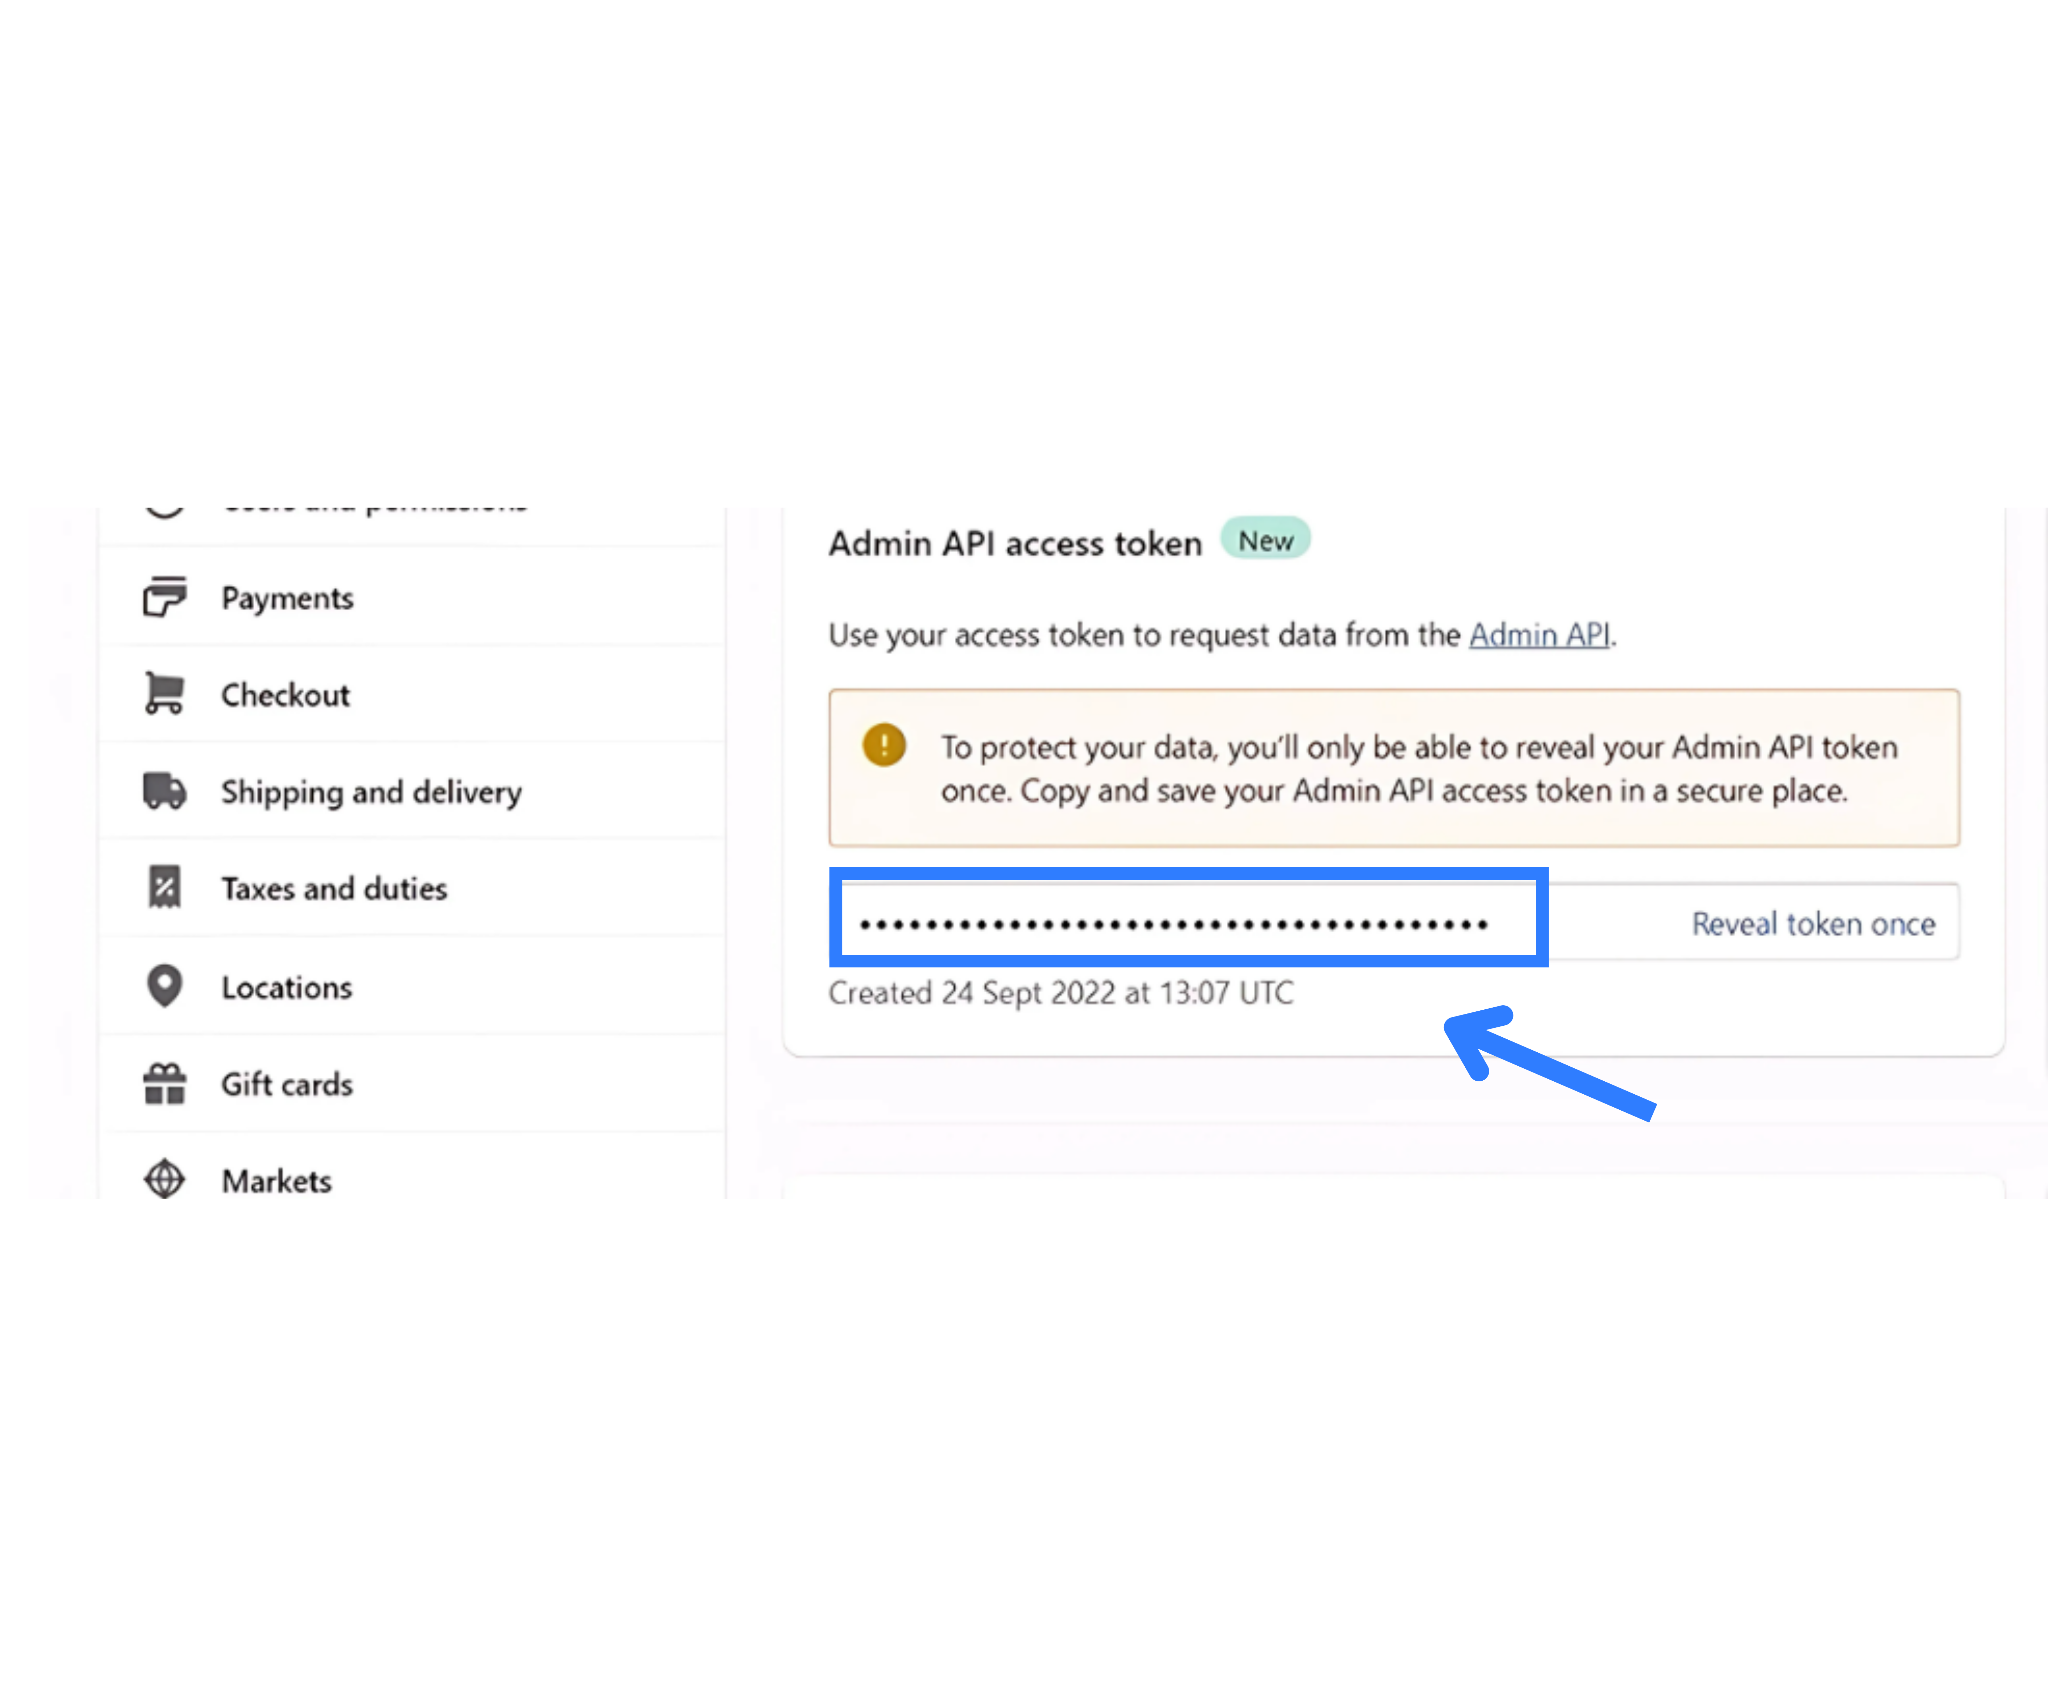
- Admin API Access Token (this will serve as your “API Password” in Base)
- Copy these credentials carefully.
Why this matters:
These two values (API Key and API Password) are the authentication mechanism that Base uses to securely connect to your Shopify store. Without correctly installing the app and retrieving them, Base cannot link.
Note:
- For the Admin API Access Token, Shopify may only show it once – copy it securely and store safely.
- If you ever revoke or reinstall the app, you will need to update Base with the new credentials.
- Keep a note of what scopes you selected earlier, if Base requires a permission you forgot, you’ll need to go back and update.
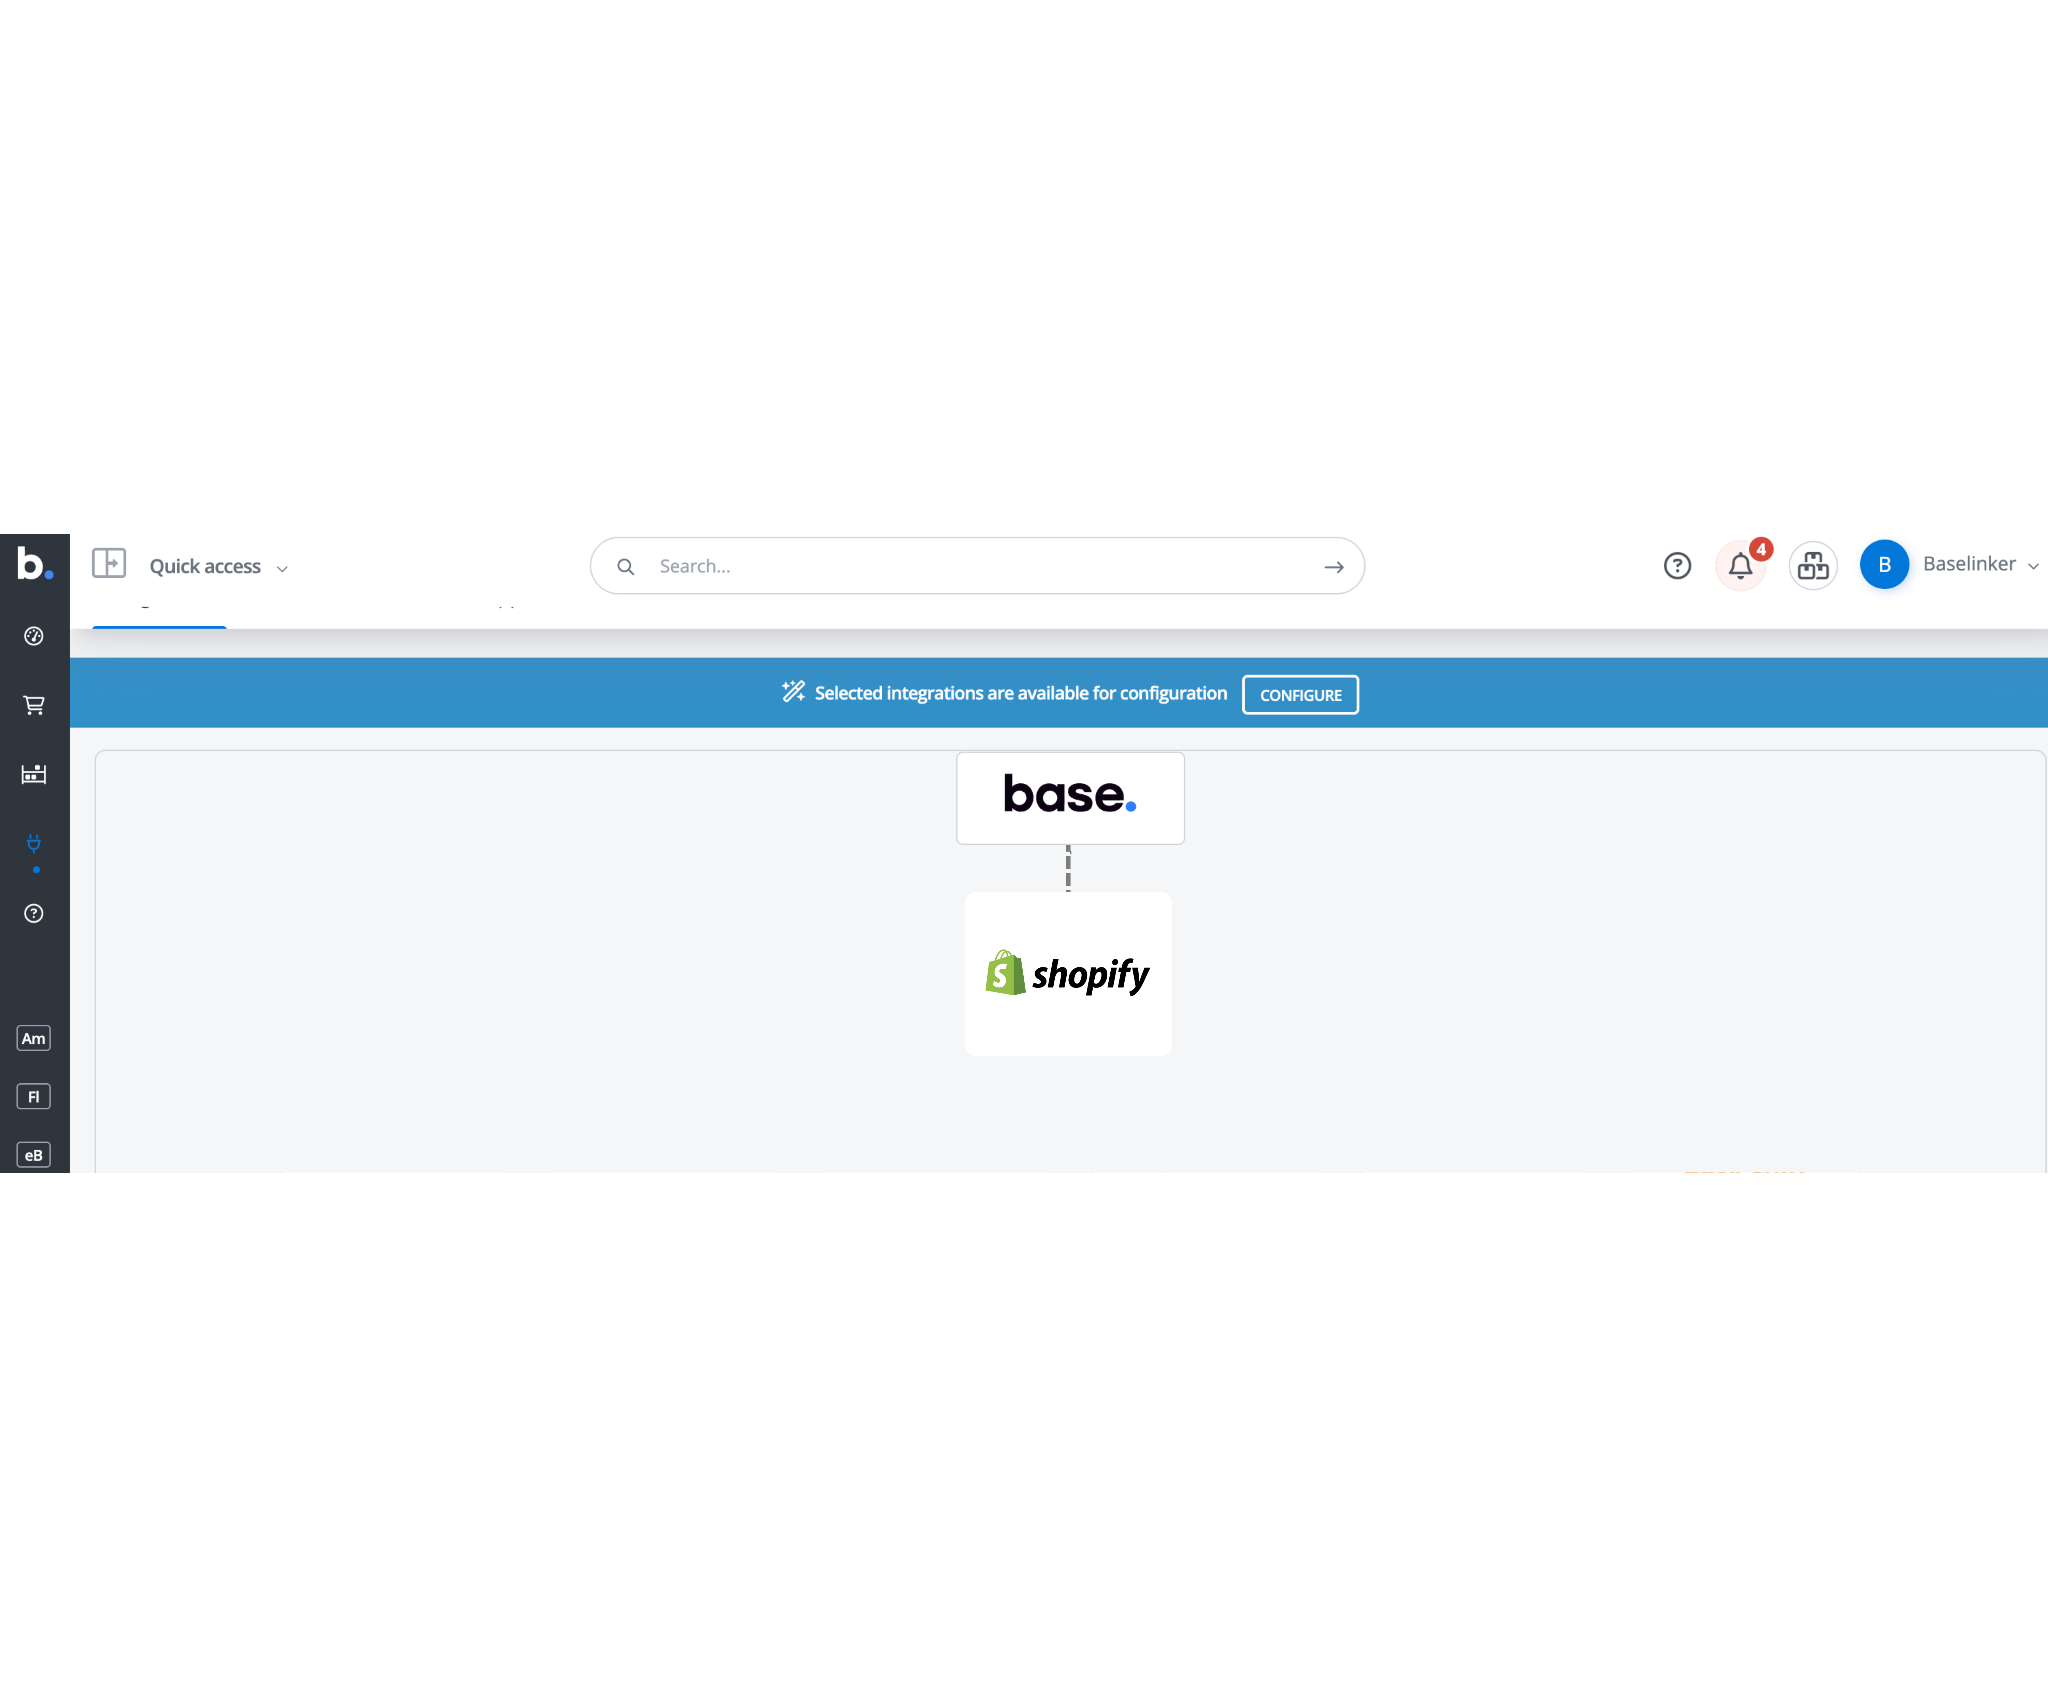
5. Completing the Integration in Base
Now that you have your credentials, you need to finalize the integration inside Base so the connection becomes active.
What to do in Base:
- In the Shopify integration screen inside Base, paste the API Key into the API Key field.
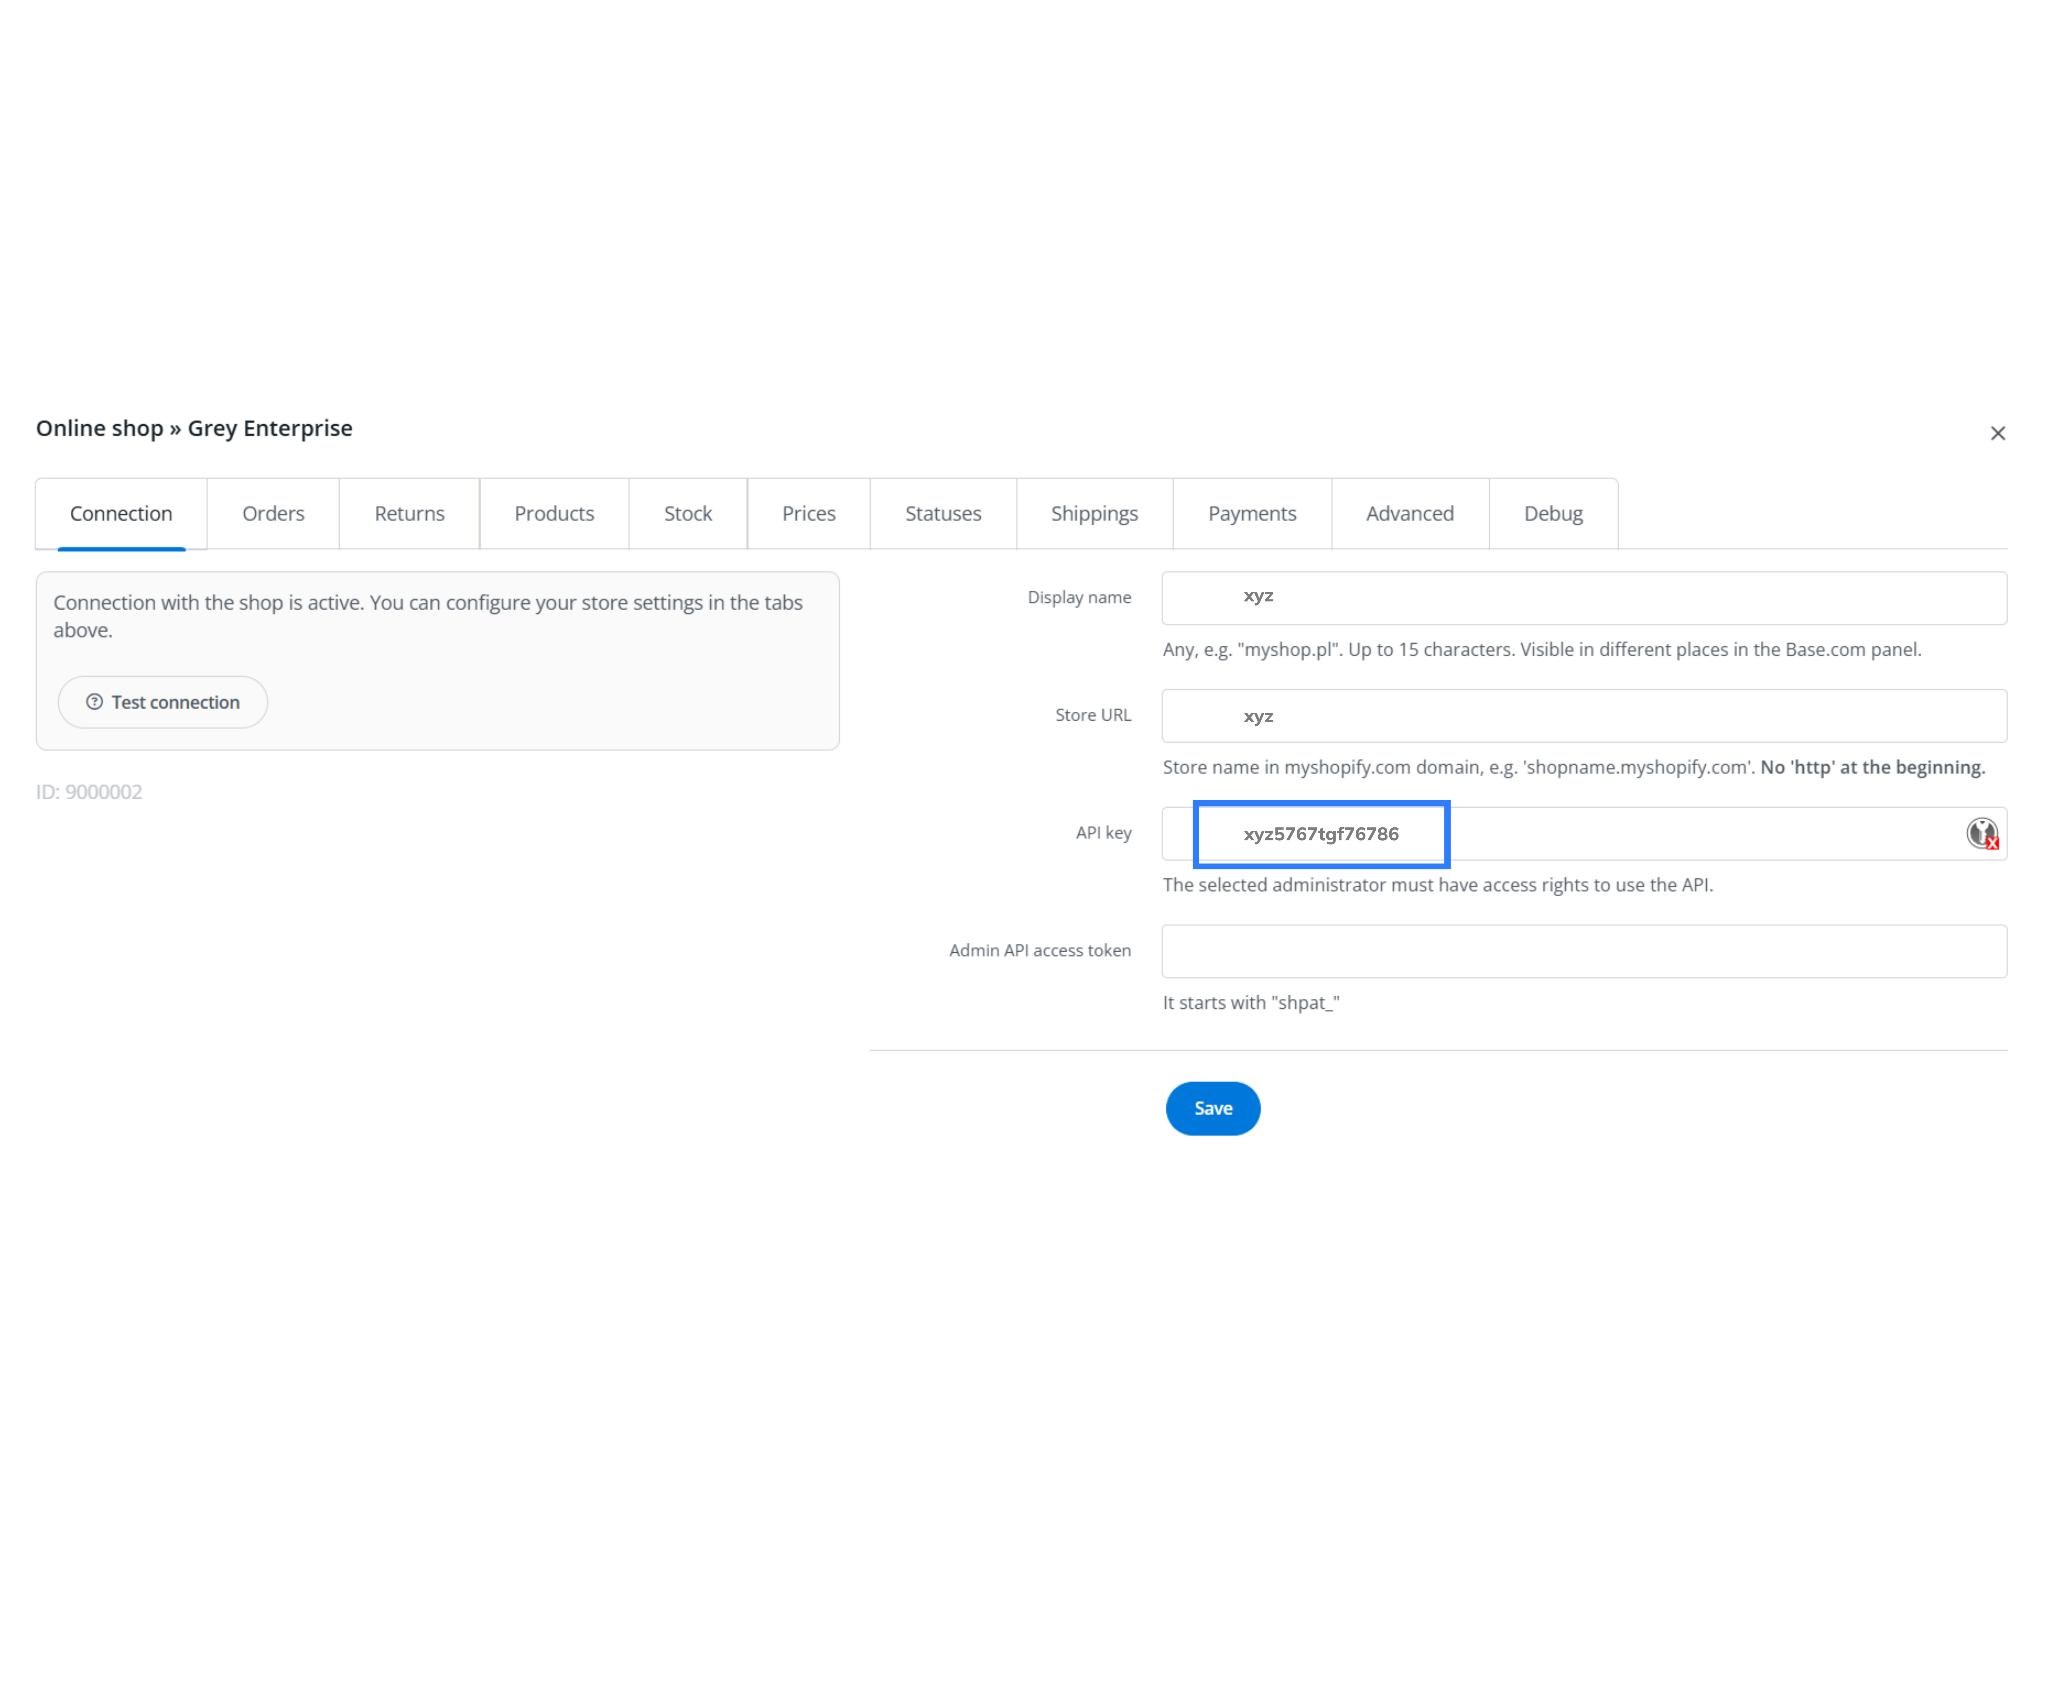
- Paste the Admin API Access Token into the API Password field.
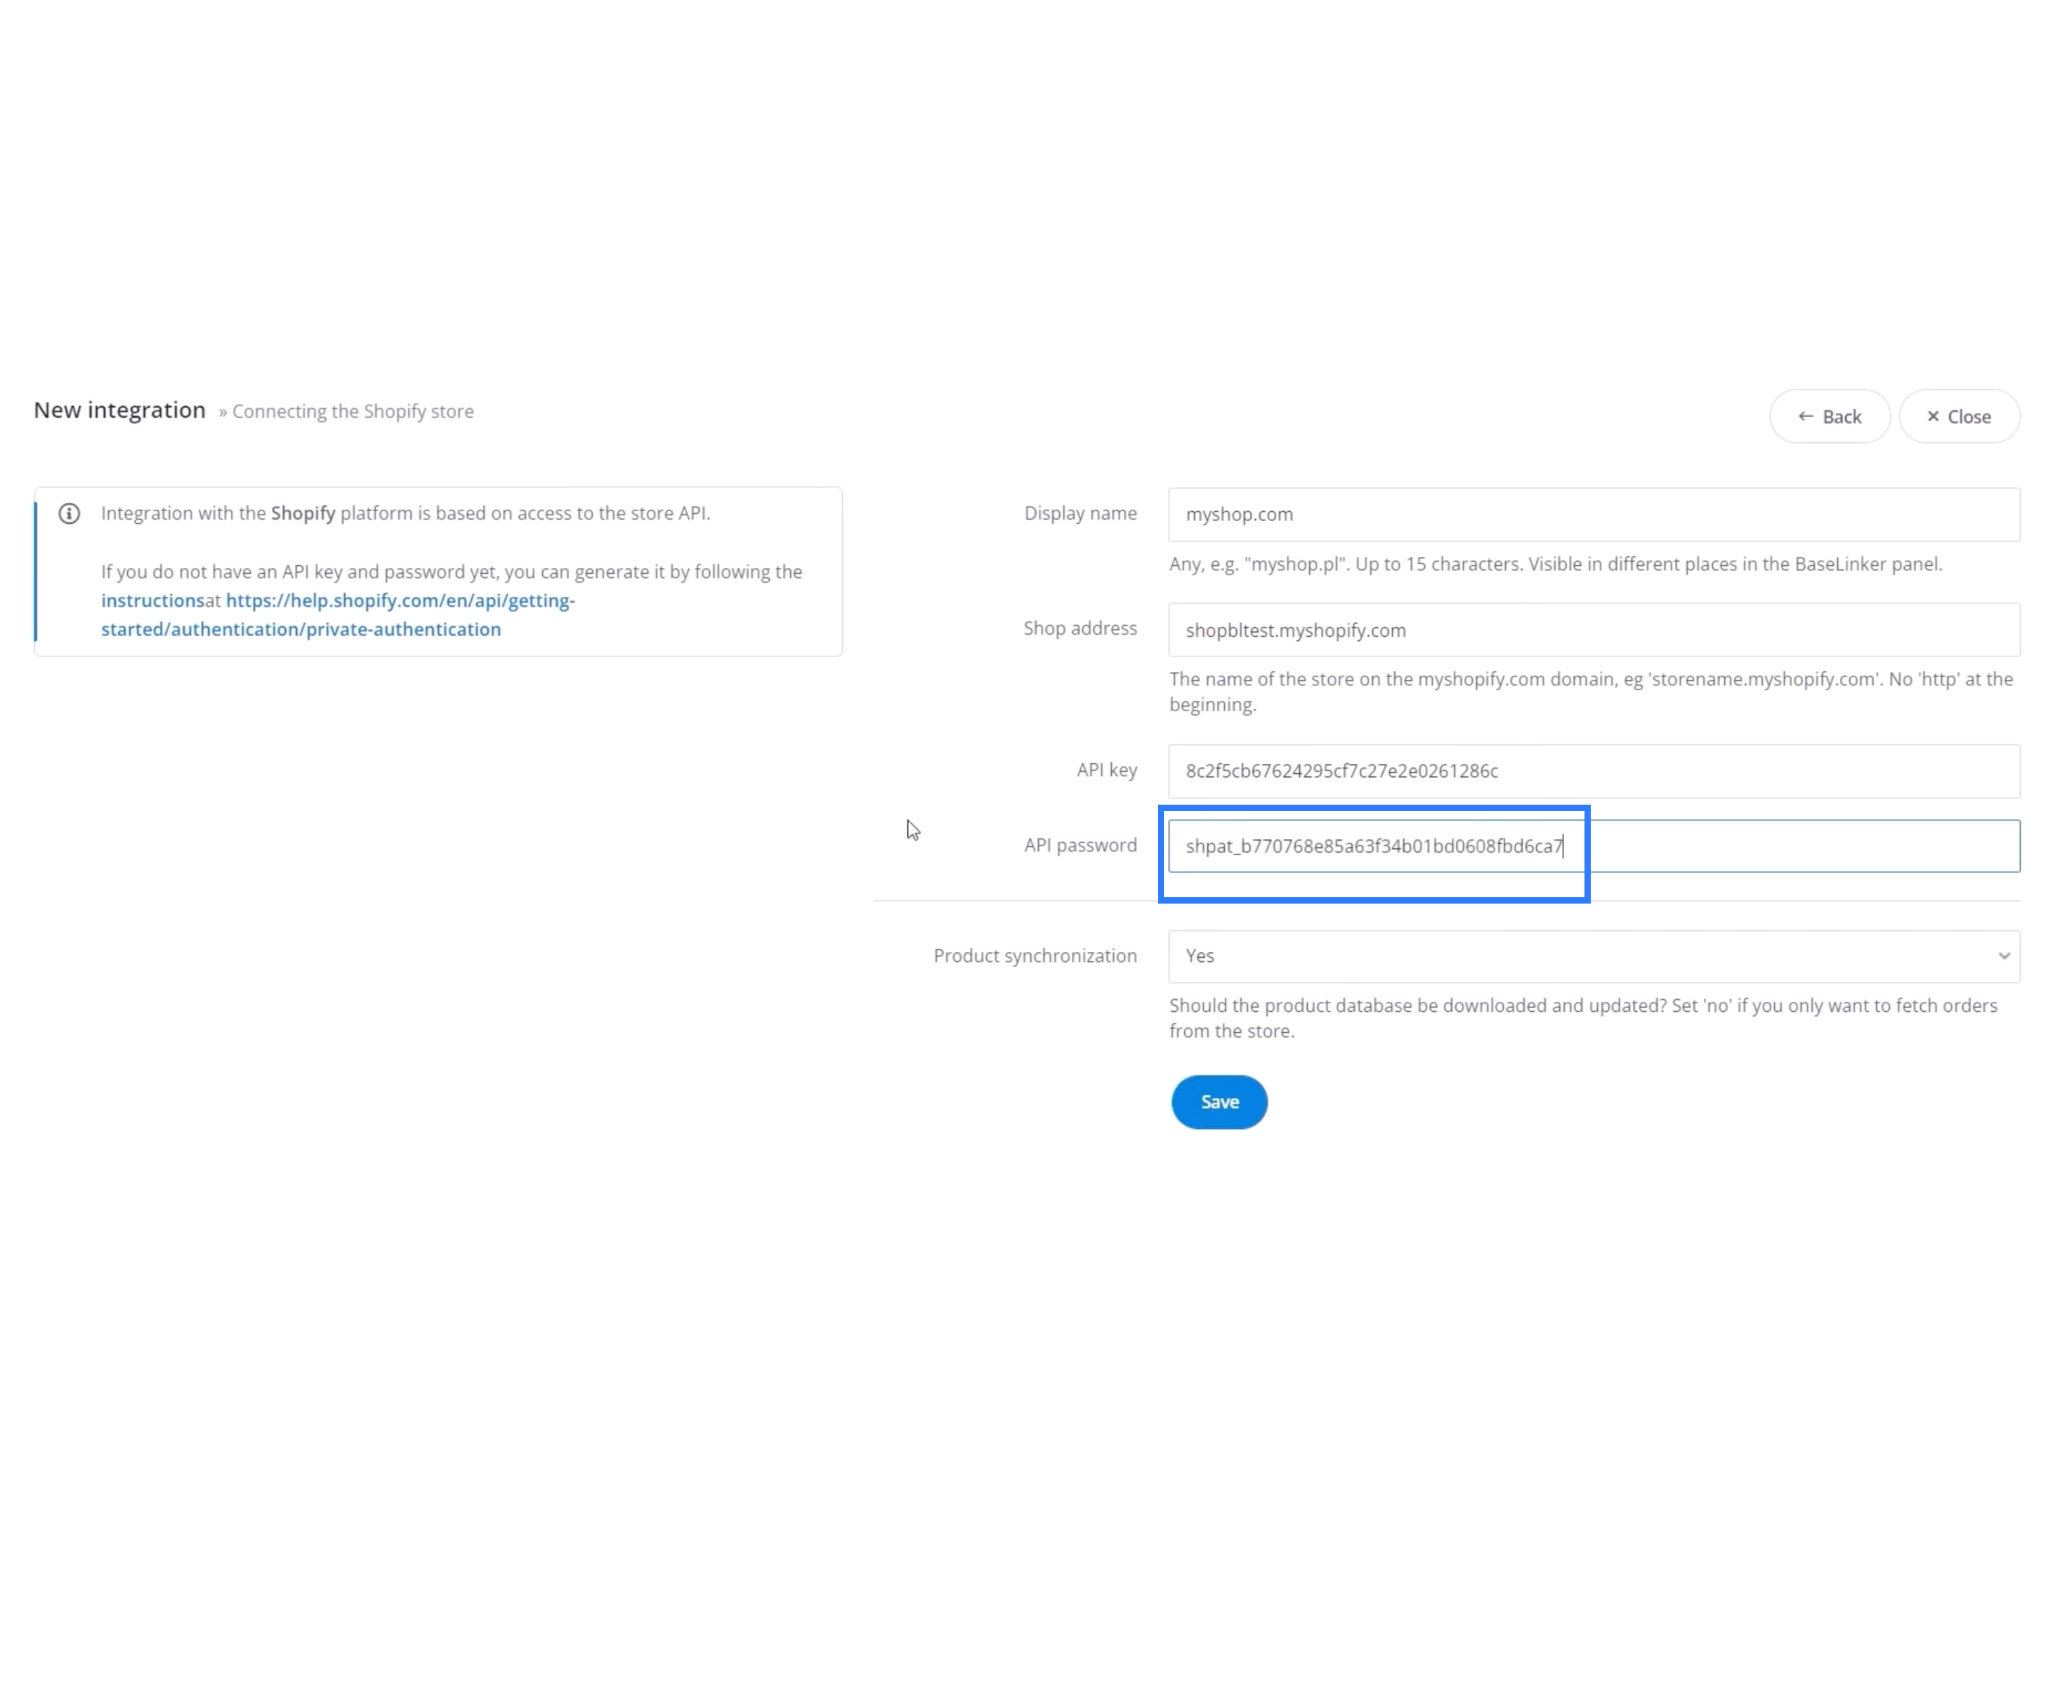
- Click Save.
- If everything is correct, you should see a confirmation message saying “Your Shopify account is now connected”.
Why this is important:
This step activates the link between Base and your Shopify store. Once saved, Base can start retrieving products, orders, etc., and you have the foundation for all the workflows that follow.
Note:
- If you see an error message, double‑check that the Store URL on the integration detail screen exactly matches your Shopify store URL.
- If credentials were revoked or scopes changed, you may need to reinstall the app or regenerate credentials.
- After connection, check in Base if initial sync of products/orders has happened to confirm the link is functioning.
6. Starting Order and Product Sync
With the integration established, Base will now begin syncing your orders and products, and you can enable updates back to Shopify.
What happens next:
- Products from Shopify will appear in Base, showing inventory, pricing, variants, etc.
- Orders placed through Shopify will flow into Base as soon as the connection is live.
- You can configure Base to send back order status updates, payment confirmations, shipment tracking numbers to Shopify.
- If you have multiple Shopify stores, you can add them by repeating this process for each one.
Why this matters:
Synchronization means you can manage your operations like inventory, fulfillment, customer communications through Base while keeping your Shopify store up to date automatically. It reduces manual work and improves accuracy.
7. Order Flow and Package Creation
Managing orders efficiently is critical. You will handle order stages, packaging, shipment, and courier selection through your connected system.
Order Stages
When an order comes in via Shopify, it will land in Base. The order flow works similarly to a marketplace: you’ll have stages like “New”, “Processing”, “Packed”, “Shipped”, etc. Unlike a typical marketplace, the ship date is controlled by you (the seller). Base provides a button‑based package creation workflow so you can move to the next stage when ready.
Courier Selection via Rules (Automated)
Instead of choosing couriers manually for every package, Base lets you set up event‑based triggers that select couriers automatically based on characteristics of the order.
You can base courier selection on:
- SKU (for example, heavy electronic items might go via courier A)
- Order quantity (bulk orders might route to a particular carrier)
- Package weight (heavier items may need specialized courier)
- Delivery location (for instance, remote regions might use a specific service)
This automation means you don’t have to pick the courier manually when creating each package, the system does it for you in the background.
Multi‑Warehouse Pickup Handling
If you operate multiple warehouses or fulfillment locations, you want to pick up orders from the correct location based on inventory and delivery destination. Base supports multi‑warehouse assignment and uses Shopify’s Fulfilment API to fetch warehouse IDs when required.
Key points:
- Assign each product in Shopify to the correct warehouse(s).
- When an order arrives and you create the package, Base will look at warehouse assignment + delivery location to determine pickup location.
- You can create the package so that the courier picks it up from the correct warehouse and delivers it to the customer directly.
It ensures you fulfil from the location most optimal (closest to customer, fastest delivery, lower cost) and your stock levels across warehouses remain accurate.
8. Inventory Stock and Price Sync
Correct inventory levels and pricing across your systems is essential. With Shopify and Base integrated, these sync naturally.
What is handled:
- Inventory: When you sell an item, Shopify inventory updates, and Base shows the change. If you manage inventory in Base (or via warehouses), the change is reflected back in Shopify.
- Price: If you adjust product price in Shopify (or in Base if you allow it), the new price flows through.
- Shipment price handling: If you have shipping charges or shipment add‑ons, these can be handled during order processing.
- Prepaid and COD orders: Both prepaid and cash‑on‑delivery orders are supported and appropriately handled in the workflow.
Why this is important:
- Prevents overselling (selling more than you actually have in stock).
- Ensures the customer sees the correct price.
- Automates updates, reducing manual errors.
- Helps in managing cash flows when COD orders are involved.
9. Product Listing and Association
To ensure your product catalogue in Shopify and Base are aligned, you need to run the “Associate products with shop” step inside Base’s Operations section.
What to do:
- Inside Base, go to the Operations section → “Associate products with shop”.
- This will link Base’s internal product listings to the items in your Shopify store.
- After association, Base recognises which product in Shopify corresponds to which product in Base. This helps with inventory sync, fulfillment and reporting.
Why this is needed:
Without product association you may end up with mismatched SKUs or duplication. Proper association ensures updates (inventory, price, packaging rules) apply correctly.
10. Customer Support Handling
Efficient customer support is a critical part of the operation. Base allows you to handle support tasks via the Order section and link email, SMS, and ticketing tools.
How this works:
- Each order imported from Shopify appears in Base, and you can send out communication (email, SMS) or create support tickets associated with that order.
- You can integrate with different customer communication channels, for example email platforms, SMS providers, even voice/calling tools if you have them.
- Base will let you track statuses of support tickets, responses and resolution, all linked to the order.
It keeps customer support tightly connected with order management, rather than having disparate systems. When a customer asks a question about their order, you see everything in one place like order data, communication history, shipment status.
11. Template Creation: Invoices, POs, Email Templates
Beyond operations, you will need documents and communications ready for your customers and internal processes. Base lets you create custom invoices, purchase orders (POs), email templates, etc.
What you can do:
- Design a custom invoice template for your branding, order details, tax details, etc.
- Create purchase orders (POs) if you source from suppliers; tie them in with your product and warehouse assignment.
- Design email templates for different triggers: order placed, payment captured, shipped, delivered, return initiated.
- Use custom fields or dynamic placeholders to personalise communications (customer name, order number, tracking link, delivery date).
Professional branding and clear communication build customer trust. Having templates ready saves time and helps maintain consistency as your business scales.
12. Sending Shipment Tracking Links
After you’ve shipped a package, you want your customer to receive a tracking link so they can monitor delivery. Base supports this via the Advanced Settings of the shop integration.
What to check:
- In Base, open the integration configuration for your Shopify store.
- Scroll to the Advanced Settings section.
- Enable “Send shipment tracking link” (or equivalent) so that when you enter the tracking number in Base, the link is automatically passed to Shopify and the customer.
- Ensure the format of tracking link matches the courier’s standard URL pattern so it resolves correctly.
Why this matters:
Shipping transparency improves customer satisfaction. If the tracking link flows automatically, you reduce manual steps and possible customer queries about tracking.
Pro Tips for Scalability and Best Practice
Since you are setting up a system that will grow with your business, here are some broader tips to ensure smooth operations now and later.
- Local Couriers and Integrations: If you operate in India (or any region) it’s helpful to set up plugins for local courier companies (for example, Delhivery, Shiprocket, etc.). These can be integrated so that delivery partners are part of your workflow rather than manual entries.
- Scale Easily: You may begin with one store, one warehouse, one courier, but your system should be ready for growth. With the Shopify–Base integration you can later add more stores, more warehouses, more courier rules without rebuilding everything.
Best Practice Summary:
- Use descriptive and consistent naming for stores, warehouses, couriers, and SKUs.
- Test thoroughly before you go live (especially for warehouse allocation, courier rules, tracking links).
- Monitor after launch; watch for stock mismatches, incorrect couriers, delivery delays.
- Keep your system updated, if Shopify changes API behaviour you may need to adjust Base settings.
- Backup credentials, document your integration settings and processes so if someone else (staff or partner) takes over they can use your documentation.
Conclusion
Integrating your Shopify store with Base gives you a complete backend system to manage orders, products, couriers, inventory, and customer support – all from one place. With automatic syncing, rule-based courier selection, and multi-warehouse pickup, you stay in control while reducing manual work and errors.
The setup also supports prepaid and COD orders, custom documentation, and centralized communication via email and SMS. As your business grows, you can easily scale by adding more stores, warehouses, and integrations, making Base a flexible and powerful solution for Shopify sellers.
Integrate Shopify with Base Now. Connect once, sync everything – orders, stock, pricing & fulfilment without manual work.
Frequently Asked Questions
Q1. Can I connect multiple Shopify stores to one Base account?
Yes. You can integrate multiple Shopify stores with a single Base account. Each store needs its own integration setup with a unique Display Name and Store URL. This allows centralized order, inventory, and courier management while maintaining separate tracking and reporting for each store.
Q2. How often does Base sync orders and inventory with Shopify?
Base syncs orders and inventory with Shopify in near real time. Orders are imported as soon as they’re placed, and stock or pricing updates reflect automatically or on a scheduled basis depending on your configuration. This ensures accurate inventory visibility and prevents overselling.
Q3. What happens if I change product prices or stock in Shopify?
When you update product prices or stock levels in Shopify, Base automatically detects those changes and syncs them across your warehouses and active channels. You can also set Base as the master system if you prefer updates to flow from Base to Shopify, ensuring both systems stay consistent.