For each product in the BaseLinker Catalog, you can assign tags. Using tags will help you group similar products and manage them in bulk.
In BaseLinker, you can create a maximum of 100 product tags and assign them freely to products and sets in the inventory. Automation is also available for products containing (or not containing) selected tags.
Tag management
In the Products section → Settings → Tags, you will find a list of all product tags created in the system. You can add up to a maximum of 100 tags.
The table displays the tag name and the number of products it is assigned to. Here, you can edit the name of each tag and/or delete it.
By clicking on the number of products associated with a selected tag, you will display all the products to which that tag has been assigned.
Using the green button + Add tag above the table, you can create a new product tag.
Displaying tags
Enabling/disabling the display of tags on the product list (Products → Product List) is possible from the Products section → Settings → Other.
Privileges
Tags are visible to all employee accounts that have the Inventory – BaseLinker products catalog management permission. This permission also allows enabling/disabling the display of tags on the product list and managing tags (Products → Settings → Tags). However, it will not be possible to assign tags to products. Without this privilege, employees will not be able to view the product list or, consequently, the tags.
To be able to assign tags to products, the account must have the Inventory – editing products privilege.
Assigning/Removing Tags
The assignment and removal of product tags are possible in two ways:
- individually, from the product/bundle card;
- in bulk, using operations on products.
Individually
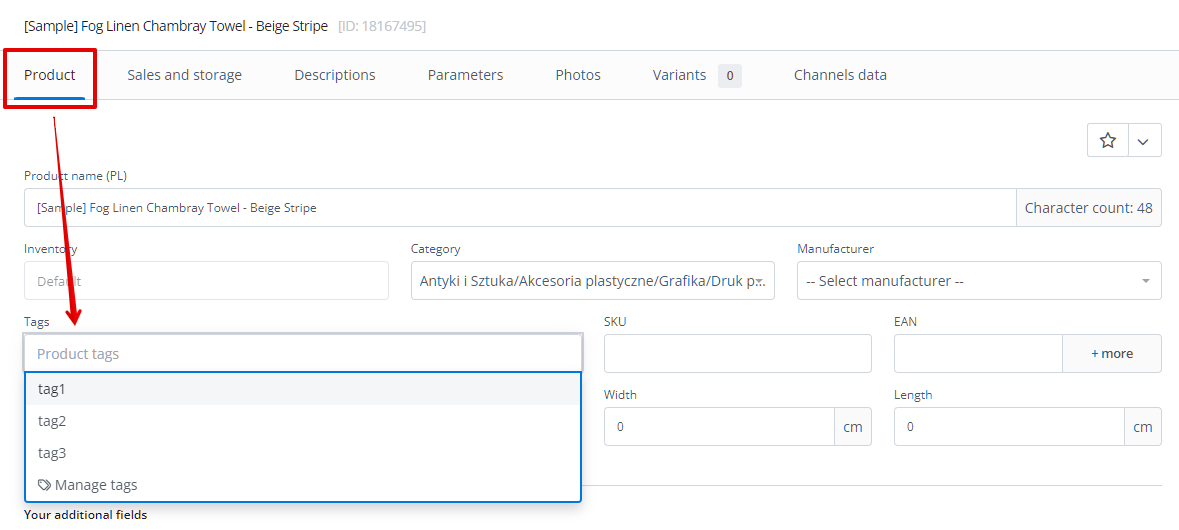
For a product/bundle, you can assign tags in the Product tab on its card (Products → Product list → Edit).
At this point, you can select tags from those already existing in the system. The Manage tags option will open the Product section → Settings → Tags in a new window.
If the tag you want to use is not yet in the system, you can enter it manually. The option + Create new tag: name will appear. After selecting it, the tag will be added to the product, and after saving the changes, it will also be available for tag management and selection for other products.
To remove a tag, you can click on the x next to its name on the product card.
In bulk
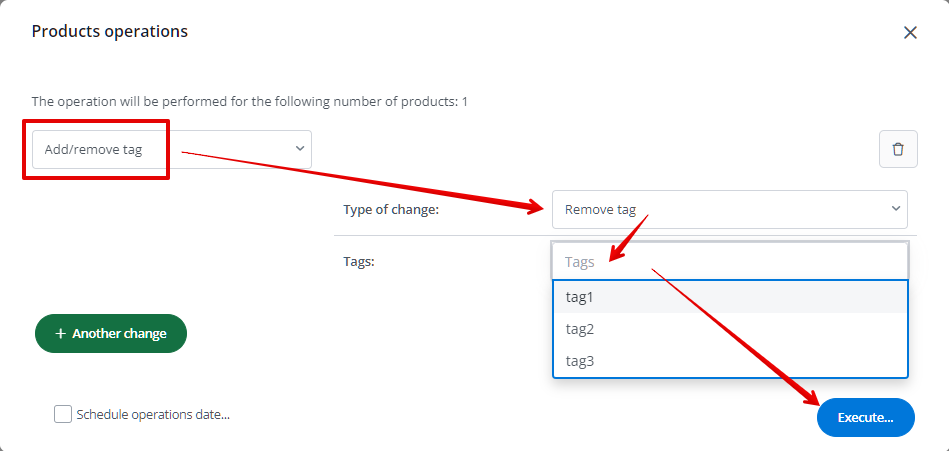
To mass assign or remove tags using operations on products, tags must be created in the system beforehand.
Once tags are available, you can select products and choose Operations → Products operations (wizard) on the product list, then select the Add/remove tag operation.
Filtering products by tags
Using basic product filtering, you can display products with a selected tag assigned. If you choose multiple tags, only products containing all selected tags will be displayed.
In advanced filtering, there is an additional Equals/Doesn’t equal connector. By selecting the Doesn’t equal option, you can display products that do not contain the specified tags.
You can save filter settings (button Saved filters below their selection). This is useful, for example, when you run seasonal sales and do not want to display certain products off-season.
Products automatic actions
For automatic product actions (Products → Automatic actions), there is a condition called Tags, through which you can create automations performed only for products that contain or do not contain specific tags.
The automation can, for example, send an email notification when the price of a product containing the specified tag changes.


