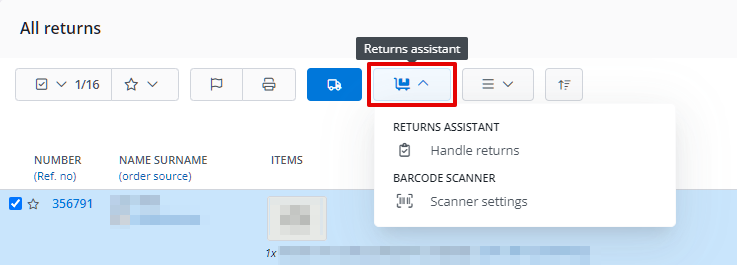
On the returns list (Orders → Returns) above the table, there’s a Returns Assistant button available.
It can be launched by:
- selecting returns and then choosing the Returns Assistant → Handle returns button;
- scanning the return code;
- scanning the return shipping label code.
Handling returns
In the Returns Assistant window, the following are available:
- return number;
- date of return creation;
- value of the return;
- ability to take a photo of the return;
- personal event buttons;
- inventory where the returned goods will be accepted (warehouse linked to the selected return item status) and its locations;
- return item status;
- workstation;
- Not accepted button;
- Accepted button – pressing this button will trigger an automatic action you’ve defined (Return accepted event) – it can, for example, mark all return items as accepted and change the return status to Completed (inventory levels restored).
Splitting items
In case of multiple purchased units of the same product, they are displayed as one item. However, it’s possible to separate them and, for example, assign a different return item status to each unit.
To divide, select the number of units of the chosen item and click on that number (x of y).
Merging items
In the same way, by clicking on the number of product units, you can merge previously divided items.
The Merge option will combine the product with the item above.
Settings
In the Returns Assistant settings (Orders → Settings → Returns → Returns assistant), you can configure:
- Default return item status in Returns Assistant – you can choose a specific one or Do not modify status;
- Automatically proceed to the next return;
- Automatically hide accepted returns in returns assistant;
- Returns data – choose what data should be displayed in the assistant:
- Order ID (which the return is associated with),
- Order source (which the return is associated with),
- Client,
- Order date,
- Shop order number,
- Seller’s comments,
- Return custom fields,
- Client (login),
- Buyer’s phone,
- Return value,
- Return label shipping number;
- Product data displayed in the assistant:
- Source (inventory),
- Product ID,
- Product EAN,
- Product SKU,
- Location,
- Current stock status,
- Attributes,
- Price;
- Product names – unchanged (as in the return), fetched from the inventory or from a custom field in the inventory;
- Product Locations – fetched current from the inventory or as in the order;
- Locations – displaying – all or just one (first alphabetically);
- Locations – require confirmation – choose whether the warehouse worker must confirm the product location;
- Product thumbnails – standard, large or none;
- Products sorting – according to the order in the return, alphabetically, by SKU, EAN, location (alphabetically/numerically) or attributes (alphabetically);
- Photo – countdown – number of seconds from the moment of accepting the return to taking a photo of its products.

