
To sync Shopify sales to TallyPrime, sellers need to map order details such as order ID, invoice number, date, SKU, quantity, selling price, discounts, GST rate and tax amounts to the corresponding Tally ledgers and stock items. The item master in Tally should also be aligned with the product catalogue in Base.com to keep product details consistent during order processing. Once the mapping is configured, sales and returns data can be imported into TallyPrime. Gateway settlements, fees, TDS, TCS and bank credits should also be reviewed against the respective payout reports to complete reconciliation.
This guide will show you how to process Shopify sales into Tally using files. We will also cover voucher creation, GST, refunds, payouts and automation. Examples are used throughout to help explain the process. Confirm your GST setup with your CA.
How to sync Shopify sales to Tally manually
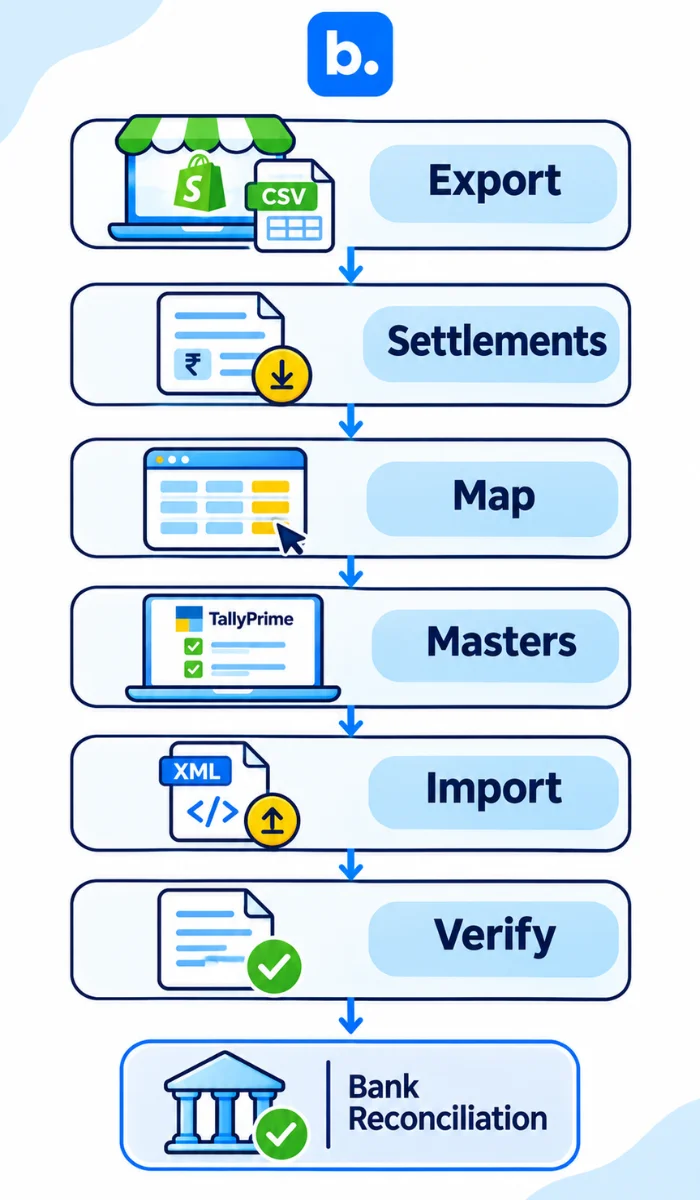
TallyPrime supports file-based import workflows. Export Shopify data, map it to a supported import format and review the vouchers. Options depend on your TallyPrime release. For a larger store, test on a copy of company data and preserve the original export.
Export orders
In Shopify, export the required date range and fields. Include transaction history where available, but keep the original CSV. It is not a payout report.
Get settlement files
Download a Shopify Payments payout/activity report, the third-party gateway’s settlement file, or the courier’s COD remittance report as relevant. These show payment movements and deductions, not just orders.
Standardise the data
Use one row per order or invoice. Check order and invoice IDs, dates, payment method, state, SKU, quantity, discount, taxable value, HSN/SAC where applicable, GST rate and tax amounts. Confirm the accounting time zone.
Map fields
Match source columns to the sample template or chosen import format. Map party, voucher date/type, item or sales ledger, tax ledgers and narration. Use the correct voucher series and GST registration.
Check masters
Confirm stock items, units, party, sales, GST and gateway-clearing ledgers exist. Use exact ledger names to avoid import exceptions.
Test the import
Choose the Excel, XML or JSON workflow supported by your TallyPrime release. Import a few orders with different tax and payment cases. Review the import summary before proceeding.
Verify vouchers
Check invoice number, buyer, item, taxable value, tax split and total. Review sales and GST reports, then compare totals with Shopify.
Post settlements separately
Match gross sales, refunds, fees, fee tax and net credits to clearing ledgers and bank statements. A payout is not another sale.
Keep evidence
Retain exports, mapping, import log and reconciliation. Record who prepared and reviewed the batch.
Annotated sample row for a manual import
| Order ID | Voucher date | Party | Sales ledger | Taxable value | Tax split | Payment ledger | Total |
|---|---|---|---|---|---|---|---|
| #1048 | 27-10-2026 | Customer / Shopify B2C | Online sales | ₹1,000.00 | CGST ₹90 + SGST ₹90 | Gateway clearing | ₹1,180.00 |
Use the actual invoice date, customer treatment, place of supply and tax rate from your records; this row is illustrative.
This sample row shows the mapping logic, not a universal import template. Your required columns may differ by TallyPrime version, voucher mode and company configuration. Confirm the template and GST fields before bulk import.
Which Tally ledgers should you create for Shopify?
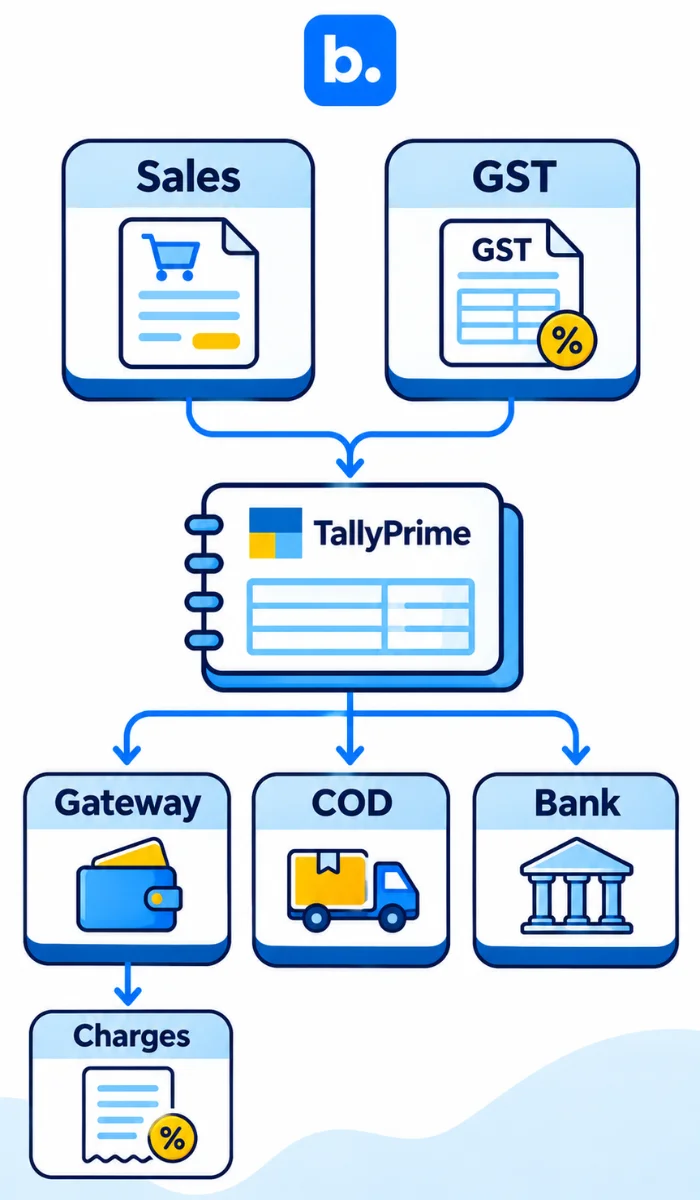
Set up and map ledgers before importing. Keep revenue, tax, clearing and gateway charges separate; posting all orders directly to the bank can show cash that has not arrived.
| Ledger | Typical purpose | Posting note |
|---|---|---|
| Online sales | Revenue from Shopify sales | Separate taxable sales by rate or category if your reporting needs it. |
| Output CGST, SGST and IGST | GST payable on sales | Use the tax ledgers configured for the company and transaction. |
| Shopify / gateway clearing | Gross amount due from the payment provider | Use a distinct clearing ledger for each gateway where practical. |
| COD courier clearing | COD collections expected from courier | Clear it when remittance is received and matched. |
| Gateway charges | Processing fees charged by a provider | Record the fee from the settlement statement, not as a discount on sales. |
| GST on gateway charges | Tax shown on the provider’s fee invoice | Claim input tax credit only after checking eligibility and documentation with your CA. |
| Sales returns / refund adjustment | Reversal or adjustment for returned sales | Use the voucher and tax treatment confirmed for your case. |
| Bank account | Amount actually credited or debited | Match against bank statement references and dates. |
Based on your accounting requirements, you can use Party Ledgers and either detailed or summary vouchers. Ensure there is a trail from the voucher back to the Shopify Order.
How do you record Shopify orders as Tally sales vouchers?
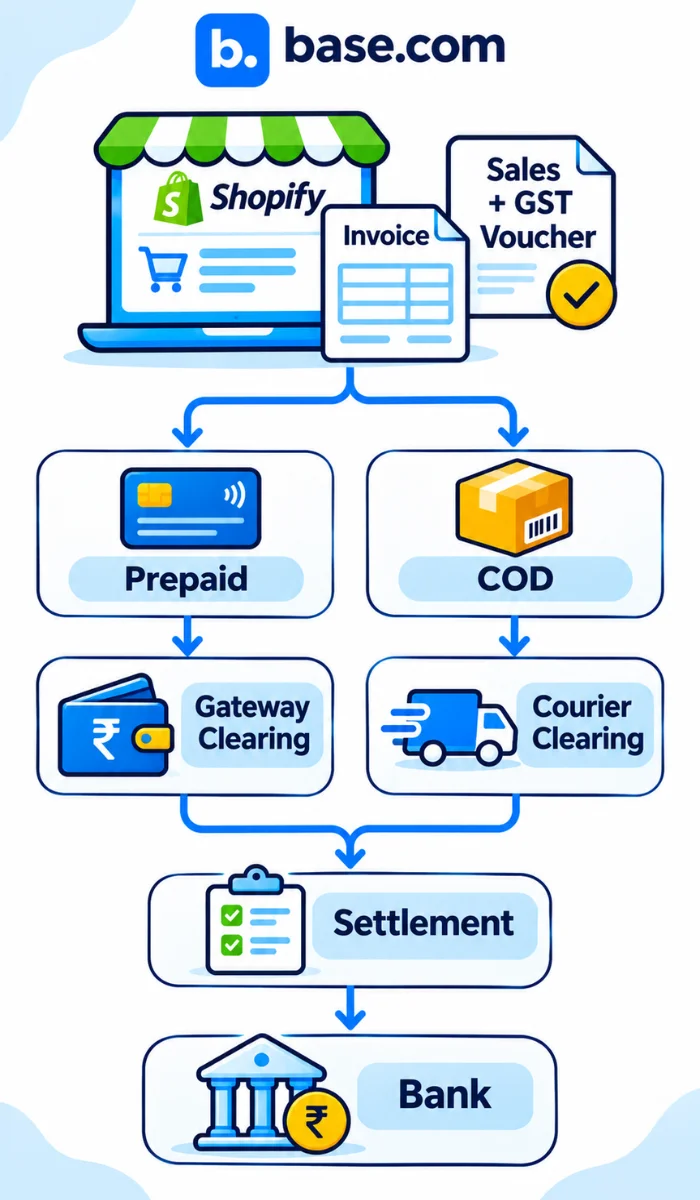
Create a sales voucher to record your sale. Choose your voucher type and fields to reflect the nature of your goods/services, invoicing and GST setup. Split your gross amount between revenue and tax.
Prepaid orders should be entered into Gateway Clearing (Debit) until the provider has been paid. COD orders should be entered into Courier Clearing (Debit) until remitted to the bank. Only enter into a Bank (Debit) once you have received the funds.
Either enter detailed invoices or a supported summary voucher with a detailed order register. Detailed entries will make it easier to trace back, however summary vouchers will reduce the number of entries. Ensure your accountant has approved the method and fields you will use to reference.
How should you handle GST on Shopify orders in Tally?
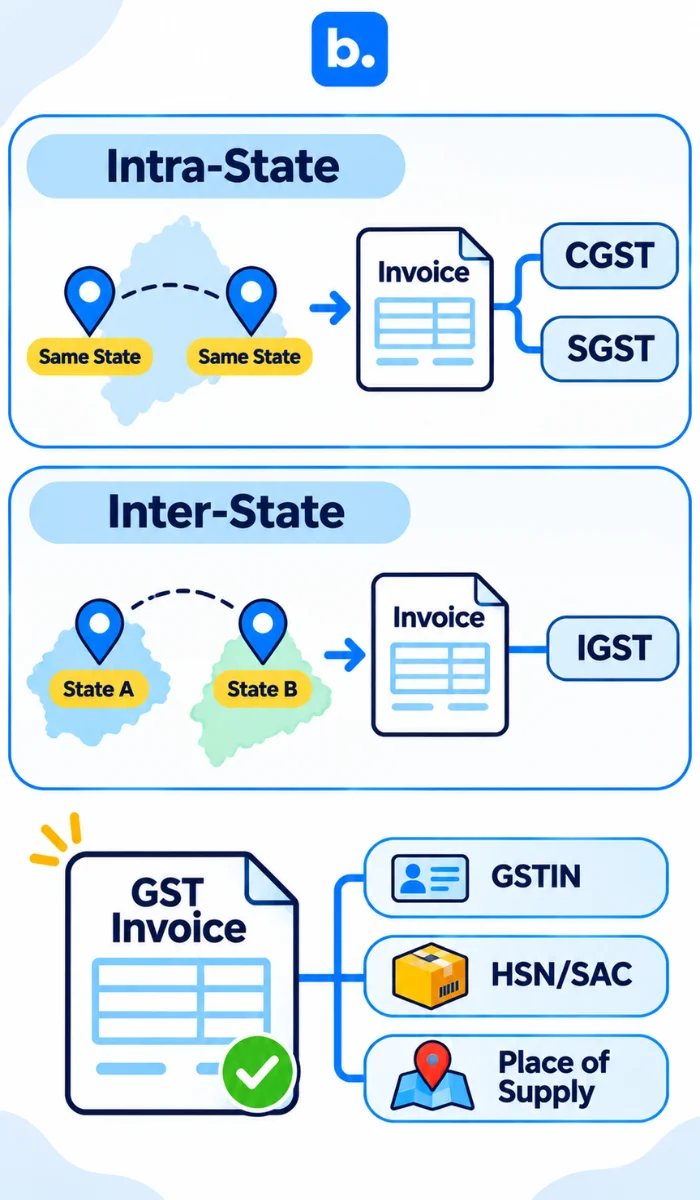
Whilst Shopify will store tax settings and tax on the order, it will not produce a GST compliant bill for India. Ensure you review your invoice and that your data in TallyPrime reflects the true supply.
Typically, the place of supply and registration will dictate if you charge CGST + SGST or IGST on taxable goods. There are exceptions depending on the transaction. Ask your CA to confirm what rate of GST, HSN/SAC code, place of supply, invoice details and how it will be filed.
Check your company GST details, tax ledgers, party state and item tax in TallyPrime. Ensure your sales registers match your invoices and GST reports. If there is a discrepancy between the tax charged on the order and your invoice, ensure this is resolved before importing.
How do you record Shopify refunds and returns in Tally?
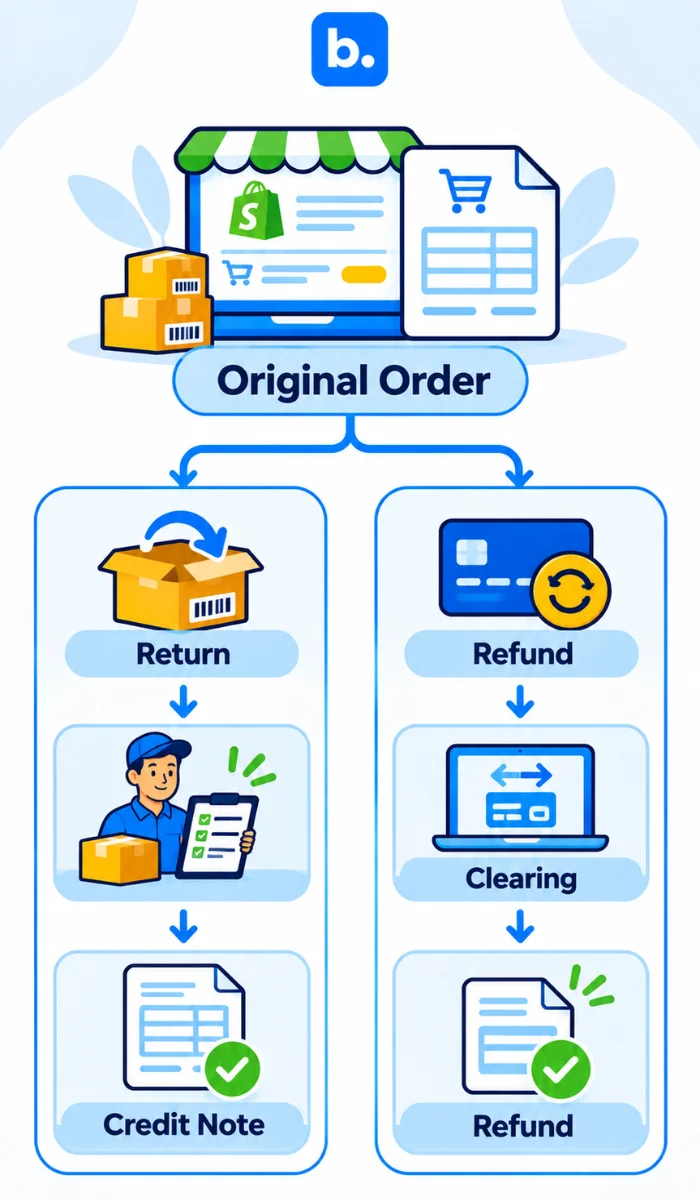
Refunds are a cash movement. Returns and reversals are accounting and tax documents. Both should be linked to the original order and invoice. They may be dated differently.
If returning goods, a credit note should be raised or use an approved return voucher process. The invoice should be referenced and the appropriate sales and tax reversed. Only adjust stock if the goods are being returned to sellable stock. Partial refunds and cancellations may be handled differently.
The refund from the provider should be posted to the original clearing account. This may mean that the amount is reduced from a future payout. Do not enter a second expense as the refund has already been treated as a sales return. Confirm shipping, discounts and tax with your CA.
How do you reconcile Shopify gateway and COD payouts?
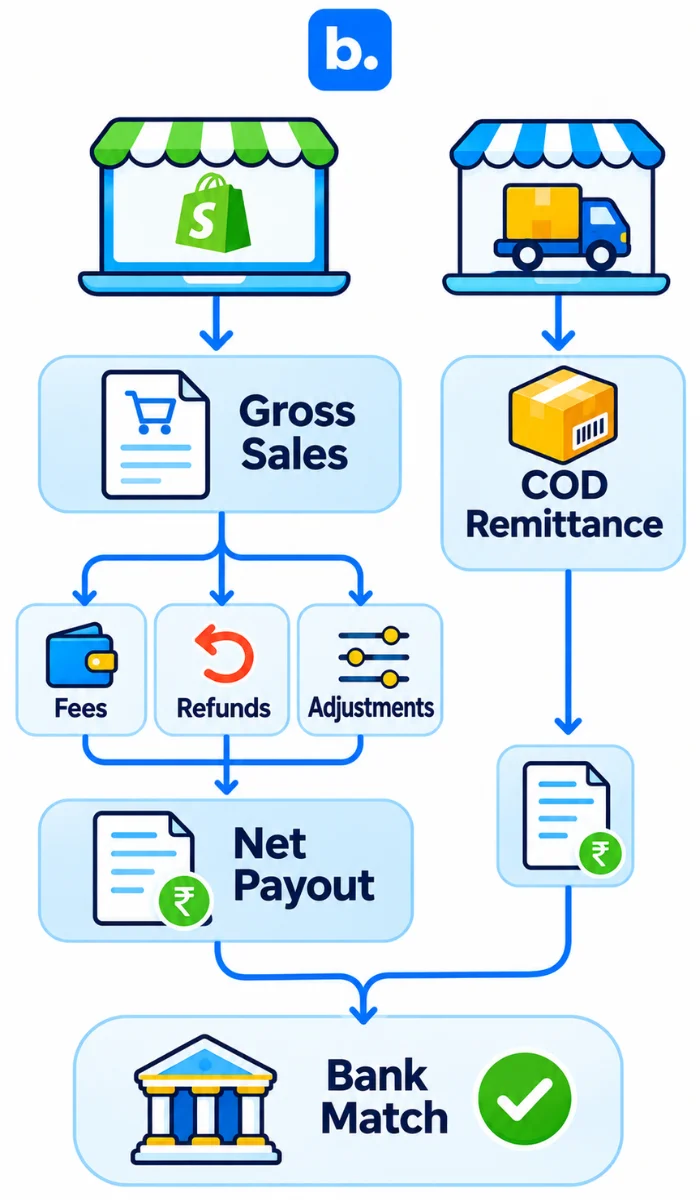
Reconcile orders to provider transactions, transactions to payout batches, then payouts to bank credits. Match order or transaction IDs, payout IDs and UTRs where available. Keep unsettled amounts in clearing until paid or explained.
Shopify Payments reports cover Shopify Payments activity, not third-party processors. Use each gateway’s own settlement file. For COD, ensure the orders delivered match the remittances from the courier and deposits into the bank. Account for refunds, chargebacks, failed payments, fee reversals, TDS, TCS and timing differences when reviewing settlement statements.
With Base.com, sales and returns data can currently be imported into Tally. Returns should be accounted for through the appropriate return or credit note entries. However, importing sales and returns is separate from reconciling marketplace settlements. Gateway fees, TDS, TCS and actual bank credits should be checked against the relevant settlement reports and accounted for separately using the appropriate ledger entries.
Illustrative payout example, not accounting or tax advice: Assume a customer pays ₹1,180 for an intra-state sale. The example treats ₹1,000 as taxable value, with ₹90 CGST and ₹90 SGST. Assume a gateway fee of 2% of ₹1,180, or ₹23.60, and 18% GST on that fee, rounded to ₹4.25. The illustrative net payout is ₹1,152.15.
| Entry | Debit | Credit |
|---|---|---|
| Sales voucher: Gateway clearing | ₹1,180.00 | |
| Online sales | ₹1,000.00 | |
| Output CGST | ₹90.00 | |
| Output SGST | ₹90.00 | |
| Payout: Bank | ₹1,152.15 | |
| Gateway charges | ₹23.60 | |
| GST on gateway fee | ₹4.25 | |
| Gateway clearing | ₹1,180.00 |
The fee percentage, GST on the fee, rounding and input-tax-credit treatment are assumptions for arithmetic only. Actual fee bases, invoices, tax rates, TDS, TCS and ITC eligibility vary. Have your CA verify them. If the settlement statement does not balance, do not force the difference into sales. Check for withheld amounts, refunds, chargebacks, tax deductions or payouts spanning several dates.
For more on matching settlements to bank credits, see the payment reconciliation guide. If COD shipping is part of your flow, review the Shiprocket integration overview and check the courier remittance report separately.
How should multi-channel sellers account for Shopify, Amazon and Flipkart?
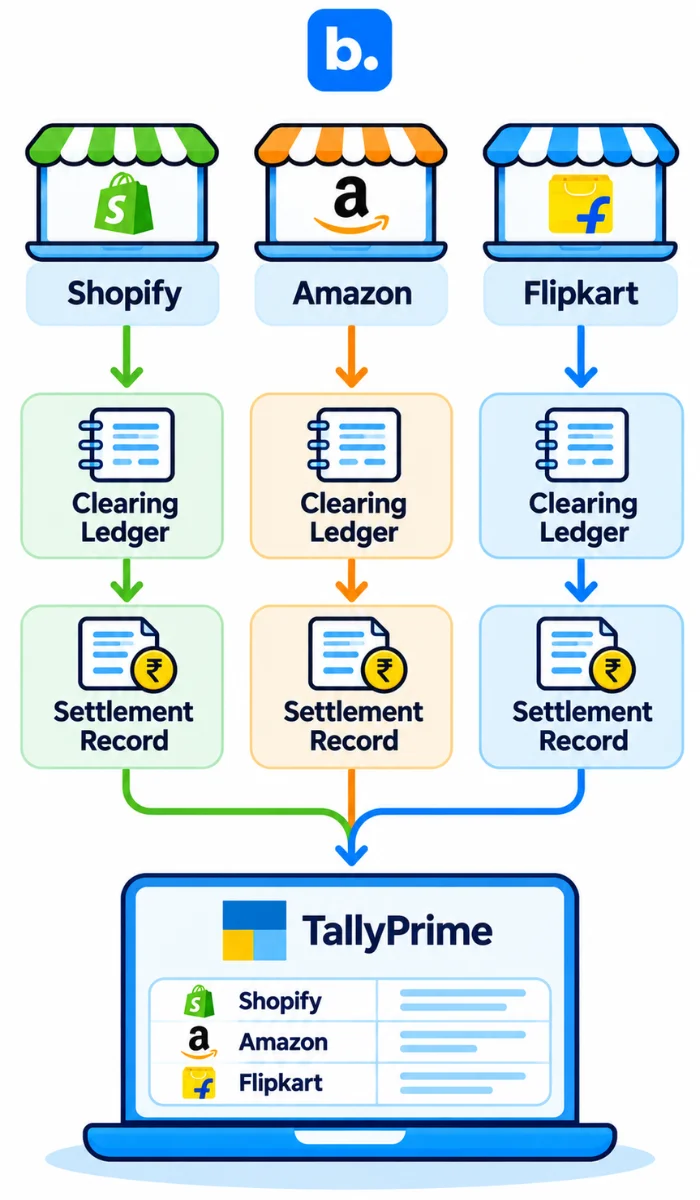
Use a distinct source reference and clearing ledger for each channel or provider. Shopify, Amazon and Flipkart have different settlement structures. Keep order/item ID, invoice number, settlement ID and bank reference for traceability.
Do not book marketplace net settlement as revenue. Record sales and tax from the approved sales record, then account for commissions, logistics, fee tax, refunds, TCS and other deductions from the platform statement using your accountant’s mapping. Reconcile deductions to relevant reports and GST records.
See the Amazon and TallyPrime integration page and Flipkart and TallyPrime integration page for channel setup context. They do not replace settlement review. Apply the same clearing discipline to Amazon Tally integration workflows.
When should you choose an OMS for Shopify and Tally?
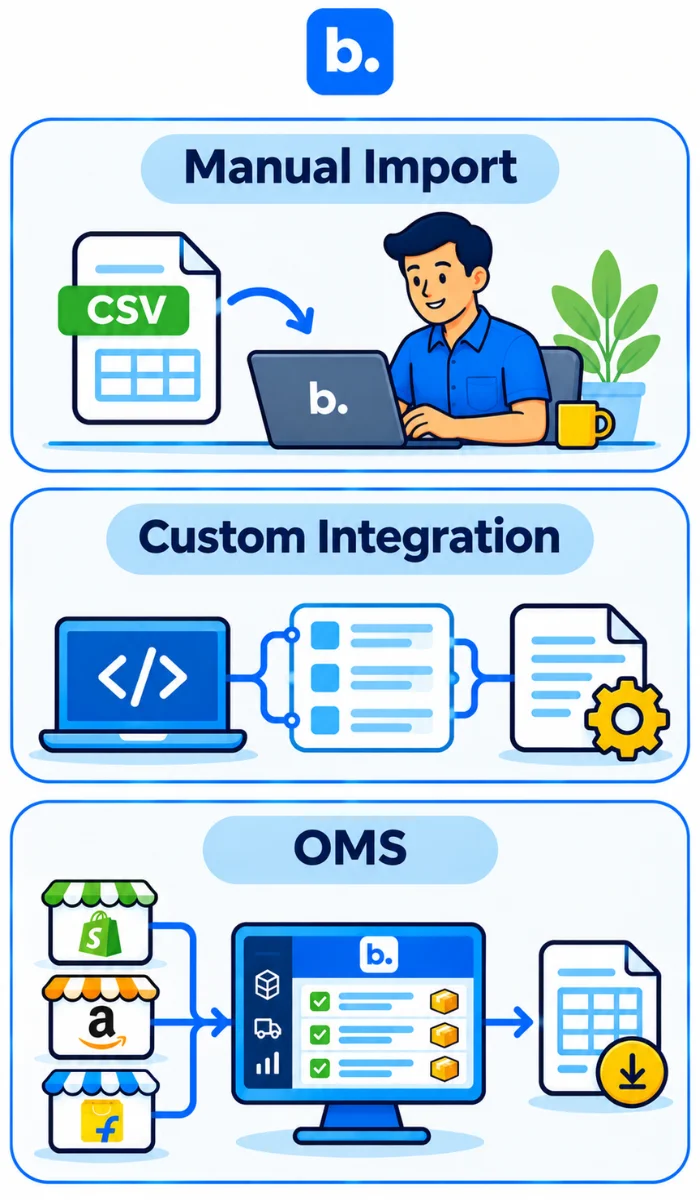
A spreadsheet can work at low volume if mapping is stable and each batch is reviewed. Consider an order management system (OMS) when exports, fulfilment, invoices and returns across channels are hard to keep aligned.
| Workflow | Best fit | Main control to keep |
|---|---|---|
| Manual CSV / file import | Low volume, occasional batches, simple ledger setup | Test imports and reconcile the source file to vouchers. |
| Custom integration | Specific data rules or in-house technical support | Document mapping, failures, retries and version changes. |
| OMS with accounting connection | Multiple channels or frequent order and document handling | Confirm exactly which records sync, when, and how exceptions are reviewed. |
Before selecting OMS software, ask vendors to demonstrate a test order through invoice, refund, gateway fee, payout and bank match. Check how missing fields, edits and returns are handled; confirm supported TallyPrime versions, duplicate prevention and review steps.
Get written confirmation of supported GST fields, ledgers, payment providers and marketplaces. Moving orders is not the same as reconciling payouts. Keep TallyPrime as the accounting system and assign someone to review exceptions, tax reports and bank balances.
What common Shopify-to-Tally import errors should you check?
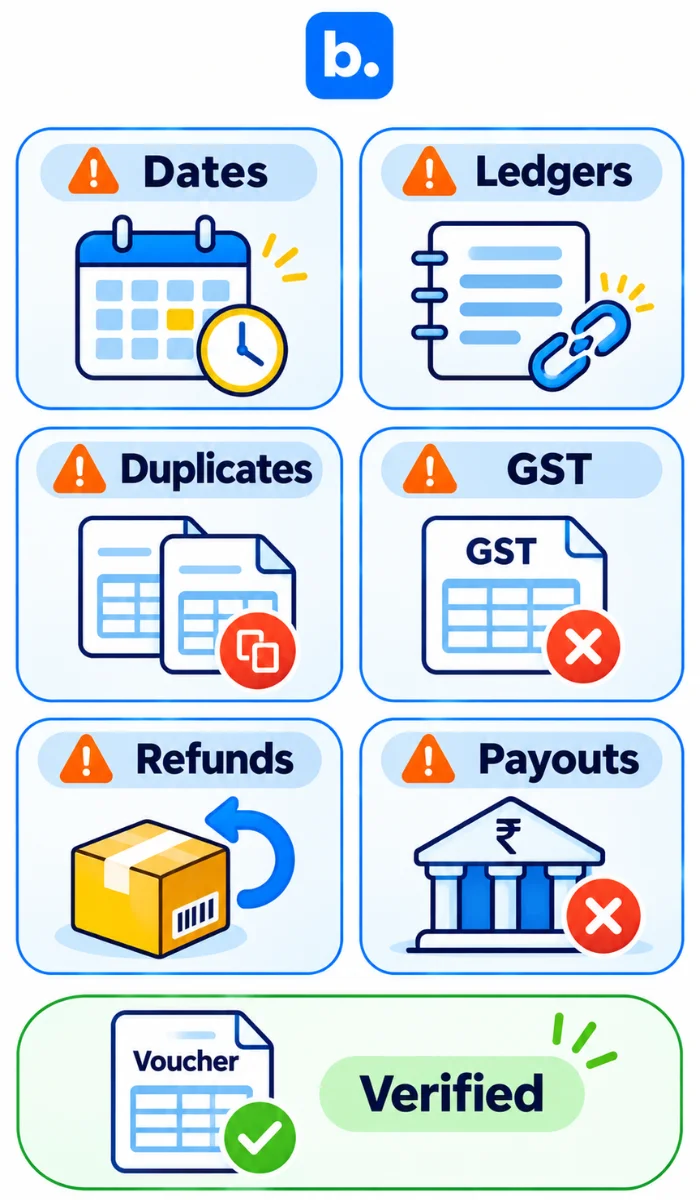
Most mismatches come from mapping and timing, not from arithmetic. Check these items before closing a period.
| Error | What it can cause | How to check it |
|---|---|---|
| Wrong date field or timezone | Sale lands in the wrong period | Compare Shopify order, invoice and voucher dates; use the accounting policy consistently. |
| Missing or mismatched ledger name | Import exception or wrong posting | Compare the mapped name with the exact TallyPrime master. |
| Duplicate order import | Revenue and tax overstated | Use a unique order or invoice reference and check previously imported batches. |
| GST rate or place-of-supply mismatch | Incorrect tax split or report | Compare invoice, address, registration and CA-approved tax mapping. |
| Refund imported as a new sale | Revenue and receivable overstated | Match refund to original order and use the correct return or credit-note workflow. |
| Gateway fee netted against sales | Revenue understated and fee trail lost | Post gross sale and record the fee separately from the settlement statement. |
| Payout treated as another sale | Revenue duplicated | Use clearing ledger for the payout transfer; do not credit sales again. |
| COD marked paid before remittance | Cash and clearing balances misstated | Keep courier clearing open until the bank credit and deductions are matched. |
| Rounding differences forced into tax | GST reports no longer tie | Review line-level rounding rules and have the accountant approve any adjustment. |
TallyPrime’s import reports and exception messages are useful, but they do not prove the tax treatment is correct. Review sample vouchers, sales registers, GST reports and clearing balances after every new mapping or software change.
How can Base OMS fit into a Shopify-to-Tally workflow?
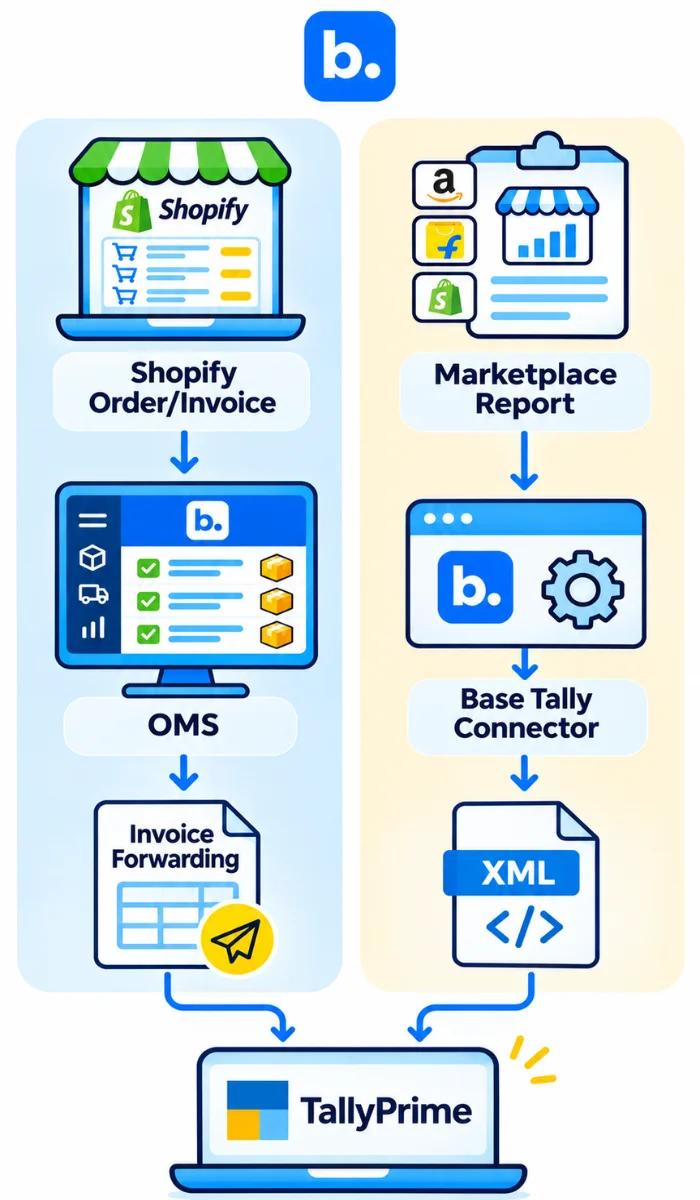
Base.com connects marketplace operations with accounting workflows, helping sellers manage orders and invoices across sales channels. For Shopify sellers, Base.com supports invoice forwarding to TallyPrime, either automatically or in bulk. This reduces the need to transfer each invoice manually.
The Tally Connector also provides a report-based workflow for processing marketplace data and preparing Tally-compatible XML files. It includes separate sections for report processing, connection configuration and accounting alias mapping.
How to use the Base.com Tally Connector
The connector setup involves three main sections: Report, Configuration and Accounting Alias.
1. Configure the Tally connection
Open Add-ons in Base.com and select Tally Connector. Go to the Configuration tab and enter the company name, Tally URL and port.
The default connection details include http://127.0.0.1 as the Tally URL and 9000 as the port. These settings identify the Tally environment with which the connector communicates. Save the configuration once the details are entered.
2. Configure marketplace accounts
The Account Management section lists the marketplace accounts available for the connector, including Amazon, Shopify, Flipkart, Myntra and Meesho.
You can add an account, edit an existing configuration or copy an account setup. Check that the relevant marketplace account is enabled before processing its data.
3. Set up Accounting Alias
Open the Accounting Alias tab to configure the mapping between marketplace information and accounting entries.
You can add entries individually or download the CSV template, fill in the required mapping details and import the completed file. Existing mappings can also be downloaded for review.
The section includes a separate Bundles tab for bundle-related accounting configurations. Complete the relevant mappings before processing reports.
4. Select the marketplace and report details
Go to the Report tab. Select the marketplace, account and report type. Choose the accounting software format, such as Tally Prime (XML), and select the branch accounting option where applicable.
Enter the From Date and To Date to define the reporting period.
5. Upload the marketplace reports
For Amazon, the connector provides three upload fields:
- Amazon B2C MTR
- Amazon B2B MTR
- Amazon STN
The B2C and B2B transaction reports can be uploaded individually or together. The STN report is optional.
The connector uses these uploaded reports as input for processing the selected reporting period.
6. Process and download the Tally file
Once the report details and files are ready, click Process and Download Tally File.
The connector processes the information and generates a Tally-compatible XML file containing the accounting data prepared for import.
7. Import the XML file into TallyPrime
Import the downloaded XML file into the relevant TallyPrime company. Review the imported vouchers, ledger postings and transaction values against the original marketplace reports.
For Shopify, Base.com also supports invoice forwarding to TallyPrime automatically or in bulk. The exact workflow depends on the configured integration and the records being transferred. The Amazon CSV upload process should not be confused with Shopify invoice forwarding.
Before using the integration for live accounting, verify the supported transaction types, GST and ledger mapping, refund handling and settlement requirements. Invoice forwarding does not automatically mean that gateway fees, payouts and bank reconciliation are also handled.
For sellers managing multiple sales channels, an OMS can help keep order and invoice information organised while TallyPrime remains the accounting system. Book a Base demo to review the integration workflow and confirm which accounting records can be transferred for your business.
Conclusion: keep sales, tax and settlement records in step
To sync Shopify sales to Tally reliably, keep orders, invoices, tax, refunds and payouts distinct, linked by references and clearing ledgers. Start with a verified test import, confirm GST treatment with your CA, and reconcile settlements to the bank. Document the approved process and keep the mapping and exception log for month-end.