Cdiscount is one of the largest and most important players on the French e-commerce market, reaching millions of active customers. For European sellers, it is a strategic sales channel, allowing for dynamic expansion and building recognition in France. Our integration with Cdiscount is an advanced tool that automates and simplifies the entire sales process on this platform, allowing you to focus on growing your business.
Integration with Cdiscount module enables:
- importing orders from all Cdiscount accounts to the Base.com panel;
- forwarding orders to an online store;
- automatic transfer of shipment numbers from Base.com panel to Cdiscount;
- bulk listing on Cdiscount based on products from a warehouse connected to the Base.com system (it can be an online store warehouse, wholesaler warehouse, Base.com warehouse or ERP system).
- managing Cdiscount offers;
- automatically renewing offers;
- synchronizing stock levels in the offer according to the current product stock in the warehouse;
- synchronizing prices in the offer according to the price of the associated product in the warehouse – taking into account the price multiplier.
How to connect the integration
To connect your account, follow these steps:
- Register your Cdiscount seller account via this link.
- Go to Integrations.
- Click the green button ‘+Add integration’, and then in the ‘Marketplace’ section select ‘Cdiscount‘.
- Enter the account name that will be displayed in the system, the Seller ID, and the e-mail address used to connect the Octopia account.
- Congratulations – you have just added an Cdiscount account to your Base.com account.
How to generate a Seller ID needed for login?
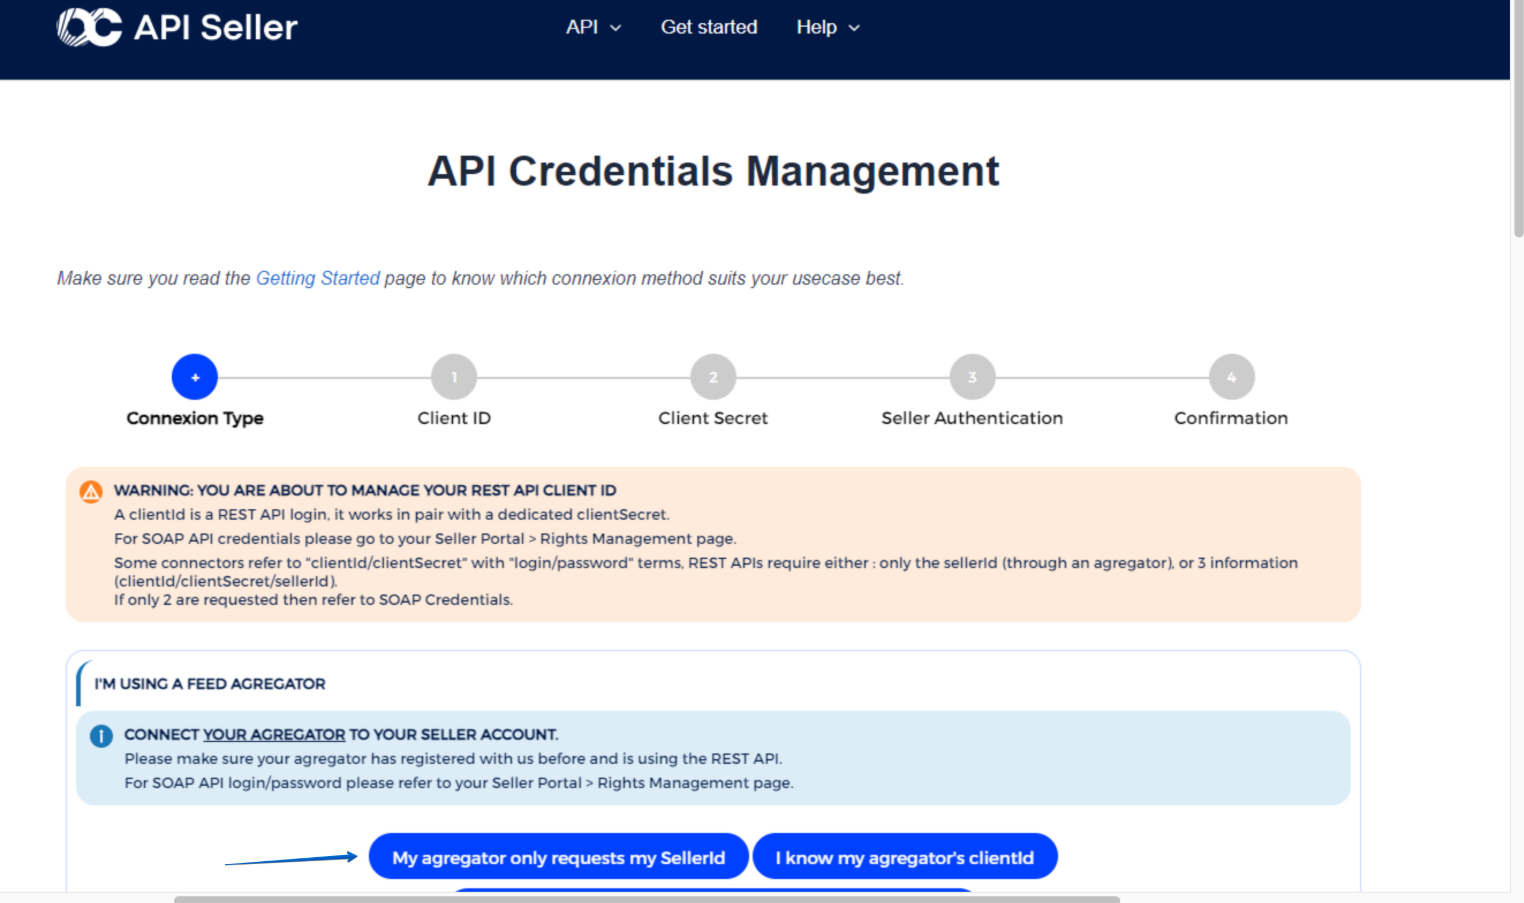
- Go to the page: https://developer.octopia-io.net/api-credentials/ and select the option My aggregator only requests my SellerId,
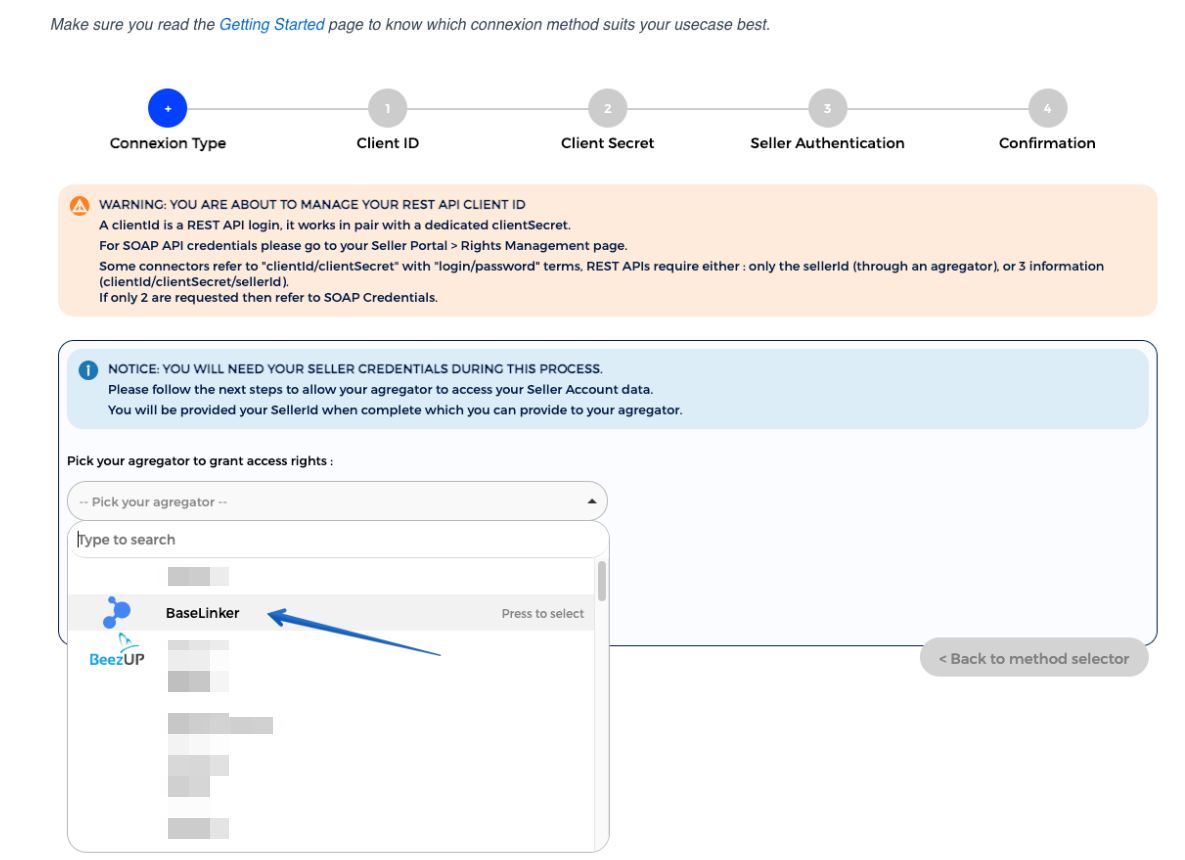
- In the next step, select BaseLinker from the list,
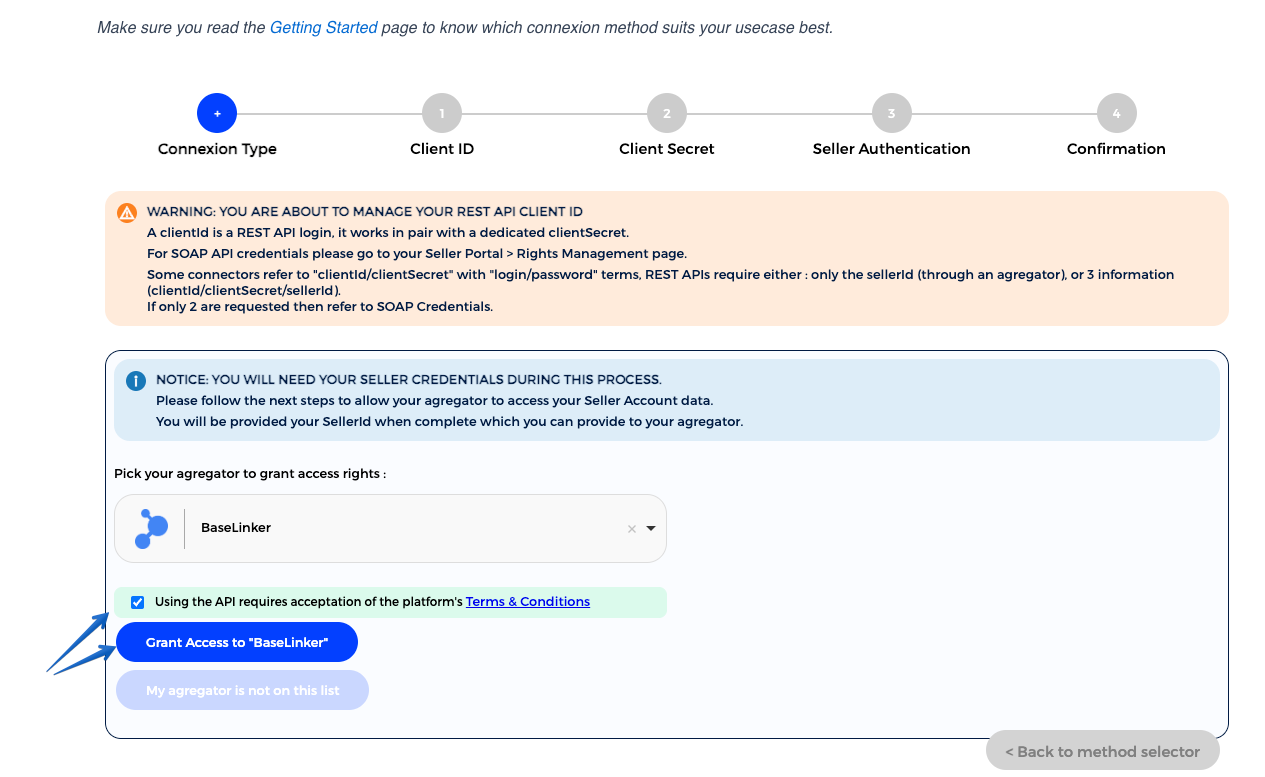
- Check the required consents and click the Grant access button,
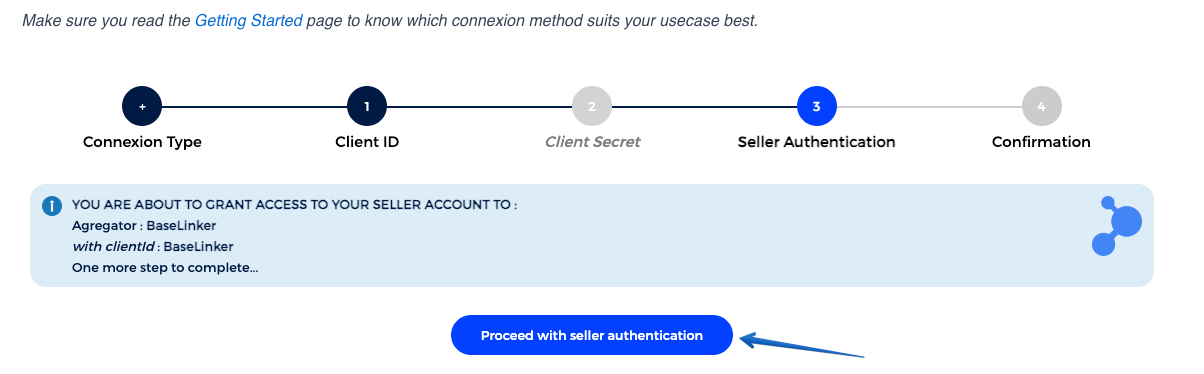
- Log into your cDiscount account to complete the authorization of adding a new API application,
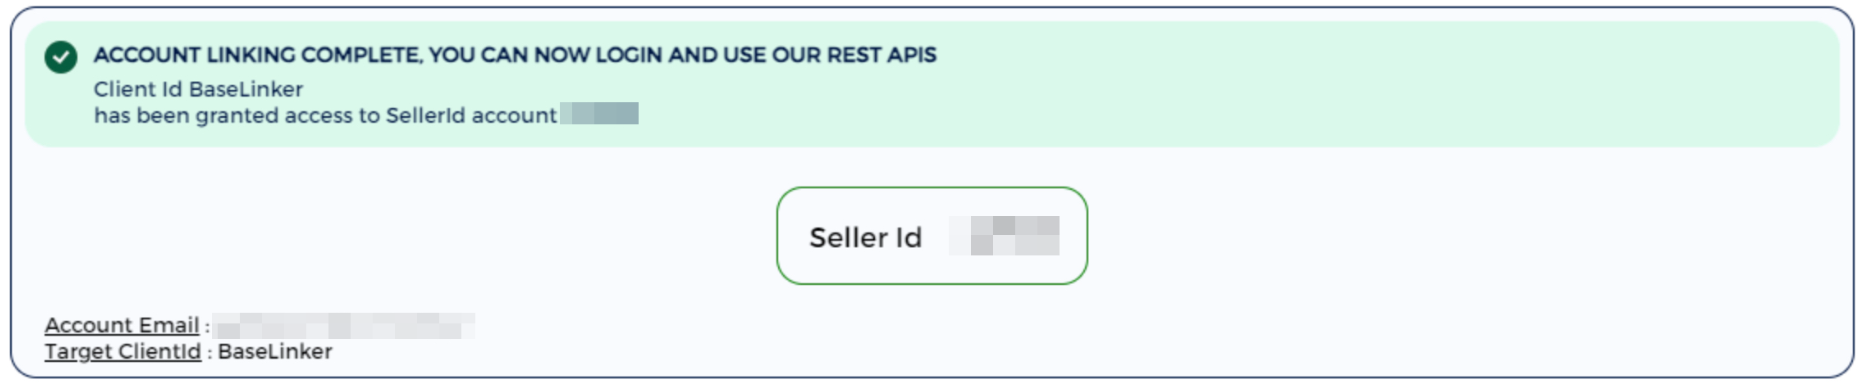
- After creating a new REST API application, a message will be displayed. You can copy your Seller ID.
Module configuration
When you add a new account, you will see 9 tabs:
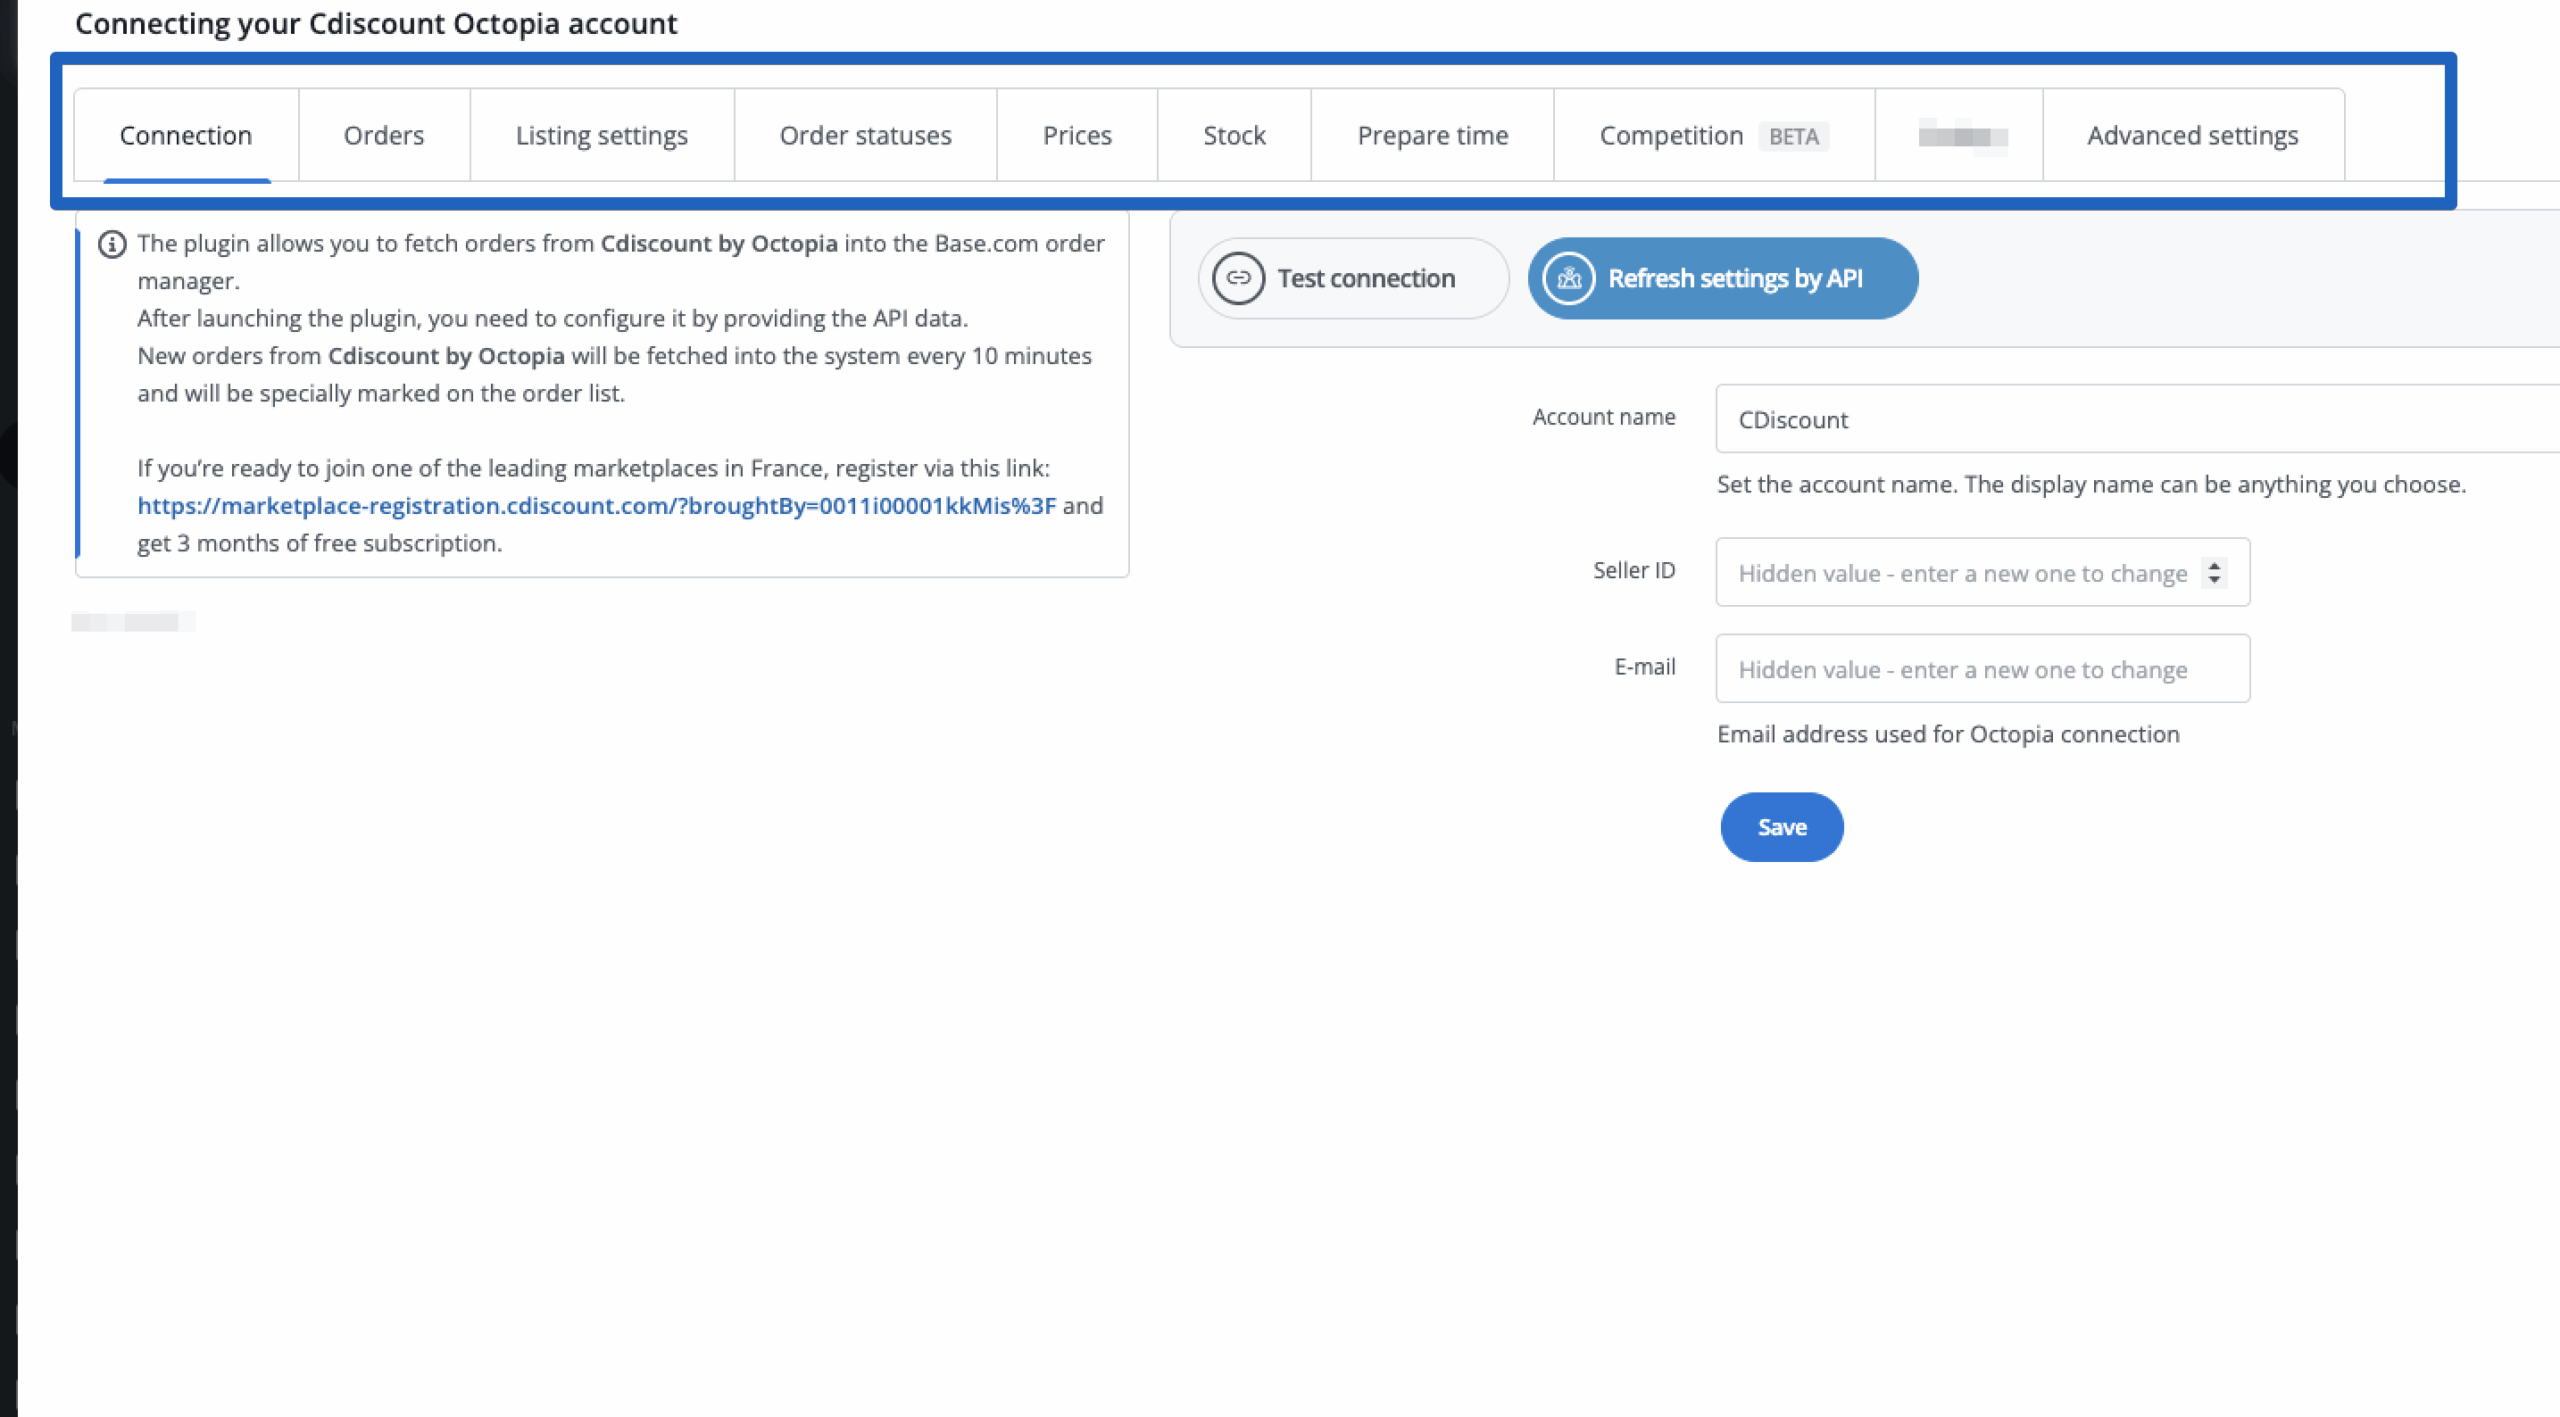
- Connection – here you can test if the connection is correct;
- Orders – here you can activate the download of orders. However, we recommend that you first configure Order Manager;
- Listing settings – here you can choose a template and category for the account, set the price multiplier and complete the general offer settings;
- Order statuses – by linking statuses, any change in the order status in Base.com will also change the order status in the service. However, synchronization does not work in the opposite direction (changing the status in the service does not change the status in Base.com. The statuses available on the Cdiscount side are: Cancelled;
- Prices – the price synchronization module will allow you to automatically synchronize prices in offers according to the prices of products in a storage;
- Stock – the stock synchronization module will allow you to automatically synchronize offer stock according to warehouse;
- Prepare time – the ability to update the shipping time field based on a field in the warehouse.
- Competition – in this tab, you can enable and configure the functionality of checking competitors’ prices and repricing;
- Advanced settings – here you can set up courier mapping.
The Cdiscount by Octopia module
On the left side of the Base.com panel you will see the Cdiscount by Octopia module. Here you will find 5 tabs:
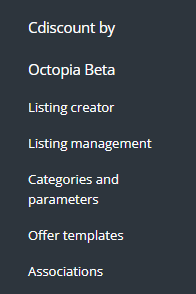
- Listing creator – here you list your offers. To proceed to the listing form, select the warehouse, Cdiscount account and products and click ‘List selected (form)’.
- Listing management – here you can update existing offers. You can also import offers listed outside Base.com (and manage them directly in the panel) and export auctions for further analysis.
- Categories and parameters – in this tab you will select your favourite categories and you will map the parameters.
- Offer templates– here you will create templetes for offers.
- Associations – here you can assign marketplace categories and shipping templates to the category (or products) from the storage.
Configuration
To list offers with literally a few clicks, configure the Cdiscount by Octopia module by following these steps:
- Connect Cdiscount account in Integrations → Add new integration.
- Select your favorite categories in Cdiscount by Octopia → Categories and parameters → Cdiscount by Octopia categories. This way, your favourite categories will be visible from a drop-down list on the listing form.
- Complete the offer settings in Integrations → Cdiscount by Octopia → Listing settings. Please complete here the default form settings (e.g. duration, offer format, multiplier, etc.).
- Map parameters in Cdiscount by Octopia → Categories and parameters → Cdiscount by Octopia parameters. Thanks to the created rules, offer parameters will be completed automatically on the listing form.
- Create category and product links in Cdiscount by Octopia → Associations. Assign marketplace categories and offer templates to categories (or products) from the storage.
- Congratulations, you have just fully set up your account 🙂
To get the most out of the system, follow these steps:
- Configure the price synchronization module in Integrations → Cdiscount by Octopia → Prices.
- Configure stock synchronization module in Integrations → Cdiscount by Octopia → Stock.
- Configure the Order Manager and activate Cdiscount order downloading to Base.com in Integrations → Cdiscount by Octopia → Orders.
Prepare Time Configuration
The new feature allows you to conveniently specify the order processing time (handling time) in the integration with Cdiscount and Octopia-based marketplaces. This setting can be configured in two ways — for an individual offer or automatically for a larger number of products.
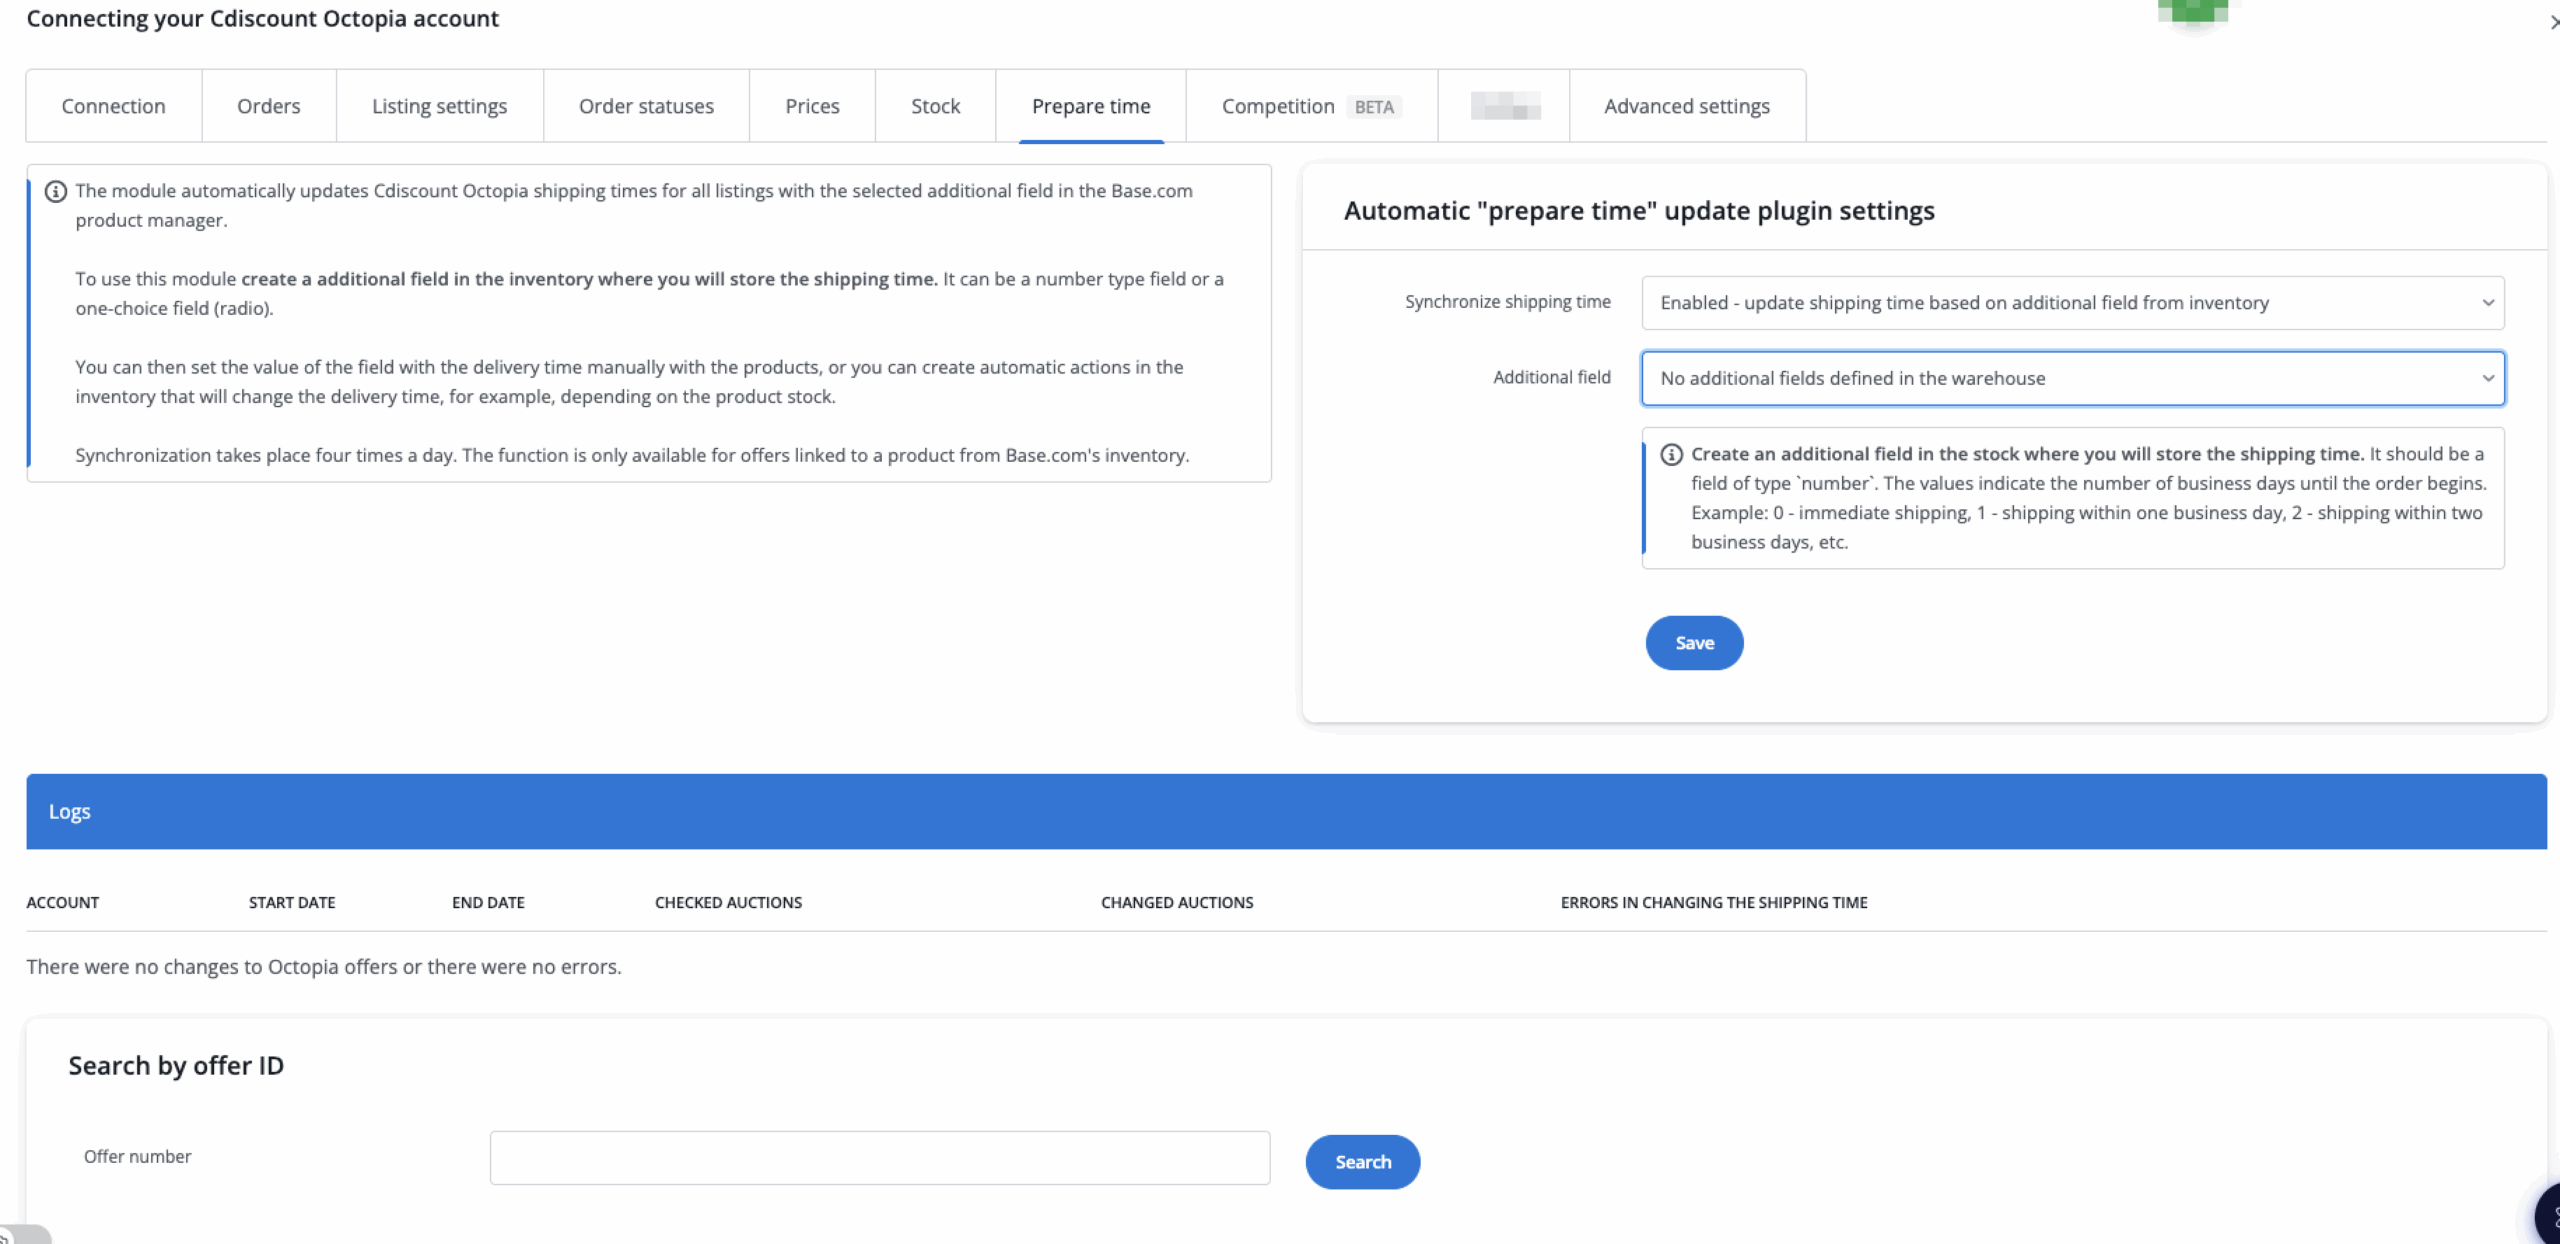
Option 1. Setting up automatic handling time synchronization for offers
-
Go to the Integrations tab.
-
Open your Cdiscount / Octopia integration.
-
Go to the Prepare time section.
-
Enable the shipping time synchronization option.
-
Select the extra field from the warehouse from which the system should retrieve the handling time value.
-
Save the settings. From now on, the system will automatically update the order processing time in offers based on the value saved in the selected product extra field.
Option 2. Setting handling time while listing an offer
-
Go to the offer listing form for Cdiscount / Octopia.
-
Fill in the Package preparation time field.
-
Enter the number of days within which the order will be prepared for shipment.
-
Save or list the offer. This solution works best when you want to set the handling time individually for a specific offer.
Additional benefit
If you use synchronization via an extra field, you can later change the handling time in bulk without editing each offer individually — simply update the value for the product in the warehouse.
Automatic delivery address update in cDiscount by Octopia orders
We have introduced an improvement for sellers using the cDiscount by Octopia integration in the fulfillment model.
Until now, for some orders, the full delivery address was not available immediately when the order was downloaded into Base. This is due to how the marketplace itself operates — address details only appear after the package is shipped by fulfillment. In practice, this meant that incomplete address data could remain in the system, requiring additional verification.
With this update, Base handles such cases much better. If the full address is not yet available during the initial order download, the system does not save a technical message in the address field. Instead, it waits for the marketplace to provide the correct data. Once the order is shipped, Base automatically checks if the delivery address has been filled in and then updates the information in the order.
As a result:
-
More complete data appears in the orders.
-
The risk of working with outdated address data is reduced.
-
The need for manual order checking is limited.
-
It is easier to use up-to-date data in further processes and automations.
This is a minor technical change, but very practical for daily operations — especially where correct data flow and efficient handling of fulfillment orders matter.