The integration of Base.com with the eMAG marketplace allows you to manage sales in Romania, Bulgaria, and Hungary from a single dashboard. Once you’ve connected your account, you can fetch orders, list and import listings, synchronize prices and inventory, and update statuses, tracking numbers, and invoices.
The eMAG integration works via API and also supports product catalog management, variants, returns, automatic listing, and repricing.
Integration with eMag module enables:
- fetching orders from all eMag accounts to the Base.com panel,
- fetching returns,
- forwarding orders to an online store,
- bulk listing on eMag based on products from a warehouse connected to the Base.com system (it can be an online store warehouse, wholesaler warehouse, Base.com warehouse or ERP system),
- offer management,
- stock synchronization,
- price synchronization,
- handling time synhronisation,
- monitoring competitors’ prices and repricing.
How to connect eMAG account
Before you begin the setup, make sure you have an active eMAG seller account, your login credentials, and access to the technical section of the marketplace dashboard. For the integration to work properly, you’ll also need the Base.com partner IP address: 51.77.52.107.
- In the Base.com dashboard, go to Integrations → +Add Integration → Marketplace → eMAG. Then follow these steps:
- In the eMAG dashboard, go to My Account → Profile → Technical Details and add the partner’s IP address: 51.77.52.107.
- In the connection form on Base.com, enter an Account Name. This is an internal name that will help you identify the integration.
- Enter the Login and Password used to log in to the appropriate eMAG dashboard.In the Region field, select a market: Romania, Bulgaria, or Hungary.
- Select the Country of company registration. If you’re using the Polish Flow process, select Poland for a Polish seller.
- Set the appropriate Fulfillment Account mode: regular sales or eMAG fulfillment.
- In the API Code field, enter the code retrieved from the technical section of your eMAG account.
- Click Save, then use the Test Connection button.
If the connection is working properly, you can also use the Refresh Settings from API button in the Connection tab. This will retrieve the latest data from eMAG, including the current VAT rates.
The API key is particularly important when opening eMAG order details from within Base.com. If the link only leads to the order list, check to see if the API key has been entered in the Integrations → eMAG → Connection tab.
eMAG Markets and Fulfillment
A single integration account fetches orders from only one market. If you sell simultaneously on eMAG.ro, eMAG.bg, and eMAG.hu, add a separate integration for each region.
For a single integration, you can fetch either standard orders or fulfillment orders. If you handle both types of orders under one account, set up a separate integration for the same marketplace by selecting a different value for the Fulfillment Account setting.
For eMAG fulfillment, the scope of synchronization is limited. Fulfillment offers may be skipped when updating status and processing time. For fulfillment orders, invoice transmission may be rejected by the marketplace.
Integration settings
When you add a new account you will see 11 tabs:
- Connection – here you can test if the connection is correct.
- Orders – here you can enable order retrieval. However, we recommend that you configure the Order Manager properly beforehand.
- Returns – here you will enable the download of returns from eMAG to Base.com.
- Listing settings – here you can select the template and category for the entire marketplace account, set the price multiplier and complete the general listing settings.
- Order statuses – a status change in the Base.com panel can trigger a status change on the eMAG platform – according to the mapping you set. The statuses available on the eMAG side are: Cancelled, New, Accepted, Prepared, Finalized, Returned.
- Returns statuses – a status change in the Base.com panel can trigger a status change on the eMAG platform – according to the mapping set. The statuses available on the eMAG side are: New, Acknowledged, Refused, Cancelled, Received, Finalized
- Prices – the price synchronization module will allow you to automatically synchronize prices on auctions according to the prices of products in the warehouse.
- Stock – the stock synchronization module will allow you to automatically synchronize the stock on auctions according to the stock of products in the warehouse.
- Prepare time – here you can configure the setting of shipping time in offers on eMAG based on the selected field in the warehouse.
- Competition – in this tab you will enable and configure the functionality of competitor price checking and repricing.
- Advanced settings – here you can set courier mapping.
The eMAG module
On the left side of the Base.com panel you will see the eMAG module. Here you will find 6 tabs:
- Listing – here you list your offers. To proceed to the listing form, select the warehouse, eMAG account and products and click List selected (form);
- Offer management – here you can update existing offers. You can also import offers listed outside Base.com (and manage them directly in the panel) and export auctions for further analysis;
- Categories and parameters – in this tab you will select your favourite categories and you will map the parameters;
- Offers templates;
- Associations – here you can assign marketplace categories and shipping templates to the category (or products) from the warehouse.
Configuration
To list offers with literally a few clicks, configure the eMAG module by following these steps:
- Connect account in Integrations → +Add integration.
- Select your favorite categories in eMAG → Categories and parameters → eMAG categories. This way your favorite categories will be visible from a drop-down list on listing form.
- Complete the offer settings in Integrations → eMAG → Offer settings. Please complete here the default form settings (e.g. duration, offer format, multiplier, etc.).
- Map parameters in eMAG → Categories and parameters → eMAG parameters. Thanks to the created rules, offer parameters will be completed automatically on the listing form.
- Create category and product links in eMAG → Associations.
- Congratulations, you have just fully set up your account.
To get the most out of the system, follow these steps:
- Configure the price synchronization module in Integrations → eMAG → Prices.
- Configure stock synchronization module in Integrations → eMAG → Stock.
- Configure the Order Manager and activate order downloading to Base.com in Integrations → eMAG → Orders.
Base.com sends the net price along with the VAT rate to eMAG, and eMAG calculates the gross price based on that information. VAT rates depend on the market and the seller’s account. After VAT rates change on the eMAG side, use the Refresh settings from API option in Base.com, and then re-import or update your listings.
Importing and Linking Existing Listings
If listings were previously created directly in eMAG, import them in eMAG → Listing Management → Import Listings. Importing listings is necessary so that Base.com can identify the listings and synchronize data from the storage.
- Start the eMAG listing import.
- Select the option to update previously imported offers.
- If possible, enable automatic linking by EAN or SKU and specify the correct storage.
- After the import is complete, verify that each offer is linked to the correct product.
- Fill in any missing links via Offer Management → Operations → Associate with products from the inventory.
Without linking an offer to a product, Base.com will have no source for price or inventory. The product data saved in an order also depends on the link that exists at the time the order is retrieved. Detailed rules are described in the article on linking offers to products.
Listing Offers, Productization, and Variants
In the Integrations → eMAG → Listing Settings tab, you can configure, among other things, the default category, offer template, source warehouse, price group, price multiplier, weight unit, and gallery settings.
When listing, you can choose one of the productization modes. A listing can be list without productization, matched to a product by the marketplace, or linked to an existing product using an EAN or PNK. The PNK is a unique product code on the eMAG side.
For variants, you can choose not to list them, list each variant as a separate listing, or create variant groups. eMAG supports a maximum of two variant parameters, and changing the variant structure of an existing listing may require relisting the entire listing.
You can list offers on eMAG manually using the standard listing form or use the automatic listing feature for new products.
Exporting Products from the Warehouse for eMAG
In collaboration with eMAG, we’ve created an export template that allows you to prepare products from the Base.com catalog in CSV format, which can be sent directly to your eMAG account manager for translation and listing.
You can find the product export file for eMAG under Products → Import/Export → Export.
Generate the file and send it to your eMAG account manager’s email address, and you’ll receive free assistance with translating product listings and onboarding products to this sales platform.
GPSR
In accordance with the requirements of the GPSR regulation, you can add the required data to your listings via Base.com.
When creating listings, the appropriate fields (parameters) for entering this data are available. You can also map them in advance.
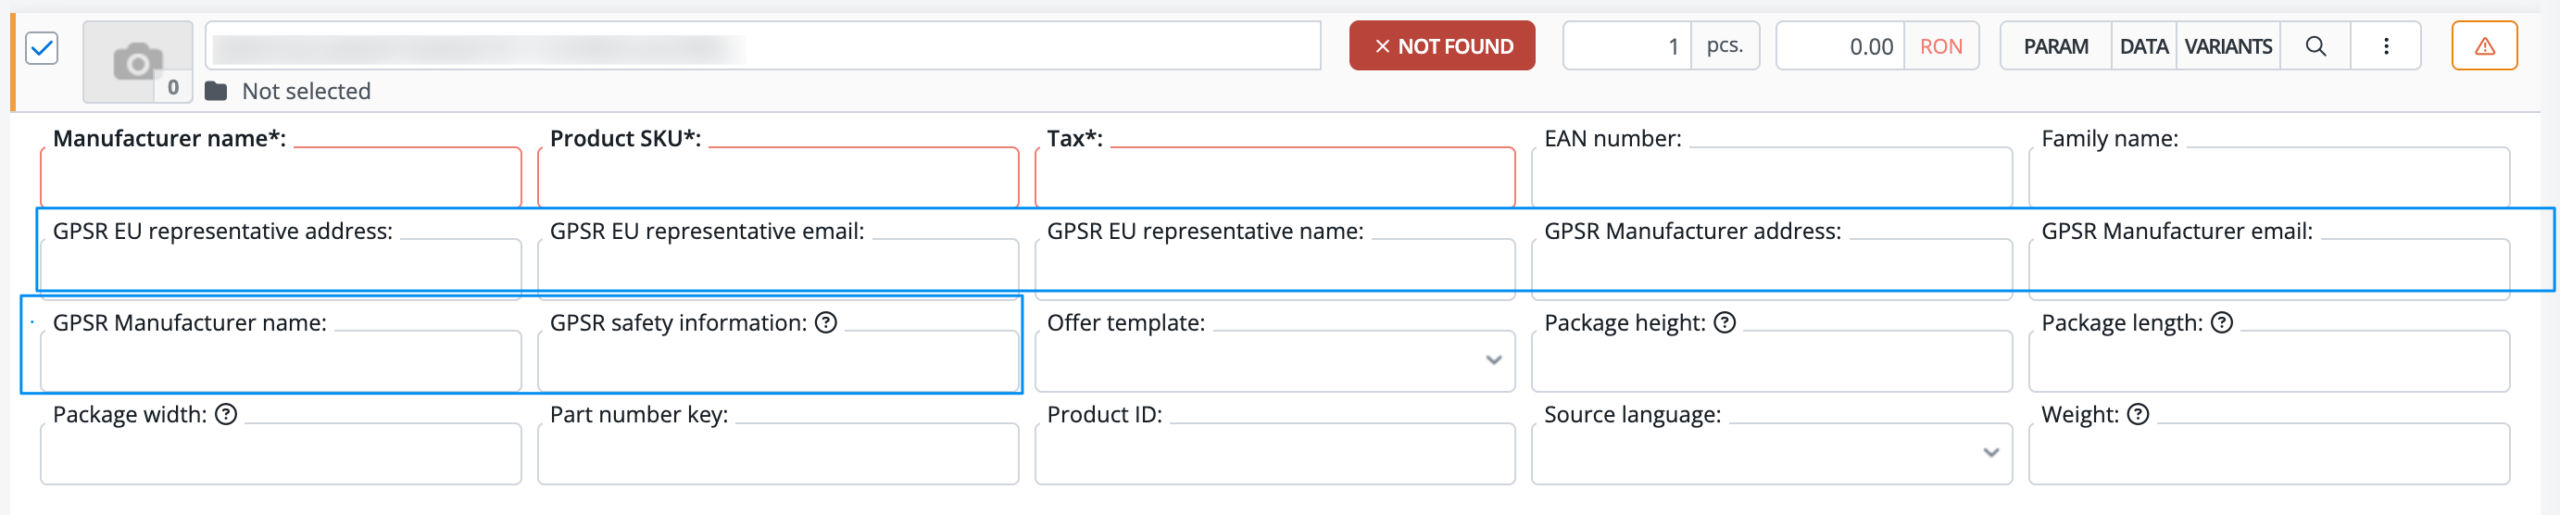
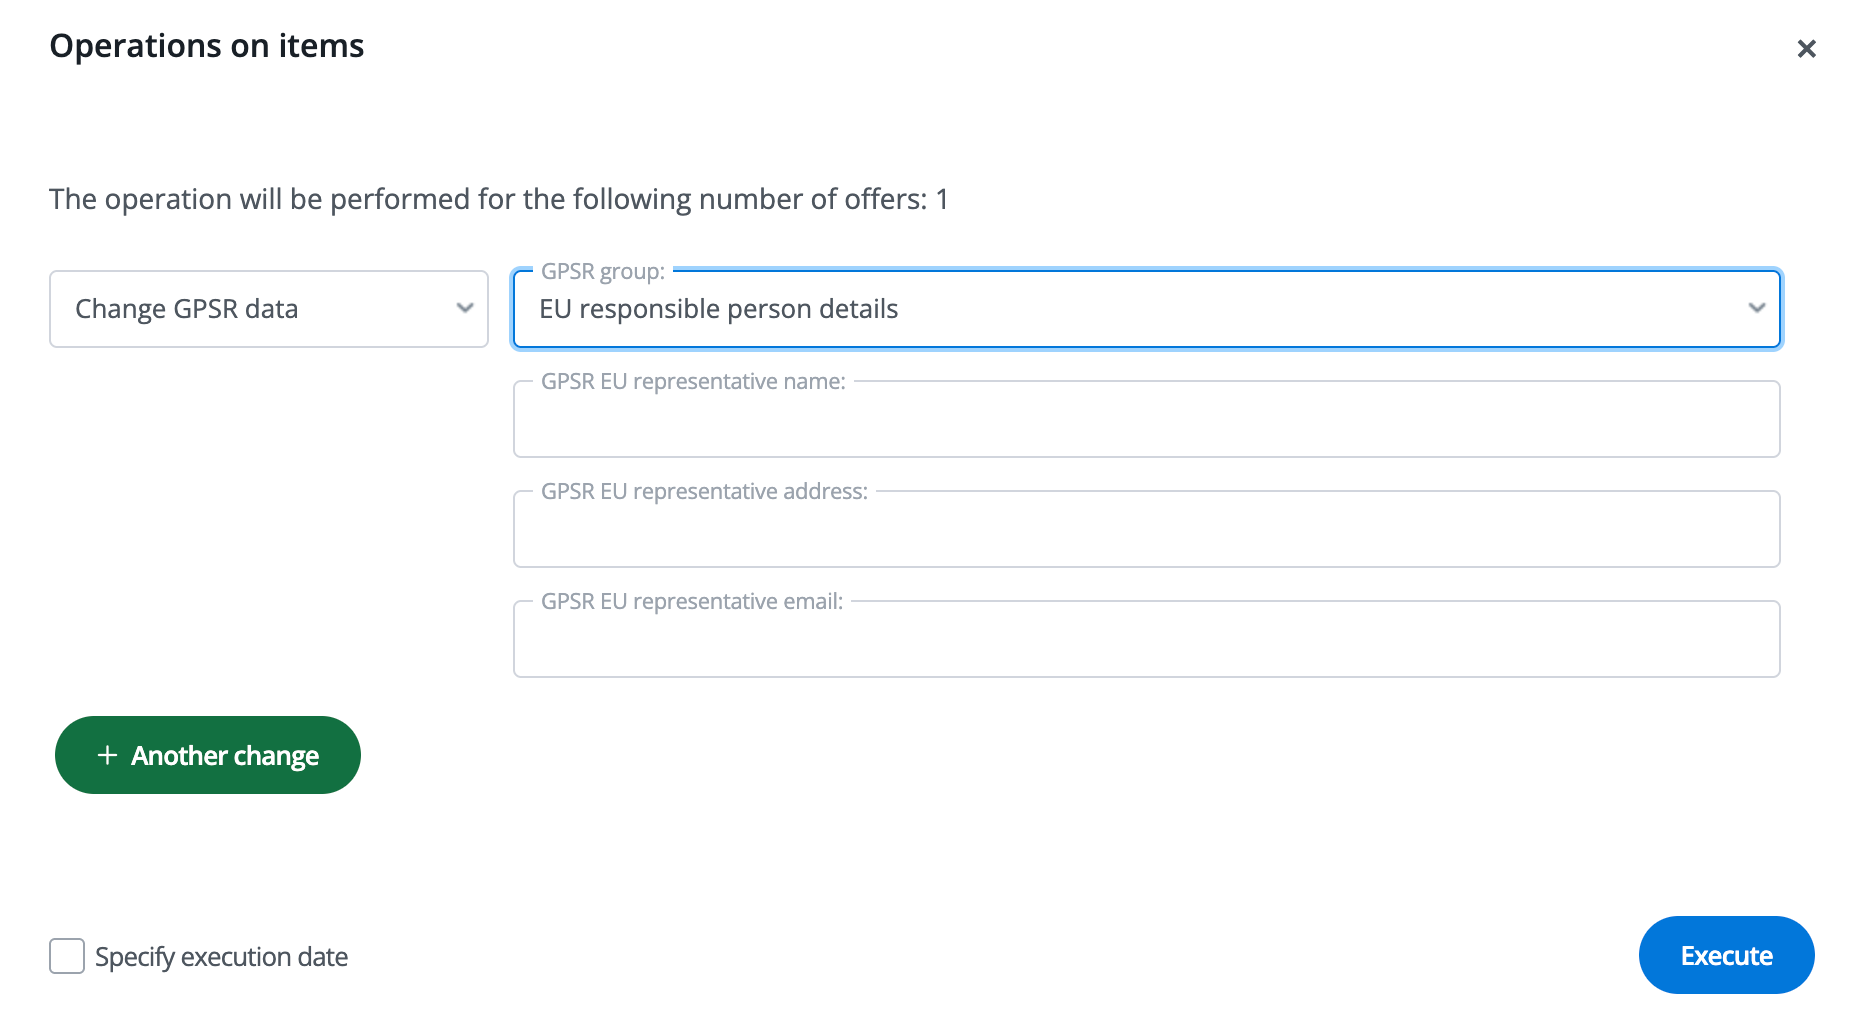
It is also possible to update these parameters in listings that have already been listed. To do this, go to the eMAG module → Listing Management, select the listings you want to change, and click Operations → Edit offers (setup wizard). Select the Change GSPR data option, specify the data you want to update, enter the appropriate values for them, and click the blue Execute button.
Shipping Numbers and Courier Mapping
To send shipping numbers to eMAG, go to the Integrations → eMAG → Orders tab and set the Send tracking numbers option. You can choose to send the numbers immediately after a shipment is created or after the order reaches a specified status. If you choose to send shipments from a specific status, they are sent approximately every 3 hours. During this period, the order must remain in that status for the transfer to occur correctly.
Next, configure Courier Mapping under Integrations → eMAG → Advanced Settings. Specify the courier used in Base.com and its corresponding courier in eMAG. The Check mappings feature is also available, which analyzes orders from the last 14 days.
Shipments should be created before the order status is changed to “shipped.” If you’re using an external courier, also check to make sure it has been activated in eMAG under the “Add external AWB’s” section. If you generate eMAG labels, you can use the separate eMAG AWB integration. To submit a shipment number for a carrier other than eMAG AWB, enable the Forward tracking numbers as External AWB option.
When submitting shipment numbers, also pay attention to the order status in eMAG. In some cases, the marketplace does not allow you to create an AWB for an order with the “New” status. The order must first be accepted by updating its status accordingly.
Invoice forwarding
You can configure invoice transfer under Integrations → eMAG → Orders → Invoice – forwarding. You can forward an invoice immediately after it is created or after the order is moved to a selected status. If invoices are forwarded from a selected status, they are transferred approximately every 3 hours. During this period, the order must remain in the specified status for the transfer to occur correctly.
Returns and Return Statuses
You can enable return fetching under Integrations → eMAG → Returns. When you first set this up, select the fetching range, and then enable status mapping in the Return Statuses tab.
Changes to return statuses are transferred from Base.com to eMAG; however, a status set directly in the marketplace will not automatically change the status in Base.com. Some statuses require a specific sequence to be followed; for example, a return must first be marked as “Received” before it can be marked as “Rejected.”
After the buyer requests a return and eMAG assigns a tracking number, that number will be automatically imported into the system.
Applying Discounts
Buyers on the eMAG platform can use vouchers to reduce the cost of their orders. Redeemed vouchers are visible in the eMAG dashboard, and in Base.com, you can decide how the discount will be displayed on the order card.
Choosing the appropriate mode affects, among other things, the amount due, the discount amount, VAT rates, and the transfer of orders to the accounting system or store.
Where do you enable the retrieval of discounts from eMAG?
First, make sure your eMAG integration is configured correctly. Then go to the order settings:
- Go to Integrations → eMAG → Orders.
- Locate the Fetch discount field.
- Select how the discount should be displayed in the order.
- If you want to apply only a specific type of discount, also configure the “Fetch discounts offered by” field.
- Click Save.
How do I limit the application of discounts to those offered by the seller or eMAG?
If an order may include discounts funded by different parties, use the “Apply discounts offered by” field. This setting only works if a mode other than “Do not apply” is selected in the “Apply discount” field.
- All – discounts funded by both the seller and the eMAG marketplace are applied.
- Seller – only discounts funded by the seller are applied, such as discounts from campaigns paid for by the seller.
- Marketplace – only discounts funded by eMAG are applied.